-
LaTeX入门学习9(tikz基础-01)
Tikz基础
tikz是 L a T e X LaTeX LaTeX的绘图包,其包含非常丰富的绘图操作,通过其可以绘制出非常精美的图像。正因如此,tikz包相当复杂,绘图参数也是非常之多。texdoc tikz 可以查看其官方文档,文档由1200多页,应该算是 L a T e X LaTeX LaTeX最复杂的包了。网上关于其资料也是多又杂,多数都是堆官方文档的直接截断拷贝。接下来tikz会作为本教程的重点更新,更新依旧是抄官方文档,不同之处是我会由简单到复杂一点点进入tikz的世界。
绘制 tikz 图像
tikz图像通常是
\begin{tikzpicture} .... ;% 代码后需要右结尾分号 \end{tikzpicture}- 1
- 2
- 3
- 4
- 5
你可以向插入普通图片一样直接插入这段代码:
\begin{figure}[!htbp] \centering \begin{tikzpicture} .... \end{tikzpicture} \end{figure}- 1
- 2
- 3
- 4
- 5
- 6
例如:
\begin{tikzpicture} \node {root} child {node {左节点}} child {node {右节点} child {node {左子}} child {node {右子}} }; \end{tikzpicture}- 1
- 2
- 3
- 4
- 5
- 6
- 7
- 8
- 9
渲染结果如下(语法我们之后解释):

当然你也可以将图像写入文件,然后引入文件这样就像插入一张图片一样插入文件。例如tikz_demo.tex内容如下:\begin{tikzpicture}[parent anchor=east,child anchor=west,grow=east,sibling distance=15mm,level distance=15mm,every node/.style={ball color=cyan,circle,text=black},edge from parent/.style={draw,dashed,thick,red}] \node {root} child {node {左节点}} child {node{右节点} child {node {左子}} child {node {右子}} }; \end{tikzpicture}- 1
- 2
- 3
- 4
- 5
- 6
- 7
- 8
- 9
在主文件中加上:
\input{tikz_demo}- 1
渲染结果如下:

对于简单图像,你可能不想加上\begin{tikzpicture}\end{tikzpicture}这样的一段,tikz提供了针对简单绘图的\tikz指令,例如:\tikz \draw[line width=2pt,color=red](1,0) -- (0,0) -- (0,1) -- cycle;此命令绘制一个红色封闭三角形:

基础绘图指令
\tikz \draw (1,1) node {text} -- (2,2):这条指令创建了一个node,这个node的文字为text。位置在(1,1),然后我们连线(1,1)--(2,2)。渲染如下:

当然你可以设置draw的参数,常见的绘图参数包括:
\begin{itemize} \item line width:线的宽度,\tikz\draw[line width=2pt] (0,0) -- (2,0);(2pt宽的线) \begin{itemize} \item ultra thin:\tikz\draw[ultra thin] (0,0) -- (2,0); (0.1pt)。 \item very thin:\tikz\draw[very thin] (0,0) -- (2,0); (0.2pt)。 \item thin:\tikz\draw[thin] (0,0) -- (2,0); (0.4pt)。 \item semithick:\tikz\draw[semithick] (0,0) -- (2,0);(0.6pt) 。 \item thick:\tikz\draw[thick] (0,0) -- (2,0);(0.8pt) 。 \item very thick:\tikz\draw[very thick] (0,0) -- (2,0);(1.2pt) 。 \item ultra thick:\tikz\draw[ultra thick] (0,0) -- (2,0);(1.6pt) 。 \end{itemize} \item color:线的颜色 \item line cap:线的包围方式 \begin{itemize} \item round:环形包围 \tikz\draw[line cap=round,line width=10pt] (0,0) -- +(2,0); \item butt:不包含边缘围 \tikz\draw[line cap=but,line width=10pt] (0,0) -- +(2,0); \item rect:矩形包围围 \tikz\draw[line cap=rect,line width=10pt] (0,0) -- +(2,0);(和butt不同在于起始和结束的包边被削掉了) \end{itemize} \item line join:线的链接方式。 \begin{itemize} \item round:\tikz \draw[line join=round,line width=4] (0,0) -- ++(.5,1) -- ++(.5,-1); \item bevel:\tikz \draw[line join=bevel,line width=4] (0,0) -- ++(.5,1) -- ++(.5,-1); \item miter:\tikz \draw[line join=miter,line width=4] (0,0) -- ++(.5,1) -- ++(.5,-1); \end{itemize} \item miter limit:设置连接处更尖锐,默认为10。 \begin{itemize} \item 默认效果:\tikz \draw[line width=5pt] (0,0) -- ++(5,.5) -- ++(-5,.5); \item 设置为25后效果:\tikz \draw[miter limit=25,line width=5pt] (6,0) -- ++(5,.5) -- ++(-5,.5); \end{itemize} \end{itemize}- 1
- 2
- 3
- 4
- 5
- 6
- 7
- 8
- 9
- 10
- 11
- 12
- 13
- 14
- 15
- 16
- 17
- 18
- 19
基础绘图相关参数
-
line width:线的宽度 -

-
color:线的颜色 -
line cap:线的包围方式round:环形包围butt:不包含边缘rect:矩形包围

-
line join:线的连接方式
-
round
-
bevel
-
miter

-
mitter limit:设置连接处

设置线型
\begin{itemize} \item data pattern:dash pattern = on 2pt off 3pt on 4pt off 4pt 表示画2pt后空3pt然后画4pt后空4pt。效果 \tikz \draw[dash pattern= on 2pt off 3pt on 4pt off 4pt] (0pt,0pt) -- (3.5cm,0.4pt); \item dash phase:设置线起点偏移多少后开始绘制\tikz \draw[dash pattern= on 2pt off 3pt on 4pt off 4pt,dash phase=4pt] (0pt,0pt) -- (3.5cm,0.4pt); \item dash expand off:需要包 decorations 。而且dash pattern只能右一个on和off。 \item solid:线型为实线。\tikz \draw[solid] (0pt,0pt) -- (50pt,0pt); \item dotted:线型为虚线(点)。\tikz \draw[dotted](0pt,0pt) -- (50pt,0pt); \item densely dotted:稠密的点。\tikz \draw[densely dotted](0pt,0pt) -- (50pt,0pt); \item loosely dotted:间距稍微大一点的点。\tikz \draw[loosely dotted](0pt,0pt) -- (50pt,0pt); \item dashed:虚线。\tikz \draw[dashed](0pt,0pt) -- (50pt,0pt); \item densely dashed:稠密虚线。\tikz \draw[densely dashed](0pt,0pt) -- (50pt,0pt); \item loosely dashed:间距稍微大一点虚线。\tikz \draw[loosely dashed](0pt,0pt) -- (50pt,0pt); \item dash dot:点线组成的虚线。\tikz \draw[dash dot](0pt,0pt) -- (50pt,0pt); \item densely dash dot:稠密的点线。\tikz \draw[densely dash dot](0pt,0pt) -- (50pt,0pt); \item loosely dash dot:间距稍微大一点的点线。\tikz \draw[loosely dash dot](0pt,0pt) -- (50pt,0pt); \item densely dash dot dot:虚线结合两个点。\tikz \draw[densely dash dot dot](0pt,0pt) -- (50pt,0pt); \item loosely dash dot dot:间距稍微大一点的点线。\tikz \draw[loosely dash dot dot](0pt,0pt) -- (50pt,0pt); \end{itemize}- 1
- 2
- 3
- 4
- 5
- 6
- 7
- 8
- 9
- 10
- 11
- 12
- 13
- 14
- 15
- 16
- 17
- 18

设置两条线风格
- double:绘制两条线
\tikz \draw[double] plot[smooth cycle] coordinates{(0,0) (1,1) (1,0) (0,1)} - double distance:绘制两条线之间的距离
\tikz \draw[draw=black,double=red,very thick](0,1) -- (1,0 - double distance bewteen line centers:两条线之间中心的距离
\tikz \foreach \lw in {0.5,1,1.4,2,2.5} \draw[double distance between line centers=3pt,line width=\lw pt,double] (\lw,0) -- ++(4mm,0)
渲染效果,双线绘制还有其他选项,不过个人觉得用的不多,不再解释,详情查看官方文档:

设置填充路径
设置图片
\begin{tikzpicture} \fill (0,0) -- (1,1) -- (2,1); % 填充三点组成的三角形区域 \fill (4,0) circle (.5cm) (4.5,0) circle (.5cm); \fill[even odd rule] (6,0) circle (.5cm) (6.5,0) circle (.5cm); \fill (9,0) -- (9,1) -- (10,0) circle (.5cm); \end{tikzpicture}- 1
- 2
- 3
- 4
- 5
- 6
渲染效果:

\filldraw和上述上述作用类似,不同在于填充和线型不同。线型比较粗的时候看着效果会有点差别:\begin{tikzpicture}[fill=yellow!80!black,line width=5pt] \filldraw (0,0) -- (1,1) -- (2,1); \filldraw (4,0) circle (.5cm) (4.5,0) circle (.5cm); \filldraw[even odd rule] (6,0) circle (.5cm) (6.5,0) circle (.5cm); \filldraw (9,0) -- (9,1) -- (10,0) circle (.5cm); \end{tikzpicture}- 1
- 2
- 3
- 4
- 5
- 6
- 7
- 8

设置填充模式(需要使用patterns库)
我们可以绘制图形后在其中填充需要的符号
\begin{tikzpicture} \draw[pattern=dots] (0,0) circle (1cm); % 绘制半径为1cm,圆心在(0,0)的圆,然后其中填充点。 \draw[pattern=fivepointed stars] (0,0) rectangle (3,1);%绘制起点为(0,0),宽高分别是[3,1]的矩形,填充五角星。 \end{tikzpicture}- 1
- 2
- 3
- 4
- 5
渲染如下:

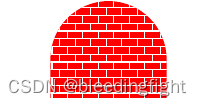
填充指定形状的图形:\begin{tikzpicture} \def\mypath{(0,0) -- +(0,1) arc (180:0:1.5cm) -- +(0,-1)} % 绘制(0,0),(0,1),arc,(1.5cm,0),填充红色 \fill [red] \mypath; \pattern[pattern color=white,pattern=bricks] \mypath; % 堆上述区域填充砖块。 \end{tikzpicture- 1
- 2
- 3
- 4
- 5
渲染:
图像填充方式:
\begin{tikzpicture} \filldraw[fill=yellow!80!black] % 顺时针绘制外部矩形(0,0) -- (0,1) -- (1,1) -- (1,0) -- cycle % 逆时针绘制外部矩形(0.25,0.25) -- (0.75,0.25) -- (0.75,0.75) -- (0.25,0.75) -- cycle; \draw[->] (0,1) -- (.4,1);% 箭头标记顺时针方向\draw[->] (0.75,0.75) -- (0.3,.75);% 箭头标记逆时针方向\draw[->] (0.5,0.5) -- +(0,1) node[above] {crossings: $-1+1 = 0$};%顺时针填充和逆时针填充抵消,内部为白色。\begin{scope}[yshift=-3cm] % 沿着上图y方向上向下移动3cm \filldraw[fill=yellow!80!black]% 设置新的图形的填充格式% Clockwise rectangle (0,0) -- (0,1) -- (1,1) -- (1,0) -- cycle%顺时针填充% Clockwise rectangle (0.25,0.25) -- (0.25,0.75) -- (0.75,0.75) -- (0.75,0.25) -- cycle;%顺时针填充\draw[->] (0,1) -- (.4,1); \draw[->] (0.25,0.75) -- (0.4,.75); \draw[->] (0.5,0.5) -- +(0,1) node[above] {crossings: $1+1 = 2$}; \end{scope} \end{tikzpicture}- 1
- 2
- 3
- 4
- 5
- 6
- 7
- 8
- 9
- 10
- 11
- 12
- 13
渲染效果:

设置重叠区域奇偶抵消\begin{tikzpicture} \filldraw[fill=yellow!80!black] % 顺时针绘制外部矩形(0,0) -- (0,1) -- (1,1) -- (1,0) -- cycle % 逆时针绘制外部矩形(0.25,0.25) -- (0.75,0.25) -- (0.75,0.75) -- (0.25,0.75) -- cycle; \draw[->] (0,1) -- (.4,1);% 箭头标记顺时针方向\draw[->] (0.75,0.75) -- (0.3,.75);% 箭头标记逆时针方向 \draw[->] (0.5,0.5) -- +(0,1) node[above] { $-1+1 = \textcolor{red}{0}$};%顺时针填充和逆时针填充抵消,内部为白色。\begin{scope}[yshift=-3cm] % 沿着上图y方向上向下移动3cm \filldraw[fill=yellow!80!black,even odd rule]% 设置新的图形的填充格式(0,0) -- (0,1) -- (1,1) -- (1,0) -- cycle%顺时针填充% Clockwise rectangle (0.25,0.25) -- (0.25,0.75) -- (0.75,0.75) -- (0.75,0.25) -- cycle;%顺时针填充\draw[->] (0,1) -- (.4,1); \draw[->] (0.25,0.75) -- (0.4,.75); \draw[->] (0.5,0.5) -- +(0,1) node[above] {$1+1 = \textcolor{red}{2}$}; \end{scope}- 1
- 2
- 3
- 4
- 5
- 6
- 7
- 8
- 9
- 10
渲染效果:

-
相关阅读:
比特币有助减少腐败;微软 Copilot 每月赔 20 美元;AIGC 明年会“洗冷水澡”丨 RTE 开发者日报 Vol.64
【毕业季·进击的技术er】机械专业在校生的学习规划
linux系统-----------搭建LNMP 架构
ASP.NET Core - 依赖注入(一)
操作系统学习——进程调度算法
如何利用无线远程通讯模块实现触摸屏与PLC间通信?
将ECharts图表插入到Word文档中
APP推广ZB简介
论文解析[6] Transformer: Attention Is All You Need
RabbitMQ
- 原文地址:https://blog.csdn.net/bleedingfight/article/details/127713688
