-
【Java】Spring boot快速上手(三)前后端分离实现小程序登录(接口篇)
系列文章目录
各位,本系列快速上手学习就到这里了,对于注解还有整个springboot架构还不懂的我推荐去看视频,继续弥补,有的东西你今天不懂,但是明天就懂了或许这是和学习能力有关的,文字内容能表达的意思有限关键还得去看讲解,后面我会全面的出一期springboot实战项目,只是由于时间和精力有限,本次快速上手系列不能再继续展开了
【Java】Spring boot快速上手(一):葵花宝典
【Java】Spring boot快速上手(二):参数传递
视频推荐:
Springboot极简入门教程,5分钟写一个http接口
前言
例如:
一、新建spring项目
创建springboot项目

安装一些依赖文件

等待安装

二、建立设计数据库
由于我的本地没有mysql服务,就用服务器ip作为演示了,大家可以下载个phpstudy配置完成后运行mysql即可
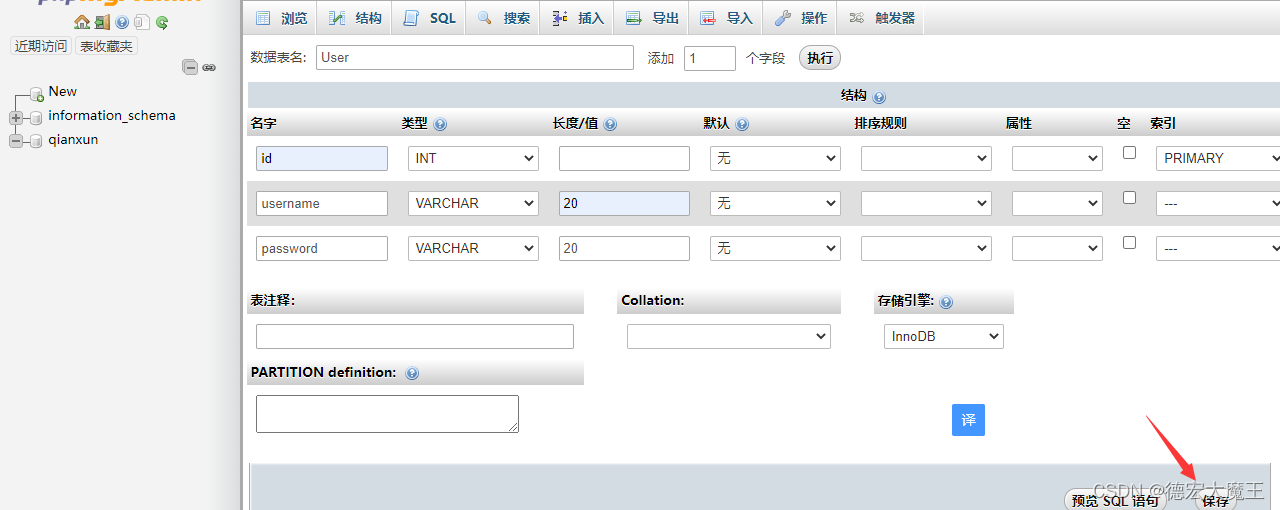
新建User表

创建字段CREATE TABLE `qianxun`.`User` ( `id` INT NOT NULL AUTO_INCREMENT , `username` VARCHAR(20) NOT NULL , `password` VARCHAR(20) NOT NULL , PRIMARY KEY (`id`)) ENGINE = InnoDB;- 1
创建后插入账号密码

三、配置环境及编写接口

spring.application.name=demo spring.datasource.driver-class-name=com.mysql.cj.jdbc.Driver spring.datasource.name=user spring.datasource.url=jdbc:mysql://localhost:3306/qianxun?serverTimezone=UTC spring.datasource.username=qianxun spring.datasource.password=123123 server.port=8080 mybatis.mapper-locations=classpath:mappers/*xml mybatis.type-aliases-package=com.example.demo.mybatis.entity- 1
- 2
- 3
- 4
- 5
- 6
- 7
- 8
- 9
- 10
- 11
- 12
- 13
- 14
- 15
- 16
- 17
- 18
- 19
- 20
配置后运行测试,不报错就说明数据库连接上了

配置mybatis框架(扫描mapper文件)
代码
package com.example.demo; import org.mybatis.spring.annotation.MapperScan; import org.springframework.boot.SpringApplication; import org.springframework.boot.autoconfigure.SpringBootApplication; @MapperScan("com.example.demo.mapper") @SpringBootApplication public class DemoApplication { public static void main(String[] args) { SpringApplication.run(DemoApplication.class, args); } }- 1
- 2
- 3
- 4
- 5
- 6
- 7
- 8
- 9
- 10
- 11
- 12
- 13
- 14
- 15
新建3个package

创建实体类,在entity文件夹下新建User.java完成字段映射,如下所示

上一篇说到构造函数使用 alt+ins 弹出快捷键

完成构造函数的编辑,这里可以用刚刚的lomb函数省略

所以(请注意需要与数据库字段匹配)
User.javapackage com.example.demo.entity; import lombok.Data; @Data public class User { private int id; private String username; private String password; }- 1
- 2
- 3
- 4
- 5
- 6
- 7
- 8
- 9
- 10
- 11
- 12
- 13
- 14
在mapper文件夹下新建UserMapper.java
package com.example.demo.mapper; import org.apache.ibatis.annotations.Select; public interface UserMapper { @Select("select id from User where username = #{username}") String findById(String username); }- 1
- 2
- 3
- 4
- 5
- 6
- 7
- 8
- 9
- 10
- 11
- 12
- 13
- 14
在controller文件夹下新建UserController.java
package com.example.demo.controller; import com.example.demo.entity.User; import com.example.demo.mapper.UserMapper; import org.springframework.web.bind.annotation.*; import javax.annotation.Resource; import java.util.List; @RestController @RequestMapping("/user") public class UserController { @Resource UserMapper userMapper; // 引用spring容器资源 @GetMapping("/{username}") public String findById(@PathVariable("username") String username) { return userMapper.findById(username); } }- 1
- 2
- 3
- 4
- 5
- 6
- 7
- 8
- 9
- 10
- 11
- 12
- 13
- 14
- 15
- 16
- 17
- 18
- 19
- 20
- 21
- 22
- 23
- 24
- 25
- 26
- 27
- 28
- 29
- 30
用户通过访问控制器的api路径,例如
http://localhost:8080/user/123
通过get查询username是否存在,存在返回id值

但是我们登录是需要两个参数账户和密码所以需要更改参数接收
UserController.java部分@RequestMapping(value="/login") public String logins(@RequestParam("username") String username, @RequestParam("password") String password) { System.out.println("username is:" + username); System.out.println("password is:" + password); }- 1
- 2
- 3
- 4
- 5
- 6
- 7
访问
http://localhost:8080/user/login?username=123&password=123
通过接口完成返回
UserController.java部分
@RequestMapping(value="/login") public String logins(@RequestParam("username") String username, @RequestParam("password") String password) { System.out.println("username is:" + username); System.out.println("password is:" + password); String id=userMapper.findById(username,password); System.out.println(id); if (id!=null){ return "{\"code\": 200, \"msg\": \"登陆成功\", \"data\": \"登陆成功\"}"; }else{ return "{\"code\": 202, \"msg\": \"登陆失败\", \"data\": \"登陆失败\"}"; } }- 1
- 2
- 3
- 4
- 5
- 6
- 7
- 8
- 9
- 10
- 11
- 12
- 13
因为data里面需要放查到的数据,所以我们还得改代码,把查到的数据通过之前构造的映射来返回
所以@RequestMapping(value="/login") public String logins(@RequestParam("username") String username, @RequestParam("password") String password) { System.out.println("username is:" + username); System.out.println("password is:" + password); String id=userMapper.findById(username,password); System.out.println(id); if (id!=null){ List<User> result=userMapper.login(username,password); return "{\"code\": 200, \"msg\": \"登陆成功\", \"data\": "+result+"}"; }else{ return "{\"code\": 202, \"msg\": \"登陆失败\", \"data\": \"\"}"; } }- 1
- 2
- 3
- 4
- 5
- 6
- 7
- 8
- 9
- 10
- 11
- 12
- 13
- 14
完整的代码
UserController.java
package com.example.demo.controller; import com.example.demo.entity.User; import com.example.demo.mapper.UserMapper; import org.springframework.web.bind.annotation.*; import javax.annotation.Resource; import java.util.List; @RestController //将下面的返回类型都改为json @RequestMapping("/user") public class UserController { @Resource UserMapper userMapper; // 引用spring容器资源 @RequestMapping(value="/login") public String logins(@RequestParam("username") String username, @RequestParam("password") String password) { System.out.println("username is:" + username); System.out.println("password is:" + password); String id=userMapper.findById(username,password); System.out.println(id); if (id!=null){ List<User> result=userMapper.login(username,password); return "{\"code\": 200, \"msg\": \"登陆成功\", \"data\": \""+result+"\"}"; }else{ return "{\"code\": 202, \"msg\": \"登陆失败\", \"data\": \"\"}"; } } // }- 1
- 2
- 3
- 4
- 5
- 6
- 7
- 8
- 9
- 10
- 11
- 12
- 13
- 14
- 15
- 16
- 17
- 18
- 19
- 20
- 21
- 22
- 23
- 24
- 25
- 26
- 27
- 28
- 29
- 30
- 31
- 32
- 33
- 34
- 35
- 36
- 37
- 38
- 39
- 40
- 41
- 42
- 43
- 44
- 45
- 46
User.java
package com.example.demo.entity; import lombok.Data; @Data public class User { private int id; private String username; private String password; }- 1
- 2
- 3
- 4
- 5
- 6
- 7
- 8
- 9
- 10
- 11
- 12
- 13
UserMapper.java
package com.example.demo.mapper; import com.example.demo.entity.User; import org.apache.ibatis.annotations.Param; import org.apache.ibatis.annotations.Select; import java.util.List; public interface UserMapper { @Select("select id from User where username = #{username} and password = #{password}") String findById(@Param(value = "username")String username,@Param(value = "password")String password); @Select("select * from User where username = #{username} and password = #{password}") List<User> login(@Param(value = "username")String username,@Param(value = "password")String password); }- 1
- 2
- 3
- 4
- 5
- 6
- 7
- 8
- 9
- 10
- 11
- 12
- 13
- 14
- 15
- 16
- 17
- 18
- 19
- 20

四、4个包的说明
mapper- - - - - - -增删查改
controler- - - - - -控制器(提供对外访问api数据)
entity- - - - - - - - 实体类(定义数据类型且与数据库一一对应)五、部分注解说明
@RestController - - - - - 将下方返回类型转换为json @RequestMapping()- - - - - 接口、方法路径,使方法通过接口去访问 @Resource- - - - - - - - - 资源引用- 1
- 2
- 3
六、小程序实现api登录
新建小程序项目,这里不多少,不会的可以看我的文章

login.wxml
<form class="login-form"> <view class="input-group {{userid_focus ? 'active' : ''}}"> <text class="input-label">帐号</text> <input type="number" cursor-spacing="30" id="userid" maxlength="7" placeholder="请输入账号" bindinput="getusername"/> <view> <view class="input-group {{passwd_focus ? 'active' : ''}}"> <text class="input-label">密码</text> <input password="true" cursor-spacing="30" id="passwd" placeholder="输入密码"bindinput="getpw"/> <view> <button type="primary" bindtap="login">登录<button > </form>- 1
- 2
- 3
- 4
- 5
- 6
- 7
- 8
- 9
- 10
- 11
- 12
login.wss
.login-form { flex: 1; display: flex; flex-direction: column; align-items: stretch; justify-content: center; } .input-group { display: flex; align-items: center; padding: 25rpx 10rpx; margin: 40rpx 3%; background: #fff; border-radius: 5px; border: 2px solid #f4f4f4; transition: all .25s ease-in-out; } .input-group.active { border: 2px solid #7acfa6; } .input-label { color: #888; font-size: 13pt; height: 25rpx; line-height: 25rpx; padding: 0 25rpx; border-right: 1px solid #d8d8d8; } .input-group input, .input-group picker { flex: 1; font-size: 13pt; min-height: 52rpx; height: 52rpx; line-height: 52rpx; padding: 0 25rpx; }- 1
- 2
- 3
- 4
- 5
- 6
- 7
- 8
- 9
- 10
- 11
- 12
- 13
- 14
- 15
- 16
- 17
- 18
- 19
- 20
- 21
- 22
- 23
- 24
- 25
- 26
- 27
- 28
- 29
- 30
- 31
- 32
- 33
- 34
- 35
- 36
- 37
- 38
- 39
login.js
// pages/login/login.js Page({ /** * 页面的初始数据 */ data: { username:'', password:'' }, getpw(e){ console.log(e.detail.value) this.setData({ password:e.detail.value }) }, getusername(e){ console.log(e.detail.value) this.setData({ username:e.detail.value }) }, /** * 生命周期函数--监听页面加载 */ onLoad(options) { }, login:function(){ let that=this; console.log("登录"); wx.request({ url: 'http://192.168.1.126:8080/user/login', data:{ username:that.data.username, password:that.data.password, }, header: { 'content-type': 'application/json' // 默认值 }, success (res) { console.log(res.data) if (res.data.code==200) { wx.showToast({ title: '登陆成功', }) } else { wx.showToast({ title: '登陆失败', icon:'none' }) } } }) }, /** * 生命周期函数--监听页面初次渲染完成 */ onReady() { }, /** * 生命周期函数--监听页面显示 */ onShow() { }, /** * 生命周期函数--监听页面隐藏 */ onHide() { }, /** * 生命周期函数--监听页面卸载 */ onUnload() { }, /** * 页面相关事件处理函数--监听用户下拉动作 */ onPullDownRefresh() { }, /** * 页面上拉触底事件的处理函数 */ onReachBottom() { }, /** * 用户点击右上角分享 */ onShareAppMessage() { } })- 1
- 2
- 3
- 4
- 5
- 6
- 7
- 8
- 9
- 10
- 11
- 12
- 13
- 14
- 15
- 16
- 17
- 18
- 19
- 20
- 21
- 22
- 23
- 24
- 25
- 26
- 27
- 28
- 29
- 30
- 31
- 32
- 33
- 34
- 35
- 36
- 37
- 38
- 39
- 40
- 41
- 42
- 43
- 44
- 45
- 46
- 47
- 48
- 49
- 50
- 51
- 52
- 53
- 54
- 55
- 56
- 57
- 58
- 59
- 60
- 61
- 62
- 63
- 64
- 65
- 66
- 67
- 68
- 69
- 70
- 71
- 72
- 73
- 74
- 75
- 76
- 77
- 78
- 79
- 80
- 81
- 82
- 83
- 84
- 85
- 86
- 87
- 88
- 89
- 90
- 91
- 92
- 93
- 94
- 95
- 96
- 97
- 98
- 99
- 100
- 101
- 102
- 103
- 104
- 105
- 106
- 107
- 108
- 109
五、关于传参的七种
1、直接把请求参数写在Controller相应的方法的形参中,此场景适用于请求参数较少的情况
/** * 1. 直接把请求参数写在 Controller 相应的方法的形参中 * @param username * @param password * @return */ @RequestMapping("/addUser1") public String addUser1(String username,String password) { System.out.println("username is:"+username); System.out.println("password is:"+password); return "success"; }- 1
- 2
- 3
- 4
- 5
- 6
- 7
- 8
- 9
- 10
- 11
- 12
- 13
- 14
- 15
此处的RequestMapping中没有限定请求方式,那么get和post的请求方式都是可以接收的。get的请求方式我们可以直接在浏览器中输入地址,
端口可以自行在application.properties中配置,然后使用postman工具进行测试2、封装一个bean直接来接收,我们这里使用上一个案例中封装好的User类来进行接收,同时适用
get、post方法。UserController中的代码如下: @RequestMapping("/addUser2") public String addUser2(User user) { System.out.println("id is:"+user.getId()); System.out.println("username is:"+user.getUsername()); System.out.println("password is:"+user.getPassword()); return "success"; }- 1
- 2
- 3
- 4
- 5
- 6
- 7
- 8
此时我们可以继续使用postman进行测试,注意这里传入的参数名要和User里面的属性名称一致(首字母之外的大小写保持一致,已测),否则无法识别接收,则相应的值会为null
3、通过原生的HttpServletRequest接收,同时适用get、post方法。
@RequestMapping("/addUser3") public String addUser3(HttpServletRequest request) { String username=request.getParameter("username"); String password=request.getParameter("password"); System.out.println("username is:"+username); System.out.println("password is:"+password); return "success"; }- 1
- 2
- 3
- 4
- 5
- 6
- 7
- 8
测试方法同上,这里就不再演示。
4、通过@PathVariable获取rest风格请求路径中的参数
@RequestMapping(value="/addUser4/{username}/{password}") public String addUser4(@PathVariable String username, @PathVariable String password) { System.out.println("username is:"+username); System.out.println("password is:"+password); return "success"; }- 1
- 2
- 3
- 4
- 5
- 6
此时测试访问路径应该是rest风格的路径,如
http://127.0.0.1:8883/addUser4/xiadewang/123456
自动将URL中模板变量{username}和{password}绑定到通过@PathVariable注解的同名参数上
注意这里的参数个数一定要保持相同,否则会报404的错误。5、使用@ModelAttribute注解请求参数,同时适用get,post
@RequestMapping(value="/addUser5") public String addUser5(@ModelAttribute("user") User user) { System.out.println("id is:"+user.getId()); System.out.println("username is:"+user.getUsername()); System.out.println("password is:"+user.getPassword()); return "success"; }- 1
- 2
- 3
- 4
- 5
- 6
- 7
6、使用注解@RequestParam绑定请求参数到方法形参,同时适用get、post方法。
@RequestMapping(value="/addUser6") public String addUser6(@RequestParam("username") String username, @RequestParam("password") String password) { System.out.println("username is:"+username); System.out.println("password is:"+password); return "success"; }- 1
- 2
- 3
- 4
- 5
- 6
- 7
注意:当请求参数username或者password不存在时会有异常发生,可以通过设置属性required=false解决
例如:@RequestParam(value="username", required=false)- 1
7、使用注解@RequestBody绑定请求参数到方法形参,只适用post方法。
@RequestMapping(value="/addUser7") public String addUser7(@RequestBody User user) { System.out.println("id is:"+user.getId()); System.out.println("username is:"+user.getUsername()); System.out.println("password is:"+user.getPassword()); return "success"; }- 1
- 2
- 3
- 4
- 5
- 6
- 7
关于最后这个@RequestBody要重点讲解下,此时前端发送请求不能使用get方式,需要使用post方式,还有请求传递的参数需要是json字符串,这里重点要设置的是Content-Type,要将其设置为application/json。我们此时使用postman测试如下
这里如果不设置content-type的话,会报如下错误小结
RequestBody和RequestParam同时使用的场景,代码如下@RequestMapping(value="/addUser8") public String addUser8(@RequestBody User user,@RequestParam("token") String token) { System.out.println("token is:"+token); System.out.println("id is:"+user.getId()); System.out.println("username is:"+user.getUsername()); System.out.println("password is:"+user.getPassword()); return "success"; }- 1
- 2
- 3
- 4
- 5
- 6
- 7
- 8
总结
以上就是今天要讲的内容,博主也在不断学习springboot,对于文中有些说不清楚的,请参考文章顶部视频,学习是个积累的过程,不可能这篇文章就能全部搞懂,后面一起努力吧!!!
-
相关阅读:
Bentley二次开发教程26-工程属性-ItemType操作实际案例
使用yum进行软件安装的基础命令
高成本获客时代,企业如何通过营销自动化实现突围?
Docker中的常用命令
查找与排序
大数据培训课程之fold(num)(func)案例
【block作为函数的参数 Objective-C语言】
Resin反序列化链分析
卸载和安装pip版本
全流程:安装uni-app(小程序端)
- 原文地址:https://blog.csdn.net/qq_35230125/article/details/127707238
