-
C/C++基础,ROS中boost::bind的使用
Boost::thread构建线程的方法:
(1)thread():构造一个表示当前执行线程的线程对象;
(2)explicit thread(const boost::function0& threadfunc):
boost::function0可以简单看为:一个无返回(返回void),无参数的函数。这里的函数也可以是类重载operator()构成的函数;该构造函数传入的是函数对象而并非是函数指针,这样一个具有一般函数特性的类也能作为参数传入。 方式一:全局函数创建线程
- #include
- #include
- #include
- //Linux make: g++ -o main main8.c -lboost_system -lboost_thread
- using namespace boost;
- void thread1(int x){
- std::cout << "x= " << x << std::endl;
- for (int i = 0; i < 5; i++){
- std::cout << "thread1: " << i << std::endl;
- }
- }
- void thread2(int x){
- std::cout << "x= " << x << std::endl;
- for (int i = 0; i < 5; i++){
- std::cout << "thread2: " << i << std::endl;
- }
- }
- int main(){
- //boost::thread thrd1(&thread1, 2);//线程中传入函数thrd1 地址,并传入参数2
- //boost::thread thrd2(&thread2, 3);
- boost::thread thrd1(boost::bind(&thread1, 1));//使用boost::bind()函数,实现函数绑定
- boost::thread thrd2(boost::bind(&thread2, 2));
- thrd1.join();
- thrd2.join();
- return 0;
- }
如果线程需要绑定的函数有参数则需要使用boost::bind。比如想使用 boost::thread创建一个线程来执行函数:void f(int i),如果这样写:boost::thread thrd(f)是不对的,因为thread构造函数声明接受的是一个没有参数且返回类型为 void 的类别,而且不提供参数 i 的值 f 也无法运行,这时就可以写:boost::thread thrd(boost::bind(f,1))。涉及到有参函数的绑定问题基本上都是boost::thread、boost::function、boost::bind结合起来使用。
方式二:用类内函数创建线程
- #include
- #include
- #include
- //Linux make: g++ -o main main8.c -lboost_system -lboost_thread
- class HelloWorld{
- public:
- void hello(){
- std::cout << "Hello world, I'm a thread!" << std::endl;
- }
- void start(){
- boost::thread thrd(boost::bind(&HelloWorld::hello,this));
- thrd.join();
- }
- };
- int main(int argc, char* argv[]){
- HelloWorld hello;
- hello.start();
- return 0;
- }
方式三:用类内函数创建线程
- #include
- #include
- //Linux make: g++ -o main main8.c -lboost_system -lboost_thread
- class HelloWorld{
- public:
- static void hello(){
- std::cout << "Hello world, I'm a thread!" << std::endl;
- }
- static void start(){
- boost::thread thrd(hello);
- thrd.join();
- }
- };
- int main(int argc, char* argv[]){
- HelloWorld::start();
- return 0;
- }
方式四:类外用类内函数创建线程
- #include
- #include
- #include
- #include
- class HelloWorld{
- public:
- void hello(const std::string& str){
- std::cout << str << std::endl;
- }
- };
- int main(int argc, char* argv[]){
- HelloWorld obj;
- boost::thread thrd(boost::bind(&HelloWorld::hello, &obj, "Hello world, I'm a thread!"));
- thrd.join();
- return 0;
- }
boost::bind的用法:
得益于c++的模板以及操作符重载,去看boost::bind的实现就会发现它是一个有n多重载的函数,这些重载主要是为了适应函数的参数个数。
其实boost::bind的原理是函数对象,而函数对象就是一个重载了()操作符的对象,这样我们就可以像调用一个方法一样来调用一个类上的这个操作符,比如a(),其实你是在调用a这个对象的()方法,而不是调用一个叫a的方法。
一般来说boost::bind有两种方式的调用,一种是对自由方法,也取非类方法, 一种是对类方法。
- 自由方法:boost::bind(函数名, 参数1,参数2,...)
- 类 方 法:boost::bind(&类名::方法名,类实例指针,参数1,参数2)
这里需要额外注意的问题是,函数对象也可以像自由方法一样被bind,而boost::function也是一种函数对象。 接下来我们需要注意什么情况下需要用_1, _2这样的参数。
举个例子:void test(int a, int b, int c)
- boost::bind(test, 1, _1, _2)得到一个函数对象b,当调用b(3,4)时,相当于调用test(1,3,4)
- boost::bind(test, _2, 3, _1)得到一个函数对象b,当调用b(3,4)时,相当于调用test(4,3,3) _1表示占位符,中间的3已经传递进去了,b(3,4),3对应_2,4对应_1,再把占位符的位置按顺序排列就是实际的传递位置
- boost::bind(test, 1, 2, 3),那么在调用b()时就相当于调用test(1, 2, 3)
注意,boost::bind里的参数个数一定要与被bind的函数相同,否则这个函数对象就无法生成了。
Boost::thread线程同步:
一、互斥量
互斥变量mutex的对象类大致如下:
(1).mutex,独占式互斥量,最简单的,而且是最常用的一种互斥变量。
(2).timed_mutex ,独占式互斥量,并提供超时锁定功能。
(3).recursive_mutex: 递归式互斥量,可以多次锁定,相应地也要多次解锁。
(4).recursive_timed_mutex: 它也是递归式互斥量,提供超时锁定功能。
(5).shared_mutex: multiple-reader/single-writer 型的共享互斥量(又称读写锁)。
直接操作 mutex,即直接调用 mutex 的 lock / unlock 函数。
- #include
- #include
- #include
- //Linux make: g++ -o main main8.c -lboost_system -lboost_thread
- using namespace std;
- boost::mutex mutex;
- void thread(){
- for(int i = 0; i < 5; ++i){
- usleep(100000);
- mutex.lock();
- std::cout << "Thread " << boost::this_thread::get_id() << ": " << i << std::endl;
- mutex.unlock();
- }
- }
- int main(){
- boost::thread t1(&thread);
- boost::thread t2(thread);
- t1.join();
- t2.join();
- }
g++编译方法:
g++ -o main main8.c -lboost_system -lboost_thread
二、lock模板类使用
lock模板类也分为独占式的 和共享式的。lock模板类与mutex对象结合使用,在lock构造函数中调用互斥体mutex的lock方法,mutex对象 被锁住,一旦离开作用域,会自动调用lock的析构函数,释放锁。
(1).boost::unique_lock
,其中T可以mutex中的任意一种。(独占式),如: boost::unique_lock
(2).boost::shared_lock
,其中的T只能是shared_mutex类。(共享锁) 使用 lock_guard 自动加锁、解锁。原理是 RAII,和智能指针类似
- #include
- #include
- #include
- #include
- boost::mutex mutex;
- int count = 0;
- void Counter() {
- // lock_guard 在构造函数里加锁,在析构函数里解锁。
- boost::lock_guard
- int i = ++count;
- std::cout << "count == " << i << std::endl;
- }
- int main() {
- boost::thread_group threads;
- for (int i = 0; i < 4; ++i) {
- threads.create_thread(&Counter);
- }
- threads.join_all();
- return 0;
- }
使用 unique_lock 自动加锁、解锁
unique_lock 与 lock_guard 原理相同,但是提供了更多功能(比如可以结合条件变量使用)。 注意:mutex::scoped_lock 其实就是 unique_lock
的 typedef。(引用) - #include
- #include
- #include
- boost::mutex mutex;
- int count = 0;
- void Counter() {
- boost::unique_lock
- int i = ++count;
- std::cout << "count == " << i << std::endl;
- }
- int main() {
- boost::thread_group threads;
- for (int i = 0; i < 4; ++i) {
- threads.create_thread(&Counter);
- }
- threads.join_all();
- return 0;
- }
使用 shared_lock
- #include
- #include
- #include
- #include
- #include
- #include
- #include
- using namespace std;
- boost::shared_mutex mutex_;//共享锁
- boost::mutex g_io_mutex;
- void wait(int seconds){
- boost::this_thread::sleep(boost::posix_time::seconds(seconds));
- }
- class Counter{
- public:
- Counter():value_(0) {}
- size_t Get() const{
- boost::shared_lock
- return value_;
- }
- void Put(){ //同一时间 只能有一个线程来访问
- boost::unique_lock
- value_++;
- }
- private:
- size_t value_;
- };
- void threadFunc(Counter& counter){
- for (int i = 0; i < 3; ++i){
- counter.Put(); //写入数据,锁住mutex
- size_t value = counter.Get(); //多个线程可以同时读取数据
- boost::lock_guard
- std::cout << boost::this_thread::get_id() << ' ' << value << std::endl;
- }
- }
- int main(){
- Counter counter;
- boost::thread_group threads; //boost threads的线程组
- for(int i =0;i< 3;i++){
- threads.create_thread(boost::bind(threadFunc, boost::ref(counter)));//ref传入引用
- }
- threads.join_all();
- return 0;
- }

Boost::thread条件变量:
condition是一个简单的同步对象,用于使一个线程等待一个特定的条件成立(比如资源可用)。一个condition对象总是和一个mutex对象配合使用。mutex在交给condition对象的wait系列函数时,必须已经通过lock对象加上了锁。当线程陷入等待时,condtion对象将释放mutex上的锁,当wait返回时,mutex上的锁会重新加上,这一unlock/lock动作由conditon对象自动完成。
先看一个示例:
- #include
- #include
- #include
- #include
- #include
- int number;
- boost::mutex m;
- boost::condition full;
- boost::condition empty;
- void writer(){
- while(1){
- boost::mutex::scoped_lock sl(m);
- if (number == 5) {
- full.wait(m);
- }
- ++number;
- std::cout << "after w: " << number << std::endl;
- empty.notify_one();
- }
- }
- void reader(){
- while(1){
- boost::mutex::scoped_lock sl(m);
- if (number == 0) {
- std::cout << std::endl;
- empty.wait(m);
- }
- --number;
- std::cout << "after r: " << number <<" ";
- full.notify_one();
- }
- }
- int main(){
- boost::thread trd1(&writer);
- boost::thread trd2(&reader);
- trd1.join();
- trd2.join();
- return 0;
- }
加延时:
- #include
- #include
- #include
- #include
- #include
- #include
- int number;
- boost::mutex m;
- boost::condition full;
- boost::condition empty;
- void writer(){
- while(1){
- usleep(500000); //500ms 这里不加延时,会正确打印0-5-4-1,加了延时之后就变成一直打印1010101010...这样的状态
- boost::mutex::scoped_lock sl(m);
- if (number == 5) {
- full.wait(m);
- }
- ++number;
- std::cout << "after w: " << number << std::endl;
- empty.notify_one(); //说明这里每次加一个数之后,就立即唤醒reader线程,然后再reader中减减,然后reader又进入了休眠,writer这边又加加,然后循环往复,而writer一直就没有休眠,所以就出现了1010101010...这样的打印
- }
- }
- void reader(){
- while(1){
- boost::mutex::scoped_lock sl(m);
- if (number == 0) {
- std::cout << std::endl;
- empty.wait(m);
- }
- --number;
- std::cout << "after r: " << number <<" ";
- full.notify_one();
- }
- }
- int main(){
- boost::thread trd1(&writer);
- boost::thread trd2(&reader);
- trd1.join();
- trd2.join();
- return 0;
- }

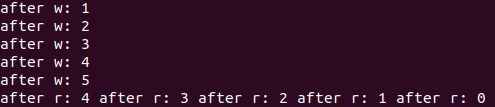
为了解决这个问题,使其正常输出0-5-4-1这样的序列,就在每次只有满足条件之后才进行通知,也就是notify_one()函数放在if判断条件里面:
- #include
- #include
- #include
- #include
- #include
- #include
- int number;
- boost::mutex m;
- boost::condition full;
- boost::condition empty;
- void writer(){
- while(1){
- usleep(500000); //500ms
- boost::mutex::scoped_lock sl(m);
- if (number == 5) {
- empty.notify_one();
- full.wait(m);
- }
- ++number;
- std::cout << "after w: " << number << std::endl;
- }
- }
- void reader(){
- while(1){
- boost::mutex::scoped_lock sl(m);
- if (number == 0) {
- full.notify_one();
- std::cout << std::endl;
- empty.wait(m);
- }
- --number;
- std::cout << "after r: " << number <<" ";
- }
- }
- int main(){
- boost::thread trd1(&writer);
- boost::thread trd2(&reader);
- trd1.join();
- trd2.join();
- return 0;
- }

可以得到正常的输出
如果再加多个writer和reader线程,结果仍然是不会变的。
- #include
- #include
- #include
- #include
- #include
- #include
- int number;
- boost::mutex m;
- boost::condition full;
- boost::condition empty;
- void writer(){
- while(1){
- usleep(500000); //500ms
- boost::mutex::scoped_lock sl(m);
- if (number == 5) {
- empty.notify_one();
- full.wait(m);
- }
- ++number;
- std::cout << "after w: " << number << std::endl;
- }
- }
- void reader(){
- while(1){
- boost::mutex::scoped_lock sl(m);
- if (number == 0) {
- full.notify_one();
- std::cout << std::endl;
- empty.wait(m);
- }
- --number;
- std::cout << "after r: " << number <<" ";
- }
- }
- int main(){
- boost::thread trd1(&writer);
- boost::thread trd2(&reader);
- boost::thread trd3(&writer);
- boost::thread trd4(&writer);
- boost::thread trd5(&reader);
- trd1.join();
- trd2.join();
- trd3.join();
- trd4.join();
- trd5.join();
- return 0;
- }

帮助理解的简单使用:
- #include
- #include
- #include
- #include
- #include
- #include
- //Linux make:g++ -o main main8.c -lboost_system -lboost_thread
- boost::mutex m;
- boost::condition empty;
- bool wakethread = false;
- void writer(){
- std::cout << "2秒后阻塞reader" << std::endl;
- usleep(2000000);
- wakethread = true;
- usleep(200000);//等待reader被阻塞
- std::cout << "2秒后恢复reader" << std::endl;
- usleep(2000000);
- empty.notify_one();
- }
- /*
- 线程阻塞时的特点:
- 该线程放弃CPU的使用权,暂停运行,只有当阻塞的原因消除后才回到就绪状态进行运行
- 被其他的线程中断,该线程也会推出阻塞状态,同时抛出InterruptedException的异常
- */
- void reader(){
- for(int i=0; i<20; i++){
- while(wakethread){
- wakethread = false;
- //std::cout << wakethread << std::endl;
- std::cout << "reader suspended" << std::endl;
- empty.wait(m); //在这里就开始阻塞,下面的都不执行了
- std::cout << "begin reader work" << std::endl; //解除阻塞之后开始从这里执行
- }
- usleep(200000);
- std::cout << "in reader..." << std::endl;
- }
- }
- int main(){
- boost::thread trd1(&writer);
- boost::thread trd2(&reader);
- trd1.join();
- trd2.join();
- return 0;
- }

有关多线程状态机的思考:
1.Switch case中,只有当前case完全退出之后才进行状态的切换
- #include
- #include
- #include
- #include
- #include
- #include
- //Linux make: g++ -o main main8.c -lboost_system -lboost_thread
- int curTask;
- enum{ TASK_NO, TASK_ON, TASK_NEW };
- bool isontask = true;
- void writer(){
- curTask = TASK_NO;
- std::cout << "curTask = TASK_NO, 1.5秒后切换状态" << std::endl;
- usleep(1500000);
- curTask = TASK_NEW;
- std::cout << "curTask = TASK_NEW" << std::endl;
- }
- void reader(){
- for(int i=0; i<7; i++){
- switch(curTask){
- case TASK_NO:
- std::cout << "TASK_NO" << std::endl;
- usleep(1000000);
- std::cout << "TASK_NO sleep 1s end......" << std::endl;
- break;
- case TASK_NEW:
- std::cout << "TASK_NEW" << std::endl;
- break;
- case TASK_ON:
- std::cout << "TASK_ON" << std::endl;
- break;
- }
- usleep(100000);
- }
- }
- int main(){
- boost::thread trd1(&writer);
- boost::thread trd2(&reader);
- trd1.join();
- trd2.join();
- return 0;
- }

从结果可以看出,在1.5s的时候状态机发生了切换,而此时reader线程还处于sleep状态,当sleep结束需要再打印一下 TASK_NO sleep 1s end...... 直到 break 才进行下一次的条件判断,也就是说必须把当前的case走完,当前线程才会真正的切换状态,而非在 writer 中标志位切换的时候,reader线程就立即进入这个状态了,需要当前状态运行完毕,才会发生状态切换。
2.while循环的退出只跟当前判断的条件有关,而跟case的状态切换无关,除非case中耦合了当前状态
- #include
- #include
- #include
- #include
- #include
- #include
- //Linux make: g++ -o main main8.c -lboost_system -lboost_thread
- int curTask;
- enum{ TASK_NO, TASK_ON, TASK_NEW };
- bool isontask = true;
- void writer(){
- curTask = TASK_NO;
- std::cout << "curTask = TASK_NO, 1.5秒后切换状态" << std::endl;
- usleep(1500000);
- curTask = TASK_NEW;
- std::cout << "curTask = TASK_NEW" << std::endl;
- }
- void reader(){
- for(int i=0; i<7; i++){
- switch(curTask){
- case TASK_NO:
- while(isontask){
- std::cout << "TASK_NO in while......" << std::endl;
- usleep(300000);
- }
- break;
- case TASK_NEW:
- std::cout << "TASK_NEW" << std::endl;
- break;
- case TASK_ON:
- std::cout << "TASK_ON" << std::endl;
- break;
- }
- usleep(100000);
- }
- }
- int main(){
- boost::thread trd1(&writer);
- boost::thread trd2(&reader);
- trd1.join();
- trd2.join();
- return 0;
- }

可以看到,即使在writer中1.5s后切换了状态, reader线程依然还是处于TASK_NO这个case,没有退出。而while的判断条件耦合了当前状态,即可安全退出while循环,上面的while判断条件换成下面这样的:
while(isontask && curTask==TASK_NO)输出:

发现可以正常的进行条件的选择和退出了。
哎编码水平有点低,都是坑啊...
-
相关阅读:
获取随机id的api接口
iOS:何为空指针和野指针
生草也叫草生
NXP iMX8M Plus M7核心FreeRTOS开发
C99可变参数宏(Variadic Macros) 打印: __VA_ARGS__ --- print(...)
cefsharp119.1.20(cef119.1.2,Chromium119.0.6045.105)版本升级体验及其他H264版本
Spring框架详解
编辑器实现思路
深入理解 Happens-Before 原则
真实案例丨OOM内存溢出解决方案连载之一,【流式查询】不容错过!
- 原文地址:https://blog.csdn.net/qq_34761779/article/details/127681991
