-
精心整理高频js手写题请查收
深克隆(deepclone)
简单版:
const newObj = JSON.parse(JSON.stringify(oldObj));- 1
- 2
局限性:
-
他无法实现对函数 、RegExp等特殊对象的克隆
-
会抛弃对象的constructor,所有的构造函数会指向Object
-
对象有循环引用,会报错
面试版:
/** * deep clone * @param {[type]} parent object 需要进行克隆的对象 * @return {[type]} 深克隆后的对象 */ const clone = parent => { // 判断类型 const isType = (obj, type) => { if (typeof obj !== "object") return false; const typeString = Object.prototype.toString.call(obj); let flag; switch (type) { case "Array": flag = typeString === "[object Array]"; break; case "Date": flag = typeString === "[object Date]"; break; case "RegExp": flag = typeString === "[object RegExp]"; break; default: flag = false; } return flag; }; // 处理正则 const getRegExp = re => { var flags = ""; if (re.global) flags += "g"; if (re.ignoreCase) flags += "i"; if (re.multiline) flags += "m"; return flags; }; // 维护两个储存循环引用的数组 const parents = []; const children = []; const _clone = parent => { if (parent === null) return null; if (typeof parent !== "object") return parent; let child, proto; if (isType(parent, "Array")) { // 对数组做特殊处理 child = []; } else if (isType(parent, "RegExp")) { // 对正则对象做特殊处理 child = new RegExp(parent.source, getRegExp(parent)); if (parent.lastIndex) child.lastIndex = parent.lastIndex; } else if (isType(parent, "Date")) { // 对Date对象做特殊处理 child = new Date(parent.getTime()); } else { // 处理对象原型 proto = Object.getPrototypeOf(parent); // 利用Object.create切断原型链 child = Object.create(proto); } // 处理循环引用 const index = parents.indexOf(parent); if (index != -1) { // 如果父数组存在本对象,说明之前已经被引用过,直接返回此对象 return children[index]; } parents.push(parent); children.push(child); for (let i in parent) { // 递归 child[i] = _clone(parent[i]); } return child; }; return _clone(parent); };- 1
- 2
- 3
- 4
- 5
- 6
- 7
- 8
- 9
- 10
- 11
- 12
- 13
- 14
- 15
- 16
- 17
- 18
- 19
- 20
- 21
- 22
- 23
- 24
- 25
- 26
- 27
- 28
- 29
- 30
- 31
- 32
- 33
- 34
- 35
- 36
- 37
- 38
- 39
- 40
- 41
- 42
- 43
- 44
- 45
- 46
- 47
- 48
- 49
- 50
- 51
- 52
- 53
- 54
- 55
- 56
- 57
- 58
- 59
- 60
- 61
- 62
- 63
- 64
- 65
- 66
- 67
- 68
- 69
- 70
- 71
- 72
- 73
- 74
- 75
- 76
- 77
- 78
- 79
- 80
- 81
- 82
- 83
局限性:
- 一些特殊情况没有处理: 例如Buffer对象、Promise、Set、Map
- 另外对于确保没有循环引用的对象,我们可以省去对循环引用的特殊处理,因为这很消耗时间
原理详解实现深克隆
打印出当前网页使用了多少种HTML元素
一行代码可以解决:
const fn = () => { return [...new Set([...document.querySelectorAll('*')].map(el => el.tagName))].length; }- 1
- 2
- 3
- 4
值得注意的是:DOM操作返回的是类数组,需要转换为数组之后才可以调用数组的方法。
查找字符串中出现最多的字符和个数
例: abbcccddddd -> 字符最多的是d,出现了5次
let str = "abcabcabcbbccccc"; let num = 0; let char = ''; // 使其按照一定的次序排列 str = str.split('').sort().join(''); // "aaabbbbbcccccccc" // 定义正则表达式 let re = /(\w)\1+/g; str.replace(re,($0,$1) => { if(num < $0.length){ num = $0.length; char = $1; } }); console.log(`字符最多的是${char},出现了${num}次`);- 1
- 2
- 3
- 4
- 5
- 6
- 7
- 8
- 9
- 10
- 11
- 12
- 13
- 14
- 15
- 16
- 17
- 18
- 19
实现发布订阅模式
简介:
发布订阅者模式,一种对象间一对多的依赖关系,但一个对象的状态发生改变时,所依赖它的对象都将得到状态改变的通知。
主要的作用(优点):
- 广泛应用于异步编程中(替代了传递回调函数)
- 对象之间松散耦合的编写代码
缺点:
- 创建订阅者本身要消耗一定的时间和内存
- 多个发布者和订阅者嵌套一起的时候,程序难以跟踪维护
实现的思路:
- 创建一个对象(缓存列表)
on方法用来把回调函数fn都加到缓存列表中emit根据key值去执行对应缓存列表中的函数off方法可以根据key值取消订阅
class EventEmiter { constructor() { // 事件对象,存放订阅的名字和事件 this._events = {} } // 订阅事件的方法 on(eventName,callback) { if(!this._events) { this._events = {} } // 合并之前订阅的cb this._events[eventName] = [...(this._events[eventName] || []),callback] } // 触发事件的方法 emit(eventName, ...args) { if(!this._events[eventName]) { return } // 遍历执行所有订阅的事件 this._events[eventName].forEach(fn=>fn(...args)) } off(eventName,cb) { if(!this._events[eventName]) { return } // 删除订阅的事件 this._events[eventName] = this._events[eventName].filter(fn=>fn != cb && fn.l != cb) } // 绑定一次 触发后将绑定的移除掉 再次触发掉 once(eventName,callback) { const one = (...args)=>{ // 等callback执行完毕在删除 callback(args) this.off(eventName,one) } one.l = callback // 自定义属性 this.on(eventName,one) } }- 1
- 2
- 3
- 4
- 5
- 6
- 7
- 8
- 9
- 10
- 11
- 12
- 13
- 14
- 15
- 16
- 17
- 18
- 19
- 20
- 21
- 22
- 23
- 24
- 25
- 26
- 27
- 28
- 29
- 30
- 31
- 32
- 33
- 34
- 35
- 36
- 37
- 38
- 39
测试用例
let event = new EventEmiter() let login1 = function(...args) { console.log('login success1', args) } let login2 = function(...args) { console.log('login success2', args) } // event.on('login',login1) event.once('login',login2) event.off('login',login1) // 解除订阅 event.emit('login', 1,2,3,4,5) event.emit('login', 6,7,8,9) event.emit('login', 10,11,12)- 1
- 2
- 3
- 4
- 5
- 6
- 7
- 8
- 9
- 10
- 11
- 12
- 13
- 14
发布订阅者模式和观察者模式的区别?
- 发布/订阅模式是观察者模式的一种变形,两者区别在于,发布/订阅模式在观察者模式的基础上,在目标和观察者之间增加一个调度中心。
- 观察者模式是由具体目标调度,比如当事件触发,
Subject就会去调用观察者的方法,所以观察者模式的订阅者与发布者之间是存在依赖的。 - 发布/订阅模式由统一调度中心调用,因此发布者和订阅者不需要知道对方的存在。
实现 getValue/setValue 函数来获取path对应的值
// 示例 var object = { a: [{ b: { c: 3 } }] }; // path: 'a[0].b.c' var array = [{ a: { b: [1] } }]; // path: '[0].a.b[0]' function getValue(target, valuePath, defaultValue) {} console.log(getValue(object, "a[0].b.c", 0)); // 输出3 console.log(getValue(array, "[0].a.b[0]", 12)); // 输出 1 console.log(getValue(array, "[0].a.b[0].c", 12)); // 输出 12- 1
- 2
- 3
- 4
- 5
- 6
- 7
- 8
- 9
实现
/** * 测试属性是否匹配 */ export function testPropTypes(value, type, dev) { const sEnums = ['number', 'string', 'boolean', 'undefined', 'function']; // NaN const oEnums = ['Null', 'Object', 'Array', 'Date', 'RegExp', 'Error']; const nEnums = [ '[object Number]', '[object String]', '[object Boolean]', '[object Undefined]', '[object Function]', '[object Null]', '[object Object]', '[object Array]', '[object Date]', '[object RegExp]', '[object Error]', ]; const reg = new RegExp('\\[object (.*?)\\]'); // 完全匹配模式,type应该传递类似格式[object Window] [object HTMLDocument] ... if (reg.test(type)) { // 排除nEnums的12种 if (~nEnums.indexOf(type)) { if (dev === true) { console.warn(value, 'The parameter type belongs to one of 12 types:number string boolean undefined Null Object Array Date RegExp function Error NaN'); } } if (Object.prototype.toString.call(value) === type) { return true; } return false; } }- 1
- 2
- 3
- 4
- 5
- 6
- 7
- 8
- 9
- 10
- 11
- 12
- 13
- 14
- 15
- 16
- 17
- 18
- 19
- 20
- 21
- 22
- 23
- 24
- 25
- 26
- 27
- 28
- 29
- 30
- 31
- 32
- 33
- 34
- 35
- 36
- 37
const syncVarIterator = { getter: function (obj, key, defaultValue) { // 结果变量 const defaultResult = defaultValue === undefined ? undefined : defaultValue; if (testPropTypes(obj, 'Object') === false && testPropTypes(obj, 'Array') === false) { return defaultResult; } // 结果变量,暂时指向obj持有的引用,后续将可能被不断的修改 let result = obj; // 得到知道值 try { // 解析属性层次序列 const keyArr = key.split('.'); // 迭代obj对象属性 for (let i = 0; i < keyArr.length; i++) { // 如果第 i 层属性存在对应的值则迭代该属性值 if (result[keyArr[i]] !== undefined) { result = result[keyArr[i]]; // 如果不存在则返回未定义 } else { return defaultResult; } } } catch (e) { return defaultResult; } // 返回获取的结果 return result; }, setter: function (obj, key, val) { // 如果不存在obj则返回未定义 if (testPropTypes(obj, 'Object') === false) { return false; } // 结果变量,暂时指向obj持有的引用,后续将可能被不断的修改 let result = obj; try { // 解析属性层次序列 const keyArr = key.split('.'); let i = 0; // 迭代obj对象属性 for (; i < keyArr.length - 1; i++) { // 如果第 i 层属性对应的值不存在,则定义为对象 if (result[keyArr[i]] === undefined) { result[keyArr[i]] = {}; } // 如果第 i 层属性对应的值不是对象(Object)的一个实例,则抛出错误 if (!(result[keyArr[i]] instanceof Object)) { throw new Error('obj.' + keyArr.splice(0, i + 1).join('.') + 'is not Object'); } // 迭代该层属性值 result = result[keyArr[i]]; } // 设置属性值 result[keyArr[i]] = val; return true; } catch (e) { return false; } }, };- 1
- 2
- 3
- 4
- 5
- 6
- 7
- 8
- 9
- 10
- 11
- 12
- 13
- 14
- 15
- 16
- 17
- 18
- 19
- 20
- 21
- 22
- 23
- 24
- 25
- 26
- 27
- 28
- 29
- 30
- 31
- 32
- 33
- 34
- 35
- 36
- 37
- 38
- 39
- 40
- 41
- 42
- 43
- 44
- 45
- 46
- 47
- 48
- 49
- 50
- 51
- 52
- 53
- 54
- 55
- 56
- 57
- 58
- 59
- 60
- 61
- 62
- 63
- 64
- 65
- 66
- 67
- 68
- 69
- 70
- 71
- 72
- 73
- 74
- 75
使用promise来实现
创建
enhancedObject函数const enhancedObject = (target) => new Proxy(target, { get(target, property) { if (property in target) { return target[property]; } else { return searchFor(property, target); //实际使用时要对value值进行复位 } }, }); let value = null; function searchFor(property, target) { for (const key of Object.keys(target)) { if (typeof target[key] === "object") { searchFor(property, target[key]); } else if (typeof target[property] !== "undefined") { value = target[property]; break; } } return value; }- 1
- 2
- 3
- 4
- 5
- 6
- 7
- 8
- 9
- 10
- 11
- 12
- 13
- 14
- 15
- 16
- 17
- 18
- 19
- 20
- 21
- 22
- 23
使用
enhancedObject函数const data = enhancedObject({ user: { name: "test", settings: { theme: "dark", }, }, }); console.log(data.user.settings.theme); // dark console.log(data.theme); // dark- 1
- 2
- 3
- 4
- 5
- 6
- 7
- 8
- 9
- 10
- 11
以上代码运行后,控制台会输出以下代码:
dark dark- 1
- 2
通过观察以上的输出结果可知,使用
enhancedObject函数处理过的对象,我们就可以方便地访问普通对象内部的深层属性。reduce用法汇总
语法
array.reduce(function(total, currentValue, currentIndex, arr), initialValue); /* total: 必需。初始值, 或者计算结束后的返回值。 currentValue: 必需。当前元素。 currentIndex: 可选。当前元素的索引; arr: 可选。当前元素所属的数组对象。 initialValue: 可选。传递给函数的初始值,相当于total的初始值。 */- 1
- 2
- 3
- 4
- 5
- 6
- 7
- 8
reduceRight()该方法用法与reduce()其实是相同的,只是遍历的顺序相反,它是从数组的最后一项开始,向前遍历到第一项1. 数组求和
const arr = [12, 34, 23]; const sum = arr.reduce((total, num) => total + num); // 设定初始值求和 const arr = [12, 34, 23]; const sum = arr.reduce((total, num) => total + num, 10); // 以10为初始值求和 // 对象数组求和 var result = [ { subject: 'math', score: 88 }, { subject: 'chinese', score: 95 }, { subject: 'english', score: 80 } ]; const sum = result.reduce((accumulator, cur) => accumulator + cur.score, 0); const sum = result.reduce((accumulator, cur) => accumulator + cur.score, -10); // 总分扣除10分- 1
- 2
- 3
- 4
- 5
- 6
- 7
- 8
- 9
- 10
- 11
- 12
- 13
- 14
- 15
- 16
2. 数组最大值
const a = [23,123,342,12]; const max = a.reduce((pre,next)=>pre>cur?pre:cur,0); // 342- 1
- 2
3. 数组转对象
var streams = [{name: '技术', id: 1}, {name: '设计', id: 2}]; var obj = streams.reduce((accumulator, cur) => {accumulator[cur.id] = cur; return accumulator;}, {});- 1
- 2
4. 扁平一个二维数组
var arr = [[1, 2, 8], [3, 4, 9], [5, 6, 10]]; var res = arr.reduce((x, y) => x.concat(y), []);- 1
- 2
5. 数组去重
实现的基本原理如下: ① 初始化一个空数组 ② 将需要去重处理的数组中的第1项在初始化数组中查找,如果找不到(空数组中肯定找不到),就将该项添加到初始化数组中 ③ 将需要去重处理的数组中的第2项在初始化数组中查找,如果找不到,就将该项继续添加到初始化数组中 ④ …… ⑤ 将需要去重处理的数组中的第n项在初始化数组中查找,如果找不到,就将该项继续添加到初始化数组中 ⑥ 将这个初始化数组返回- 1
- 2
- 3
- 4
- 5
- 6
- 7
- 8
var newArr = arr.reduce(function (prev, cur) { prev.indexOf(cur) === -1 && prev.push(cur); return prev; },[]);- 1
- 2
- 3
- 4
6. 对象数组去重
const dedup = (data, getKey = () => { }) => { const dateMap = data.reduce((pre, cur) => { const key = getKey(cur) if (!pre[key]) { pre[key] = cur } return pre }, {}) return Object.values(dateMap) }- 1
- 2
- 3
- 4
- 5
- 6
- 7
- 8
- 9
- 10
7. 求字符串中字母出现的次数
const str = 'sfhjasfjgfasjuwqrqadqeiqsajsdaiwqdaklldflas-cmxzmnha'; const res = str.split('').reduce((pre,next)=>{ pre[next] ? pre[next]++ : pre[next] = 1 return pre },{})- 1
- 2
- 3
- 4
- 5
- 6
// 结果 -: 1 a: 8 c: 1 d: 4 e: 1 f: 4 g: 1 h: 2 i: 2 j: 4 k: 1 l: 3 m: 2 n: 1 q: 5 r: 1 s: 6 u: 1 w: 2 x: 1 z: 1- 1
- 2
- 3
- 4
- 5
- 6
- 7
- 8
- 9
- 10
- 11
- 12
- 13
- 14
- 15
- 16
- 17
- 18
- 19
- 20
- 21
- 22
8. compose函数
redux compose源码实现function compose(...funs) { if (funs.length === 0) { return arg => arg; } if (funs.length === 1) { return funs[0]; } return funs.reduce((a, b) => (...arg) => a(b(...arg))) }- 1
- 2
- 3
- 4
- 5
- 6
- 7
- 8
- 9
Promise实现
基于
Promise封装Ajax- 返回一个新的
Promise实例 - 创建
HMLHttpRequest异步对象 - 调用
open方法,打开url,与服务器建立链接(发送前的一些处理) - 监听
Ajax状态信息 - 如果
xhr.readyState == 4(表示服务器响应完成,可以获取使用服务器的响应了)xhr.status == 200,返回resolve状态xhr.status == 404,返回reject状态
xhr.readyState !== 4,把请求主体的信息基于send发送给服务器
function ajax(url) { return new Promise((resolve, reject) => { let xhr = new XMLHttpRequest() xhr.open('get', url) xhr.onreadystatechange = () => { if (xhr.readyState == 4) { if (xhr.status >= 200 && xhr.status <= 300) { resolve(JSON.parse(xhr.responseText)) } else { reject('请求出错') } } } xhr.send() //发送hppt请求 }) } let url = '/data.json' ajax(url).then(res => console.log(res)) .catch(reason => console.log(reason))- 1
- 2
- 3
- 4
- 5
- 6
- 7
- 8
- 9
- 10
- 11
- 12
- 13
- 14
- 15
- 16
- 17
- 18
- 19
- 20
参考:前端手写面试题详细解答
实现Vue reactive响应式
// Dep module class Dep { static stack = [] static target = null deps = null constructor() { this.deps = new Set() } depend() { if (Dep.target) { this.deps.add(Dep.target) } } notify() { this.deps.forEach(w => w.update()) } static pushTarget(t) { if (this.target) { this.stack.push(this.target) } this.target = t } static popTarget() { this.target = this.stack.pop() } } // reactive function reactive(o) { if (o && typeof o === 'object') { Object.keys(o).forEach(k => { defineReactive(o, k, o[k]) }) } return o } function defineReactive(obj, k, val) { let dep = new Dep() Object.defineProperty(obj, k, { get() { dep.depend() return val }, set(newVal) { val = newVal dep.notify() } }) if (val && typeof val === 'object') { reactive(val) } } // watcher class Watcher { constructor(effect) { this.effect = effect this.update() } update() { Dep.pushTarget(this) this.value = this.effect() Dep.popTarget() return this.value } } // 测试代码 const data = reactive({ msg: 'aaa' }) new Watcher(() => { console.log('===> effect', data.msg); }) setTimeout(() => { data.msg = 'hello' }, 1000)- 1
- 2
- 3
- 4
- 5
- 6
- 7
- 8
- 9
- 10
- 11
- 12
- 13
- 14
- 15
- 16
- 17
- 18
- 19
- 20
- 21
- 22
- 23
- 24
- 25
- 26
- 27
- 28
- 29
- 30
- 31
- 32
- 33
- 34
- 35
- 36
- 37
- 38
- 39
- 40
- 41
- 42
- 43
- 44
- 45
- 46
- 47
- 48
- 49
- 50
- 51
- 52
- 53
- 54
- 55
- 56
- 57
- 58
- 59
- 60
- 61
- 62
- 63
- 64
- 65
- 66
- 67
- 68
- 69
- 70
- 71
- 72
- 73
- 74
- 75
- 76
- 77
- 78
- 79
- 80
- 81
- 82
- 83
- 84
- 85
- 86
实现千位分隔符
// 保留三位小数 parseToMoney(1234.56); // return '1,234.56' parseToMoney(123456789); // return '123,456,789' parseToMoney(1087654.321); // return '1,087,654.321'- 1
- 2
- 3
- 4
- 5
- 6
function parseToMoney(num) { num = parseFloat(num.toFixed(3)); let [integer, decimal] = String.prototype.split.call(num, '.'); integer = integer.replace(/\d(?=(\d{3})+$)/g, '$&,'); return integer + '.' + (decimal ? decimal : ''); }- 1
- 2
- 3
- 4
- 5
- 6
- 7
- 8
正则表达式(运用了正则的前向声明和反前向声明):
function parseToMoney(str){ // 仅仅对位置进行匹配 let re = /(?=(?!\b)(\d{3})+$)/g; return str.replace(re,','); }- 1
- 2
- 3
- 4
- 5
- 6
判断是否是电话号码
function isPhone(tel) { var regx = /^1[34578]\d{9}$/; return regx.test(tel); }- 1
- 2
- 3
- 4
实现模板字符串解析功能
let template = '我是{{name}},年龄{{age}},性别{{sex}}'; let data = { name: '姓名', age: 18 } render(template, data); // 我是姓名,年龄18,性别undefined- 1
- 2
- 3
- 4
- 5
- 6
function render(template, data) { const reg = /\{\{(\w+)\}\}/; // 模板字符串正则 if (reg.test(template)) { // 判断模板里是否有模板字符串 const name = reg.exec(template)[1]; // 查找当前模板里第一个模板字符串的字段 template = template.replace(reg, data[name]); // 将第一个模板字符串渲染 return render(template, data); // 递归的渲染并返回渲染后的结构 } return template; // 如果模板没有模板字符串直接返回 }- 1
- 2
- 3
- 4
- 5
- 6
- 7
- 8
- 9
实现一个迭代器生成函数
ES6对迭代器的实现
JS原生的集合类型数据结构,只有
Array(数组)和Object(对象);而ES6中,又新增了Map和Set。四种数据结构各自有着自己特别的内部实现,但我们仍期待以同样的一套规则去遍历它们,所以ES6在推出新数据结构的同时也推出了一套 统一的接口机制 ——迭代器(Iterator)。ES6约定,任何数据结构只要具备Symbol.iterator属性(这个属性就是Iterator的具体实现,它本质上是当前数据结构默认的迭代器生成函数),就可以被遍历——准确地说,是被for...of...循环和迭代器的next方法遍历。 事实上,for...of...的背后正是对next方法的反复调用。在ES6中,针对
Array、Map、Set、String、TypedArray、函数的arguments对象、NodeList对象这些原生的数据结构都可以通过for...of...进行遍历。原理都是一样的,此处我们拿最简单的数组进行举例,当我们用for...of...遍历数组时:const arr = [1, 2, 3] const len = arr.length for(item of arr) { console.log(`当前元素是${item}`) }- 1
- 2
- 3
- 4
- 5
之所以能够按顺序一次一次地拿到数组里的每一个成员,是因为我们借助数组的
Symbol.iterator生成了它对应的迭代器对象,通过反复调用迭代器对象的next方法访问了数组成员,像这样:const arr = [1, 2, 3] // 通过调用iterator,拿到迭代器对象 const iterator = arr[Symbol.iterator]() // 对迭代器对象执行next,就能逐个访问集合的成员 iterator.next() iterator.next() iterator.next()- 1
- 2
- 3
- 4
- 5
- 6
- 7
- 8
丢进控制台,我们可以看到
next每次会按顺序帮我们访问一个集合成员: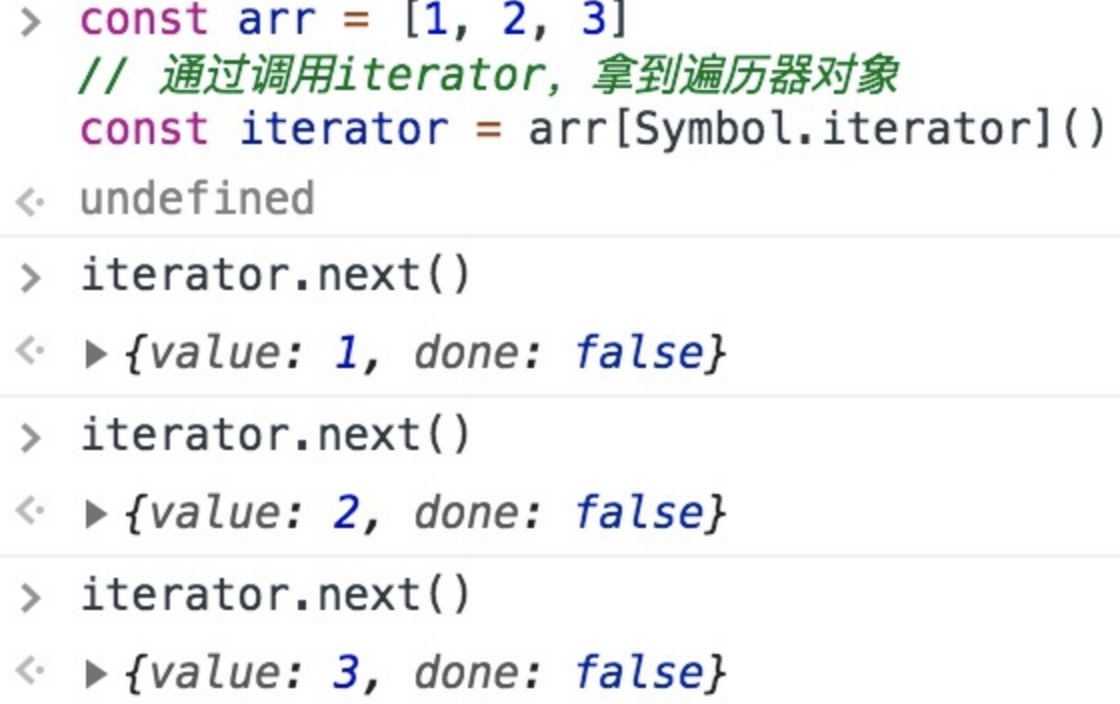
而
for...of...做的事情,基本等价于下面这通操作:// 通过调用iterator,拿到迭代器对象 const iterator = arr[Symbol.iterator]() // 初始化一个迭代结果 let now = { done: false } // 循环往外迭代成员 while(!now.done) { now = iterator.next() if(!now.done) { console.log(`现在遍历到了${now.value}`) } }- 1
- 2
- 3
- 4
- 5
- 6
- 7
- 8
- 9
- 10
- 11
- 12
- 13
可以看出,
for...of...其实就是iterator循环调用换了种写法。在ES6中我们之所以能够开心地用for...of...遍历各种各种的集合,全靠迭代器模式在背后给力。ps:此处推荐阅读迭代协议 (opens new window),相信大家读过后会对迭代器在ES6中的实现有更深的理解。
实现一个JSON.stringify
JSON.stringify(value[, replacer [, space]]):- 1
Boolean | Number| String类型会自动转换成对应的原始值。undefined、任意函数以及symbol,会被忽略(出现在非数组对象的属性值中时),或者被转换成null(出现在数组中时)。- 不可枚举的属性会被忽略如果一个对象的属性值通过某种间接的方式指回该对象本身,即循环引用,属性也会被忽略
- 如果一个对象的属性值通过某种间接的方式指回该对象本身,即循环引用,属性也会被忽略
function jsonStringify(obj) { let type = typeof obj; if (type !== "object") { if (/string|undefined|function/.test(type)) { obj = '"' + obj + '"'; } return String(obj); } else { let json = [] let arr = Array.isArray(obj) for (let k in obj) { let v = obj[k]; let type = typeof v; if (/string|undefined|function/.test(type)) { v = '"' + v + '"'; } else if (type === "object") { v = jsonStringify(v); } json.push((arr ? "" : '"' + k + '":') + String(v)); } return (arr ? "[" : "{") + String(json) + (arr ? "]" : "}") } } jsonStringify({x : 5}) // "{"x":5}" jsonStringify([1, "false", false]) // "[1,"false",false]" jsonStringify({b: undefined}) // "{"b":"undefined"}"- 1
- 2
- 3
- 4
- 5
- 6
- 7
- 8
- 9
- 10
- 11
- 12
- 13
- 14
- 15
- 16
- 17
- 18
- 19
- 20
- 21
- 22
- 23
- 24
- 25
- 26
对象扁平化
function objectFlat(obj = {}) { const res = {} function flat(item, preKey = '') { Object.entries(item).forEach(([key, val]) => { const newKey = preKey ? `${preKey}.${key}` : key if (val && typeof val === 'object') { flat(val, newKey) } else { res[newKey] = val } }) } flat(obj) return res } // 测试 const source = { a: { b: { c: 1, d: 2 }, e: 3 }, f: { g: 2 } } console.log(objectFlat(source));- 1
- 2
- 3
- 4
- 5
- 6
- 7
- 8
- 9
- 10
- 11
- 12
- 13
- 14
- 15
- 16
- 17
- 18
- 19
实现一个迷你版的vue
入口
// js/vue.js class Vue { constructor (options) { // 1. 通过属性保存选项的数据 this.$options = options || {} this.$data = options.data || {} this.$el = typeof options.el === 'string' ? document.querySelector(options.el) : options.el // 2. 把data中的成员转换成getter和setter,注入到vue实例中 this._proxyData(this.$data) // 3. 调用observer对象,监听数据的变化 new Observer(this.$data) // 4. 调用compiler对象,解析指令和差值表达式 new Compiler(this) } _proxyData (data) { // 遍历data中的所有属性 Object.keys(data).forEach(key => { // 把data的属性注入到vue实例中 Object.defineProperty(this, key, { enumerable: true, configurable: true, get () { return data[key] }, set (newValue) { if (newValue === data[key]) { return } data[key] = newValue } }) }) } }- 1
- 2
- 3
- 4
- 5
- 6
- 7
- 8
- 9
- 10
- 11
- 12
- 13
- 14
- 15
- 16
- 17
- 18
- 19
- 20
- 21
- 22
- 23
- 24
- 25
- 26
- 27
- 28
- 29
- 30
- 31
- 32
- 33
- 34
实现Dep
class Dep { constructor () { // 存储所有的观察者 this.subs = [] } // 添加观察者 addSub (sub) { if (sub && sub.update) { this.subs.push(sub) } } // 发送通知 notify () { this.subs.forEach(sub => { sub.update() }) } }- 1
- 2
- 3
- 4
- 5
- 6
- 7
- 8
- 9
- 10
- 11
- 12
- 13
- 14
- 15
- 16
- 17
- 18
实现watcher
class Watcher { constructor (vm, key, cb) { this.vm = vm // data中的属性名称 this.key = key // 回调函数负责更新视图 this.cb = cb // 把watcher对象记录到Dep类的静态属性target Dep.target = this // 触发get方法,在get方法中会调用addSub this.oldValue = vm[key] Dep.target = null } // 当数据发生变化的时候更新视图 update () { let newValue = this.vm[this.key] if (this.oldValue === newValue) { return } this.cb(newValue) } }- 1
- 2
- 3
- 4
- 5
- 6
- 7
- 8
- 9
- 10
- 11
- 12
- 13
- 14
- 15
- 16
- 17
- 18
- 19
- 20
- 21
- 22
- 23
实现compiler
class Compiler { constructor (vm) { this.el = vm.$el this.vm = vm this.compile(this.el) } // 编译模板,处理文本节点和元素节点 compile (el) { let childNodes = el.childNodes Array.from(childNodes).forEach(node => { // 处理文本节点 if (this.isTextNode(node)) { this.compileText(node) } else if (this.isElementNode(node)) { // 处理元素节点 this.compileElement(node) } // 判断node节点,是否有子节点,如果有子节点,要递归调用compile if (node.childNodes && node.childNodes.length) { this.compile(node) } }) } // 编译元素节点,处理指令 compileElement (node) { // console.log(node.attributes) // 遍历所有的属性节点 Array.from(node.attributes).forEach(attr => { // 判断是否是指令 let attrName = attr.name if (this.isDirective(attrName)) { // v-text --> text attrName = attrName.substr(2) let key = attr.value this.update(node, key, attrName) } }) } update (node, key, attrName) { let updateFn = this[attrName + 'Updater'] updateFn && updateFn.call(this, node, this.vm[key], key) } // 处理 v-text 指令 textUpdater (node, value, key) { node.textContent = value new Watcher(this.vm, key, (newValue) => { node.textContent = newValue }) } // v-model modelUpdater (node, value, key) { node.value = value new Watcher(this.vm, key, (newValue) => { node.value = newValue }) // 双向绑定 node.addEventListener('input', () => { this.vm[key] = node.value }) } // 编译文本节点,处理差值表达式 compileText (node) { // console.dir(node) // {{ msg }} let reg = /\{\{(.+?)\}\}/ let value = node.textContent if (reg.test(value)) { let key = RegExp.$1.trim() node.textContent = value.replace(reg, this.vm[key]) // 创建watcher对象,当数据改变更新视图 new Watcher(this.vm, key, (newValue) => { node.textContent = newValue }) } } // 判断元素属性是否是指令 isDirective (attrName) { return attrName.startsWith('v-') } // 判断节点是否是文本节点 isTextNode (node) { return node.nodeType === 3 } // 判断节点是否是元素节点 isElementNode (node) { return node.nodeType === 1 } }- 1
- 2
- 3
- 4
- 5
- 6
- 7
- 8
- 9
- 10
- 11
- 12
- 13
- 14
- 15
- 16
- 17
- 18
- 19
- 20
- 21
- 22
- 23
- 24
- 25
- 26
- 27
- 28
- 29
- 30
- 31
- 32
- 33
- 34
- 35
- 36
- 37
- 38
- 39
- 40
- 41
- 42
- 43
- 44
- 45
- 46
- 47
- 48
- 49
- 50
- 51
- 52
- 53
- 54
- 55
- 56
- 57
- 58
- 59
- 60
- 61
- 62
- 63
- 64
- 65
- 66
- 67
- 68
- 69
- 70
- 71
- 72
- 73
- 74
- 75
- 76
- 77
- 78
- 79
- 80
- 81
- 82
- 83
- 84
- 85
- 86
- 87
- 88
- 89
- 90
- 91
- 92
- 93
实现Observer
class Observer { constructor (data) { this.walk(data) } walk (data) { // 1. 判断data是否是对象 if (!data || typeof data !== 'object') { return } // 2. 遍历data对象的所有属性 Object.keys(data).forEach(key => { this.defineReactive(data, key, data[key]) }) } defineReactive (obj, key, val) { let that = this // 负责收集依赖,并发送通知 let dep = new Dep() // 如果val是对象,把val内部的属性转换成响应式数据 this.walk(val) Object.defineProperty(obj, key, { enumerable: true, configurable: true, get () { // 收集依赖 Dep.target && dep.addSub(Dep.target) return val }, set (newValue) { if (newValue === val) { return } val = newValue that.walk(newValue) // 发送通知 dep.notify() } }) } }- 1
- 2
- 3
- 4
- 5
- 6
- 7
- 8
- 9
- 10
- 11
- 12
- 13
- 14
- 15
- 16
- 17
- 18
- 19
- 20
- 21
- 22
- 23
- 24
- 25
- 26
- 27
- 28
- 29
- 30
- 31
- 32
- 33
- 34
- 35
- 36
- 37
- 38
- 39
- 40
使用
DOCTYPE html> <html lang="cn"> <head> <meta charset="UTF-8"> <meta name="viewport" content="width=device-width, initial-scale=1.0"> <meta http-equiv="X-UA-Compatible" content="ie=edge"> <title>Mini Vuetitle> head> <body> <div id="app"> <h1>差值表达式h1> <h3>{{ msg }}h3> <h3>{{ count }}h3> <h1>v-texth1> <div v-text="msg">div> <h1>v-modelh1> <input type="text" v-model="msg"> <input type="text" v-model="count"> div> <script src="./js/dep.js">script> <script src="./js/watcher.js">script> <script src="./js/compiler.js">script> <script src="./js/observer.js">script> <script src="./js/vue.js">script> <script> let vm = new Vue({ el: '#app', data: { msg: 'Hello Vue', count: 100, person: { name: 'zs' } } }) console.log(vm.msg) // vm.msg = { test: 'Hello' } vm.test = 'abc' script> body> html>- 1
- 2
- 3
- 4
- 5
- 6
- 7
- 8
- 9
- 10
- 11
- 12
- 13
- 14
- 15
- 16
- 17
- 18
- 19
- 20
- 21
- 22
- 23
- 24
- 25
- 26
- 27
- 28
- 29
- 30
- 31
- 32
- 33
- 34
- 35
- 36
- 37
- 38
- 39
字符串最长的不重复子串
题目描述
给定一个字符串 s ,请你找出其中不含有重复字符的 最长子串 的长度。 示例 1: 输入: s = "abcabcbb" 输出: 3 解释: 因为无重复字符的最长子串是 "abc",所以其长度为 3。 示例 2: 输入: s = "bbbbb" 输出: 1 解释: 因为无重复字符的最长子串是 "b",所以其长度为 1。 示例 3: 输入: s = "pwwkew" 输出: 3 解释: 因为无重复字符的最长子串是 "wke",所以其长度为 3。 请注意,你的答案必须是 子串 的长度,"pwke" 是一个子序列,不是子串。 示例 4: 输入: s = "" 输出: 0- 1
- 2
- 3
- 4
- 5
- 6
- 7
- 8
- 9
- 10
- 11
- 12
- 13
- 14
- 15
- 16
- 17
- 18
- 19
- 20
- 21
- 22
- 23
- 24
- 25
- 26
答案
const lengthOfLongestSubstring = function (s) { if (s.length === 0) { return 0; } let left = 0; let right = 1; let max = 0; while (right <= s.length) { let lr = s.slice(left, right); const index = lr.indexOf(s[right]); if (index > -1) { left = index + left + 1; } else { lr = s.slice(left, right + 1); max = Math.max(max, lr.length); } right++; } return max; };- 1
- 2
- 3
- 4
- 5
- 6
- 7
- 8
- 9
- 10
- 11
- 12
- 13
- 14
- 15
- 16
- 17
- 18
- 19
- 20
- 21
- 22
解析 URL Params 为对象
let url = 'http://www.domain.com/?user=anonymous&id=123&id=456&city=%E5%8C%97%E4%BA%AC&enabled'; parseParam(url) /* 结果{ user: 'anonymous', id: [ 123, 456 ], // 重复出现的 key 要组装成数组,能被转成数字的就转成数字类型 city: '北京', // 中文需解码 enabled: true, // 未指定值得 key 约定为 true}*/- 1
- 2
- 3
- 4
function parseParam(url) { const paramsStr = /.+\?(.+)$/.exec(url)[1]; // 将 ? 后面的字符串取出来 const paramsArr = paramsStr.split('&'); // 将字符串以 & 分割后存到数组中 let paramsObj = {}; // 将 params 存到对象中 paramsArr.forEach(param => { if (/=/.test(param)) { // 处理有 value 的参数 let [key, val] = param.split('='); // 分割 key 和 value val = decodeURIComponent(val); // 解码 val = /^\d+$/.test(val) ? parseFloat(val) : val; // 判断是否转为数字 if (paramsObj.hasOwnProperty(key)) { // 如果对象有 key,则添加一个值 paramsObj[key] = [].concat(paramsObj[key], val); } else { // 如果对象没有这个 key,创建 key 并设置值 paramsObj[key] = val; } } else { // 处理没有 value 的参数 paramsObj[param] = true; } }) return paramsObj; }- 1
- 2
- 3
- 4
- 5
- 6
- 7
- 8
- 9
- 10
- 11
- 12
- 13
- 14
- 15
- 16
- 17
- 18
- 19
- 20
- 21
- 22
手写节流函数
函数节流是指规定一个单位时间,在这个单位时间内,只能有一次触发事件的回调函数执行,如果在同一个单位时间内某事件被触发多次,只有一次能生效。节流可以使用在 scroll 函数的事件监听上,通过事件节流来降低事件调用的频率。
// 函数节流的实现; function throttle(fn, delay) { let curTime = Date.now(); return function() { let context = this, args = arguments, nowTime = Date.now(); // 如果两次时间间隔超过了指定时间,则执行函数。 if (nowTime - curTime >= delay) { curTime = Date.now(); return fn.apply(context, args); } }; }- 1
- 2
- 3
- 4
- 5
- 6
- 7
- 8
- 9
- 10
- 11
- 12
- 13
- 14
- 15
- 16
- 17
实现一下hash路由
基础的
html代码:<html> <style> html, body { margin: 0; height: 100%; } ul { list-style: none; margin: 0; padding: 0; display: flex; justify-content: center; } .box { width: 100%; height: 100%; background-color: red; } style> <body> <ul> <li> <a href="#red">红色a> li> <li> <a href="#green">绿色a> li> <li> <a href="#purple">紫色a> li> ul> body> html>- 1
- 2
- 3
- 4
- 5
- 6
- 7
- 8
- 9
- 10
- 11
- 12
- 13
- 14
- 15
- 16
- 17
- 18
- 19
- 20
- 21
- 22
- 23
- 24
- 25
- 26
- 27
- 28
- 29
- 30
- 31
- 32
- 33
简单实现:
<script> const box = document.getElementsByClassName('box')[0]; const hash = location.hash window.onhashchange = function (e) { const color = hash.slice(1) box.style.background = color } script>- 1
- 2
- 3
- 4
- 5
- 6
- 7
- 8
封装成一个class:
<script> const box = document.getElementsByClassName('box')[0]; const hash = location.hash class HashRouter { constructor (hashStr, cb) { this.hashStr = hashStr this.cb = cb this.watchHash() this.watch = this.watchHash.bind(this) window.addEventListener('hashchange', this.watch) } watchHash () { let hash = window.location.hash.slice(1) this.hashStr = hash this.cb(hash) } } new HashRouter('red', (color) => { box.style.background = color }) script>- 1
- 2
- 3
- 4
- 5
- 6
- 7
- 8
- 9
- 10
- 11
- 12
- 13
- 14
- 15
- 16
- 17
- 18
- 19
- 20
- 21
对象数组列表转成树形结构(处理菜单)
[ { id: 1, text: '节点1', parentId: 0 //这里用0表示为顶级节点 }, { id: 2, text: '节点1_1', parentId: 1 //通过这个字段来确定子父级 } ... ] 转成 [ { id: 1, text: '节点1', parentId: 0, children: [ { id:2, text: '节点1_1', parentId:1 } ] } ]- 1
- 2
- 3
- 4
- 5
- 6
- 7
- 8
- 9
- 10
- 11
- 12
- 13
- 14
- 15
- 16
- 17
- 18
- 19
- 20
- 21
- 22
- 23
- 24
- 25
- 26
- 27
- 28
- 29
实现代码如下:
function listToTree(data) { let temp = {}; let treeData = []; for (let i = 0; i < data.length; i++) { temp[data[i].id] = data[i]; } for (let i in temp) { if (+temp[i].parentId != 0) { if (!temp[temp[i].parentId].children) { temp[temp[i].parentId].children = []; } temp[temp[i].parentId].children.push(temp[i]); } else { treeData.push(temp[i]); } } return treeData; }- 1
- 2
- 3
- 4
- 5
- 6
- 7
- 8
- 9
- 10
- 11
- 12
- 13
- 14
- 15
- 16
- 17
- 18
-
相关阅读:
rotation matrix &reflection matrix
查看依赖包、插件的版本
短信上行和短信下行
《论文阅读》CAB:认知、情感和行为的共情对话生成 DASFAA 2023
karmada介绍和分析
QFont-使用外部字体文件的问题
清理mac苹果电脑磁盘软件有哪些免费实用的?
Android 获取IP地址的Ping值 NetworkPingUtils
Go学习第四章——程序流程控制
海外代理IP是什么?如何使用?
- 原文地址:https://blog.csdn.net/helloworld1024fd/article/details/127627816
