-
Android数据存储
Android系统提供了四种数据存储方式:
1.SharedPreference:
一种常用的数据存储方式,其本质是基于**XML文件存储键值对数据,**通常用来存储一些简单的配置信息。
2.文件:
即常说的文件存储方法,常用于存储数据量比较大的数据,但缺点是更新数据困难。
3.SQLite:
一个轻量级数据库,支持基本SQL语法,是Android系统中常被采用的一种数据存储方式。
4.ContentProvider:
Android系统中能实现应用程序之间数据共享的一种存储方式。
一、SharedPreferences方式:
- 存放在xml文件中,通常用于存储软件的配置信息,类似于java中的properties。
- SharedPreferences类似于Map集合,将数据以键值对的形式保存至xml文件中,数据可以被同应用下所有Activity访问。
- 只能保存基本类型的值。
- 这些文件保存在文件系统的/data/data/your_app_package_name/shared_prefs/目录下。
1.SharedPreferences对象:读数据
SharedPreferences对象本身只能获取数据,不支持存储和修改。
/* SharedPreferences getSharedPreferences(String name, int mode) name:存储键值对(key-value)的文件名,不加后缀. 参数mode:指定文件操作模式,共有4种操作方式: Context.MODE_PRIVATE 或0 指定该SharedPreferences数据只能被本应用程序读写,写入的内容会覆盖原文件的内容 Context.MODE_APPEND 检查SharedPreferences文件是否存在,存在就往SharedPreferences文件追加内容,否则就创建新的文件 Context.MODE_WORLD_READABLE 指定该SharedPreferences文件数据只能被其它应用程序读,不能写 Context.MODE_WORLD_WRITEABLE 指定该SharedPreferences文件能被其它应用程序读写 */ SharedPreferences sharedPreferences = getSharedPreferences("text", Context.MODE_PRIVATE); //boolean contains(String key) 判断SharedPreferences是否包含特定名称为键(key)的数据 boolean f = sharedPreferences.contains("name"); //Map- 1
- 2
- 3
- 4
- 5
- 6
- 7
- 8
- 9
- 10
- 11
- 12
- 13
- 14
- 15
- 16
- 17
- 18
- 19
- 20
- 21
- 22
- 23
2.SharedPreferences.Editor对象:写数据
该对象用于完成SharedPreferences中数据的存储和修改。
/* SharedPreferences getSharedPreferences(String name, int mode) name:存储键值对(key-value)的文件名,不加后缀. 参数mode:指定文件操作模式,共有4种操作方式: Context.MODE_PRIVATE 指定该SharedPreferences数据只能被本应用程序读写,写入的内容会覆盖原文件的内容 Context.MODE_APPEND 检查SharedPreferences文件是否存在,存在就往SharedPreferences文件追加内容,否则就创建新的文件 Context.MODE_WORLD_READABLE 指定该SharedPreferences文件数据只能被其它应用程序读,不能写 Context.MODE_WORLD_WRITEABLE 指定该SharedPreferences文件能被其它应用程序读写 */ SharedPreferences sharedPreferences = getSharedPreferences("text", Context.MODE_PRIVATE); //Editor edit() 返回一个Editor对象用于操作SharedPreferences,返回值类型为Editor SharedPreferences.Editor edit = sharedPreferences.edit(); //clear() 清空SharedPreferences里所有的数据 edit.clear(); //Editor putXxx(String key,Xxx value) 向SharedPreferences存入指定的key对应的数据,其中Xxx与之前所述相同一样,表示不同的数据类型 edit.putInt("age",18); edit.putString("name","zhangsan"); //Editor remove(String key) 删除SharedPreferences里指定key对应的值 edit.remove("name"); //boolean commit() 当Editor编辑完成后,调用该方法可以提交修改,相当于数据库中的提交操作。无论对SharedPreferences对象进行了什么操作,最后都必须使用commit()方法进行保存,否则将无法存储修改信息。返回值类型为boolean,提交成功返回true,失败返回false。 boolean b = edit.commit();- 1
- 2
- 3
- 4
- 5
- 6
- 7
- 8
- 9
- 10
- 11
- 12
- 13
- 14
- 15
- 16
- 17
- 18
- 19
- 20
- 21
- 22
- 23
- 24
- 25
- 26
二、文件存储方式:
- Java提供了一套完整的IO流体系,用来对文件进行操作。具体内容:Java IO流详细
- 这些文件保存在/data/data//files/目录下。
1.FileInputStream对象:读数据
利用Context或者Activity中的 openFileInput() 方法与FileInputStream对象来读取设备上的文件。
try{ /* 参数 name为要打开的文件名,不能包含路径分隔符。 */ FileInputStream fis = openFileInput("text.txt"); }catch (Exception e){ }- 1
- 2
- 3
- 4
- 5
- 6
- 7
- 8
2.FileOutputStream对象:写数据
利用Context或者Activity中的openFileOutput()方法与FileOutputStream对象来创建或访问设备上的文件。
try{ /* 参数 name为要打开的文件名,不能包含路径分隔符。 参数mode为操作模式,有以下保存模式: Context.MODE_PRIVATE:为默认操作模式,代表该文件是私有数据,只能被应用本身访问,在该模式下写入的内容会覆盖原文件的内容。 Context.MODE_APPEND:检查文件是否存在,存在就往文件追加内容,否则就创建新文件。 Context.MODE_WORLD_READABLE:表示当前文件可以被其他应用读取。 Context.MODE_WORLD_WRITEABLE:表示当前文件可以被其他应用写入。 */ FileOutputStream fos = openFileOutput("text.txt", Context.MODE_PRIVATE); }catch (Exception e){ }- 1
- 2
- 3
- 4
- 5
- 6
- 7
- 8
- 9
- 10
- 11
- 12
- 13
3.其他常用方法:
//删除指定的文件,name为要删除的文件名,不能包含路径分隔符。 boolean deleteFile(String name) //在应用程序的数据文件下获取或创建name对应的子目录。 File getDir(String name, int mode) //得到该应用程序数据文件夹的绝对路径。 File getFilesDir() //得到该应用程序数据文件夹下的全部文件的文件名。 String[] fileList()- 1
- 2
- 3
- 4
- 5
- 6
- 7
- 8
4.SDCard读写:
我们使用FileInputStream和FileOutputStream进行文件操作时打开的都是app的数据文件夹中的文件,但如果想存储视频等大文件,我们可以存到SD卡中进行读写。存储在data/data/应用程序包名/files目录下。
(1)使用方法:
第一步:在AndroidManifest.xml中添加SD卡权限
<uses-permission android:name="android.permission.MOUNT_UNMOUNT_FILESYSTEMS"/> <uses-permission android:name="android.permission.WRITE_EXTERNAL_STORAGE"/> android:requestLegacyExternalStorage="true"- 1
- 2
- 3
第二步:读写前先判断SD卡是否插入,并且可以读写
Environment.getExternalStorageState() 获得Android外部存储器的当前状态,有以下保存模式: Environment.MEDIA_BAD_REMOVAL:在没有正确卸载SDCard之前就移除了。 Environment.MEDIA_CHECKING:正在磁盘检查。 Environment.MEDIA_MOUNTED:已经挂载并且拥有可读可写权限。常用、常用、常用、常用、常用 Environment.MEDIA_MOUNTED_READ_ONLY:已经挂载, 但只拥有可读权限。 Environment.MEDIA_NOFS:对象空白, 或者文件系统不支持。 Environment.MEDIA_REMOVED:已经移除扩展设备。 Environment.MEDIA_SHARED:如果SDCard未挂载, 同时通过USB大容量存储方式与其他设备共享。 Environment.MEDIA_UNMOUNTABLE:不可以挂载任何扩展设备。 Environment.MEDIA_UNMOUNTED:已经卸载。 Environment.getExternalStorageState().equals(Environment.MEDIA_MOUNTED)- 1
- 2
- 3
- 4
- 5
- 6
- 7
- 8
- 9
- 10
- 11
第三步:获取SD卡的外部目录,同时获取SD卡的路径
//getExternalStorageDirectory():获得Android外部存储器也就是SDCard的目录。 //getCanonicalPath():表示获取当前文件的绝对路径,会把 ..\ 或者.\ 这样的符号解析掉。 Environment.getExternalStorageDirectory().getCanonicalPath()+"/"+fileName- 1
- 2
- 3
第四步:使用FileOutputStream,FileInputStream或者FileReader或FileWriter读写SD卡中的文件。
//获得data文件夹的目录 Environment.getDataDirectory(); //获得AndroidDownload/Cache内容的目录 Environment.getDownloadCacheDirectory(); //获得SDcard的目录 Environment.getExternalStorageDirectory(); //获得Root文件夹的目录 Environment.getRootDirectory();- 1
- 2
- 3
- 4
- 5
- 6
- 7
- 8
三、SQLite:
- SQLite是一个轻量级的开源关系型数据库,运算速度快,占用资源少,且轻量级,不需要安装。
1.SQLiteOpenHelper:获得数据库实例、关闭数据库
- 抽象类,通过继承该类来重写数据库和表的创建及更新的方法。
- 通过该类的对象获得数据库实例、关闭数据库。
(1)使用方法:
第一步:自定义一个类继承SQLiteOpenHelper类。
第二步:重写构造方法,在该类的构造方法中设置好要创建的数据库名,版本号。
第三步:重写onCreate( )方法(数据库第一次被创建时调用的方法)创建表结构。
第四步:重写onUpgrade( )方法定义版本号发生改变后执行的操作。
package com.example.t.androidproject.myapplication5; import android.content.Context; import android.database.sqlite.SQLiteDatabase; import android.database.sqlite.SQLiteOpenHelper; import androidx.annotation.Nullable; /** * 1.当调用SQLiteOpenHelper的getWritableDatabase()或者getReadableDatabase()方法获取用于操作数据库的SQLiteDatabase实例的时候, * 如果数据库不存在,Android系统会自动生成一个数据库,接着调用onCreate()方法,onCreate()方法在初次生成数据库时才会被调用, * 在onCreate()方法里可以生成数据库表结构及添加一些应用使用到的初始化数据。 * onUpgrade()方法在数据库的版本发生变化时会被调用,数据库的版本是由程序员控制的,假设数据库现在的版本是1, * 由于业务的需要,修改了数据库表的结构,这时候就需要升级软件,升级软件时希望更新用户手机里的数据库表结构,为了实现这一目的,可以把原来的数据库版本设置为2, * 并且在onUpgrade()方法里面实现表结构的更新。当软件的版本升级次数比较多,这时在onUpgrade()方法里面可以根据原版号和目标版本号进行判断,然后作出相应的表结构及数据更新。 * (1).如果数据库文件不存在,SQLiteOpenHelper在自动创建数据库后只会调用onCreate方法,在该方法中一般需要创建数据库中的表、视图等组件。在创建之前,数据库是空的,因此,不需要先删除数据库中相关的组件。 * (2).如果数据库文件存在,并且当前的版本号不同于上次创建或升级时的版本号,SQLiteOpenHelper会调用onUpgrade方法, * 调用该方法后,会更新数据库版本号。在onUpgrade方法中除了创建表、视图等组件外,还需要首先删除这些相关的组件, * 因此,在调用onUpgrade方法之前,数据库是存在的,里面还有很多数据库组件。 */ public class TestSQLiteOpenHelper extends SQLiteOpenHelper { /* 构造方法 */ public TestSQLiteOpenHelper(@Nullable Context context) { /*调用父类的构造方法 参数: context:上下文对象 name:要创建的数据库的名称 factory:数据库游标工厂类,当查询(query)被提交时,该对象会被调用来实例化一个游标。一般用null代替。 version:数据库版本号,最小为1 */ super(context, "mydatabase", null, 1); } /* 当第一次创建数据库时回调的方法,可以完成创建数据库表结构及添加一些应用使用到的初始化数据等功能。 创建的数据库放在/data/data//database目录下。 */ @Override public void onCreate(SQLiteDatabase db) { //初始化数据库的表结构,执行一条建表的SQL语句 db.execSQL("create table person(id integer primary key autoincrement,name varchar(20),number varchar(20))"); } /* 当数据库版本更新时回调该方法。 */ @Override public void onUpgrade(SQLiteDatabase db, int oldVersion, int newVersion) { db.execSQL("alter table person add account varchar(20)"); } }- 1
- 2
- 3
- 4
- 5
- 6
- 7
- 8
- 9
- 10
- 11
- 12
- 13
- 14
- 15
- 16
- 17
- 18
- 19
- 20
- 21
- 22
- 23
- 24
- 25
- 26
- 27
- 28
- 29
- 30
- 31
- 32
- 33
- 34
- 35
- 36
- 37
- 38
- 39
- 40
- 41
- 42
- 43
- 44
- 45
- 46
- 47
- 48
- 49
- 50
- 51
- 52
(2)常用方法:
//以可读的方式打开数据库,获得一个SQLiteDatabase实例 Synchronized SQLiteDatabase getReadableDatabase(); //以可读写的方式打开数据库,获得一个SQLiteDatabase实例 Synchronized SQLiteDatabase getWritableDatabase(); //关闭所有打开的SQLiteDatabase。 Synchronized void close();- 1
- 2
- 3
- 4
- 5
- 6
2.SQLiteDatabase:数据库访问增删查改
- 数据库访问类,我们可以通过该类的对象来对数据库中的表进行增删查改的操作。
(1)使用方法:
第一步:获取SQLiteDatabase实例。
package com.example.t.androidproject.myapplication5; import androidx.appcompat.app.AppCompatActivity; import android.database.sqlite.SQLiteDatabase; import android.os.Bundle; public class TestActivity extends AppCompatActivity { @Override protected void onCreate(Bundle savedInstanceState) { super.onCreate(savedInstanceState); setContentView(R.layout.activity_test); /**方法一:通过SQLiteOpenHelper获取SQLiteDatabase实例 * 具体见SQLiteOpenHelper的讲解 */ TestSQLiteOpenHelper sqLiteOpenHelper = new TestSQLiteOpenHelper(this); SQLiteDatabase database = sqLiteOpenHelper.getReadableDatabase(); /**方法二:SQLiteDatabase的静态方法 * public static SQLiteDatabase openDatabase (String path, SQLiteDatabase.CursorFactory factory, int flags) * 打开path路径下所代表的数据库,返回值是数据库SQLiteDatabase对象。如果数据库不存在则抛出FileNotFoundException异常。 * 属性: * path:数据库文件路径 * factory:可选的数据库游标工厂类,当查询(query)被提交时,该对象会被调用来实例化一个游标。默认为null。 * flags:控制数据库的访问模式。主要有以下几种模式: * OPEN_READWRITE 以可读写方式打开数据库 * OPEN_READONLY 以只读方式打开数据库 * CREATE_IF_NECESSARY 检查数据库是否存在,若不存在,则创建数据库 * NO_LOCALIZED_COLLATORS 打开数据库时,不按照本地化语言对数据进行排序 */ SQLiteDatabase database1 = SQLiteDatabase .openDatabase("databases/myDataBase.db", null, SQLiteDatabase.OPEN_READWRITE); /**方法三:SQLiteDatabase的静态方法 * public static SQLiteDatabase openOrCreateDatabase (String path, SQLiteDatabase.CursorFactory factory) * 打开或创建path路径下所代表的SQLite数据库,返回值是SQLiteDatabase对象。 */ SQLiteDatabase database2 = SQLiteDatabase.openOrCreateDatabase("databases/myDataBase.db", null); /**方法四:SQLiteDatabase的静态方法 * public static SQLiteDatabase openOrCreateDatabase (File file, SQLiteDatabase.CursorFactory factory) * 打开或创建file文件所代表的SQLite数据库,返回值是SQLiteDatabase对象。 */ SQLiteDatabase database3 = SQLiteDatabase.openOrCreateDatabase("myDataBase.db", null); } }- 1
- 2
- 3
- 4
- 5
- 6
- 7
- 8
- 9
- 10
- 11
- 12
- 13
- 14
- 15
- 16
- 17
- 18
- 19
- 20
- 21
- 22
- 23
- 24
- 25
- 26
- 27
- 28
- 29
- 30
- 31
- 32
- 33
- 34
- 35
- 36
- 37
- 38
- 39
- 40
- 41
- 42
- 43
第二步:使用SQLiteDatabase对象对数据库进行增删查改。
package com.example.t.androidproject.myapplication5; import androidx.appcompat.app.AppCompatActivity; import android.content.ContentValues; import android.database.Cursor; import android.database.sqlite.SQLiteDatabase; import android.os.Bundle; public class TestActivity extends AppCompatActivity { @Override protected void onCreate(Bundle savedInstanceState) { super.onCreate(savedInstanceState); setContentView(R.layout.activity_test); /**通过SQLiteOpenHelper获取SQLiteDatabase实例 * 具体见SQLiteOpenHelper的讲解 */ TestSQLiteOpenHelper sqLiteOpenHelper = new TestSQLiteOpenHelper(this); SQLiteDatabase database = sqLiteOpenHelper.getReadableDatabase(); /** 创建数据库 * 使用SQLiteOpenHelper,具体见SQLiteOpenHelper */ ...... /** 删除数据库 * public static boolean deleteDatabase(File file) * 删除指定名称的数据库 * 参数: * File为要删除的数据库及路径 */ SQLiteDatabase.deleteDatabase(new File("MyDatabase.db")); /** * 建表 */ database.execSQL("CREATE TABLE person (id INTEGER PRIMARY KEY,age INTEGER,name VARCHAR(256))"); /** * 删除表 */ database.execSQL("DROP TABLE person"); /** 插入方式一 * long insert(String table,String nullColumnHack, ContentValues values) * 向表中插入数据,返回新插入行号。 * 属性: * table:想插入数据的表名 * nullColumnHack:强行插入null值的数据列的列名。 * values:代表一行记录的数据。ContentValues是存取数据的类。put(String key,XXX val)方法来进行插入值的设置,其中key为列名,val的值可以为SQLite支持的数据类型。 * 返回值:为新插入的行ID,-1时插入错误。 */ ContentValues row = new ContentValues(); row.put("id",001); row.put("name","zhangsan"); row.put("number",151693); long result = database.insert("person",null,row); /** 插入方式二 *public void execSQL(String sql, Object[] bindArgs) throws SQLException * 可以使用占位符的方式向插入语句中传值 */ database.execSQL("insert into person values(?,?,?)",new String[]{"001","zhangsan","151693"}); /** 更新方式一 * public int update(String table,ContentValues values,String whereClause,String[] whereArgs) * 更新表中指定的数据。该方法返回受此update语句影响的记录的条数。 * 参数: * table:想要更新数据的表名 * values:想要更新的数据 * whereClause:更新的条件,满足该where子句的记录将会被更新。如果为null,则所有行都将更新。 * whereArgs:为where子句传入的参数。 */ ContentValues row = new ContentValues(); row.put("id",001); row.put("name","zhangsan"); row.put("number",151693); database.update("person",row,"name=?",new String[]{"李四"}); /** 更新方式二 *public void execSQL(String sql, Object[] bindArgs) throws SQLException * 可以使用占位符的方式向插入语句中传值 */ database.execSQL("update person set name=? where id=?",new String[]{"李四","001"}); /** 删除方式一 * int delete(String table,String whereClause,String[] whereArgs) * 删除表中指定的数据。返回值为删除的行数,0时代表失败。 * 参数: * table:要对其进行删除操作的表名 * whereClause:删除条件 * whereArgs:删除条件参数数组 */ database.delete("person","name=?",new String[]{"张三"}); /** 删除方式二 *public void execSQL(String sql, Object[] bindArgs) throws SQLException * 可以使用占位符的方式向插入语句中传值 */ database.execSQL("delete from person where name=?",new String[]{"张三"}); /** 查询方式一 * public Cursor query(String table,String[] columns,String selection,String[] selectionArgs,String groupBy,String having,String orderBy,String limit):对数据表根据一定的条件查询数据,返回值为cursor对象。 * 参数: * table:表名。相当于from关键字后面的部分。 * columns:要查询出来的列名。相当于select关键字后面的部分。 * selection:查询条件子句,相当于where关键字后面的部分,在条件子句允许使用占位符“?” * selectionArgs:对应于selection语句中占位符的值,值在数组中的位置与占位符在语句中的位置必须一致,否则就会有异常。 * groupBy:相当于group by关键字后面的部分,若为null则不分组 * having:相当于having关键字后面的部分,若为null则返回全部 * orderBy:相当于order by关键字后面部分,为null则默认排序方式; * limit:限制返回的记录的条数,为null则不限制。 */ Cursor cursor = database.query("person", new String[]{id,name,age}, "name like ?", new String[]{"张%"}, null, null, "id desc", null); /** 查询方式二 * public Cursor rawQuery (String sql, String[] selectionArgs) * 执行带占位符的SQL查询。 * 参数: * sql:select语句 * selectionArgs:select语句中占位符参数的值,如果select语句没有使用占位符,该参数可以设置为null。 * 注意:这种方式查询必须有一列的名字为_id,可以在select时用as _id */ Cursor cursor = database.rawQuery("select * from person where name like ? and age=?", new String[]{"张%", "20"}); } }- 1
- 2
- 3
- 4
- 5
- 6
- 7
- 8
- 9
- 10
- 11
- 12
- 13
- 14
- 15
- 16
- 17
- 18
- 19
- 20
- 21
- 22
- 23
- 24
- 25
- 26
- 27
- 28
- 29
- 30
- 31
- 32
- 33
- 34
- 35
- 36
- 37
- 38
- 39
- 40
- 41
- 42
- 43
- 44
- 45
- 46
- 47
- 48
- 49
- 50
- 51
- 52
- 53
- 54
- 55
- 56
- 57
- 58
- 59
- 60
- 61
- 62
- 63
- 64
- 65
- 66
- 67
- 68
- 69
- 70
- 71
- 72
- 73
- 74
- 75
- 76
- 77
- 78
- 79
- 80
- 81
- 82
- 83
- 84
- 85
- 86
- 87
- 88
- 89
- 90
- 91
- 92
- 93
- 94
- 95
- 96
- 97
- 98
- 99
- 100
- 101
- 102
- 103
- 104
- 105
- 106
- 107
- 108
- 109
- 110
- 111
- 112
- 113
- 114
- 115
- 116
- 117
- 118
- 119
- 120
- 121
- 122
- 123
- 124
- 125
- 126
- 127
- 128
- 129
- 130
- 131
- 132
- 133
第三步:关闭cursor和SQLiteDatabase:
cursor.close(); /* 使用完SQLiteDatabase对象后一定要关闭, 否则数据库连接会一直存在,会不断消耗内存, 并且报出数据库未关闭异常,当系统内存不足时将获取不到SQLiteDatabase对象。 */ database.close();- 1
- 2
- 3
- 4
- 5
- 6
- 7
3.Cursor:结果集
- 游标,存储查询的结果集,类似JDBC中的ResultSet。
(1)常用方法:
boolean moveToNext()方法可以将游标从当前行移动到下一行,如果已经移过了结果集的最后一行,返回结果为false,否则为true。 boolean moveToPrevious()方法:用于将游标从当前行移动到上一行,如果已经移过了结果集的第一行,返回值为false,否则为true boolean moveToFirst()方法:用于将游标移动到结果集的第一行,如果结果集为空,返回值为false,否则为true boolean moveToLast()方法:用于将游标移动到结果集的最后一行,如果结果集为空,返回值为false,否则为true 。 boolean moveToPosition(int position):将记录指针移动到指定的行,如果移动成功则返回true。 boolean move(int offset):将记录指针向上或向下移动指定的行数。Offset为正数就是向下移动,为负数就是向上移动。 int getInt(int columnIndex):获取指定索引列的整型值 String getString(int columnIndex):获取指定索引列的字符串- 1
- 2
- 3
- 4
- 5
- 6
- 7
- 8
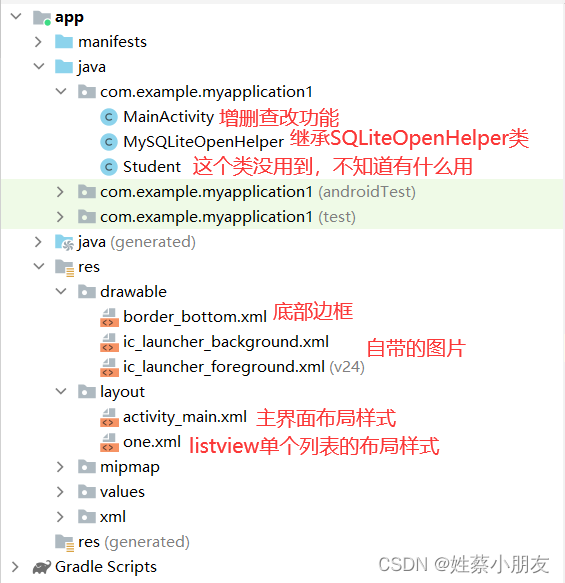
四、SQLite案例:
1.效果:增删查改功能

2.项目结构:
3.border_bottom.xml:
<shape xmlns:android="http://schemas.android.com/apk/res/android"> <solid android:color="@color/black"/> shape>- 1
- 2
- 3
- 4
4.one.xml:
<LinearLayout xmlns:android="http://schemas.android.com/apk/res/android" android:layout_width="match_parent" android:layout_height="match_parent" android:orientation="horizontal" android:id="@+id/one"> <TextView android:id="@+id/oneid" android:layout_width="0dp" android:layout_height="wrap_content" android:layout_weight="1"/> <TextView android:id="@+id/onename" android:layout_width="0dp" android:layout_height="wrap_content" android:layout_weight="1"/> <TextView android:id="@+id/onesex" android:layout_width="0dp" android:layout_height="wrap_content" android:layout_weight="1"/> <TextView android:id="@+id/oneage" android:layout_width="0dp" android:layout_height="wrap_content" android:layout_weight="1"/> LinearLayout>- 1
- 2
- 3
- 4
- 5
- 6
- 7
- 8
- 9
- 10
- 11
- 12
- 13
- 14
- 15
- 16
- 17
- 18
- 19
- 20
- 21
- 22
- 23
- 24
- 25
- 26
- 27
5.activity_main.xml:
<LinearLayout xmlns:android="http://schemas.android.com/apk/res/android" android:layout_width="match_parent" android:layout_height="match_parent" android:orientation="vertical"> <LinearLayout android:layout_width="match_parent" android:layout_height="wrap_content" android:orientation="horizontal"> <TextView android:layout_width="wrap_content" android:layout_height="match_parent" android:text="学号:" android:textSize="20sp" android:gravity="center"/> <EditText android:id="@+id/stuId" android:layout_width="0dp" android:layout_height="match_parent" android:layout_weight="1" android:drawableBottom="@drawable/border_bottom"/> LinearLayout> <LinearLayout android:layout_width="match_parent" android:layout_height="wrap_content" android:orientation="horizontal"> <TextView android:layout_width="wrap_content" android:layout_height="match_parent" android:text="姓名:" android:textSize="20sp" android:gravity="center"/> <EditText android:id="@+id/stuName" android:layout_width="0dp" android:layout_height="match_parent" android:layout_weight="1" android:drawableBottom="@drawable/border_bottom"/> LinearLayout> <LinearLayout android:layout_width="match_parent" android:layout_height="wrap_content" android:orientation="horizontal"> <TextView android:layout_width="wrap_content" android:layout_height="match_parent" android:text="性别:" android:textSize="20sp" android:gravity="center"/> <EditText android:id="@+id/stuSex" android:layout_width="0dp" android:layout_height="match_parent" android:layout_weight="1" android:drawableBottom="@drawable/border_bottom"/> LinearLayout> <LinearLayout android:layout_width="match_parent" android:layout_height="wrap_content" android:orientation="horizontal"> <TextView android:layout_width="wrap_content" android:layout_height="match_parent" android:text="年龄:" android:textSize="20sp" android:gravity="center"/> <EditText android:id="@+id/stuAge" android:layout_width="0dp" android:layout_height="match_parent" android:layout_weight="1" android:drawableBottom="@drawable/border_bottom"/> LinearLayout> <LinearLayout android:layout_width="match_parent" android:layout_height="wrap_content" android:orientation="horizontal"> <Button android:id="@+id/addbtn" android:layout_width="wrap_content" android:layout_height="match_parent" android:text="添加"/> <Button android:id="@+id/deletebtn" android:layout_width="wrap_content" android:layout_height="match_parent" android:text="删除"/> <Button android:id="@+id/updatebtn" android:layout_width="wrap_content" android:layout_height="match_parent" android:text="修改"/> <Button android:id="@+id/selectbtn" android:layout_width="wrap_content" android:layout_height="match_parent" android:text="查询"/> LinearLayout> <LinearLayout android:layout_width="match_parent" android:layout_height="wrap_content" android:orientation="horizontal" > <TextView android:layout_width="0dp" android:layout_height="wrap_content" android:layout_weight="1" android:text="学号"/> <TextView android:layout_width="0dp" android:layout_height="wrap_content" android:layout_weight="1" android:text="姓名"/> <TextView android:layout_width="0dp" android:layout_height="wrap_content" android:layout_weight="1" android:text="性别"/> <TextView android:layout_width="0dp" android:layout_height="wrap_content" android:layout_weight="1" android:text="年龄"/> LinearLayout> <ListView android:id="@+id/listview" android:layout_width="match_parent" android:layout_height="wrap_content"> ListView> LinearLayout>- 1
- 2
- 3
- 4
- 5
- 6
- 7
- 8
- 9
- 10
- 11
- 12
- 13
- 14
- 15
- 16
- 17
- 18
- 19
- 20
- 21
- 22
- 23
- 24
- 25
- 26
- 27
- 28
- 29
- 30
- 31
- 32
- 33
- 34
- 35
- 36
- 37
- 38
- 39
- 40
- 41
- 42
- 43
- 44
- 45
- 46
- 47
- 48
- 49
- 50
- 51
- 52
- 53
- 54
- 55
- 56
- 57
- 58
- 59
- 60
- 61
- 62
- 63
- 64
- 65
- 66
- 67
- 68
- 69
- 70
- 71
- 72
- 73
- 74
- 75
- 76
- 77
- 78
- 79
- 80
- 81
- 82
- 83
- 84
- 85
- 86
- 87
- 88
- 89
- 90
- 91
- 92
- 93
- 94
- 95
- 96
- 97
- 98
- 99
- 100
- 101
- 102
- 103
- 104
- 105
- 106
- 107
- 108
- 109
- 110
- 111
- 112
- 113
- 114
- 115
- 116
- 117
- 118
- 119
- 120
- 121
- 122
- 123
- 124
- 125
- 126
- 127
- 128
- 129
- 130
- 131
6.MySQLiteOpenHelper.java:
package com.example.myapplication1; import android.content.Context; import android.database.sqlite.SQLiteDatabase; import android.database.sqlite.SQLiteOpenHelper; import androidx.annotation.Nullable; public class MySQLiteOpenHelper extends SQLiteOpenHelper { public MySQLiteOpenHelper(@Nullable Context context) { super(context, "mydatabase", null, 1); } @Override public void onCreate(SQLiteDatabase sqLiteDatabase) { sqLiteDatabase.execSQL("create table student(stuId varchar(20) primary key ,stuName varchar(20) ,stuSex varchar(20) ,stuAge varchar(20))"); } @Override public void onUpgrade(SQLiteDatabase sqLiteDatabase, int i, int i1) { } }- 1
- 2
- 3
- 4
- 5
- 6
- 7
- 8
- 9
- 10
- 11
- 12
- 13
- 14
- 15
- 16
- 17
- 18
- 19
- 20
- 21
- 22
- 23
7.MainActivity.java:
package com.example.myapplication1; import androidx.appcompat.app.AppCompatActivity; import android.database.Cursor; import android.database.sqlite.SQLiteDatabase; import android.os.Bundle; import android.util.Log; import android.view.View; import android.widget.AdapterView; import android.widget.Button; import android.widget.EditText; import android.widget.ListView; import android.widget.SimpleCursorAdapter; import android.widget.TextView; public class MainActivity extends AppCompatActivity { @Override protected void onCreate(Bundle savedInstanceState) { super.onCreate(savedInstanceState); setContentView(R.layout.activity_main); MySQLiteOpenHelper openHelper = new MySQLiteOpenHelper(this); SQLiteDatabase database = openHelper.getWritableDatabase(); EditText stuId = findViewById(R.id.stuId); EditText stuName = findViewById(R.id.stuName); EditText stuSex = findViewById(R.id.stuSex); EditText stuAge = findViewById(R.id.stuAge); ListView listview = findViewById(R.id.listview); Button addBtn = findViewById(R.id.addbtn); Button deleteBtn = findViewById(R.id.deletebtn); Button selectBtn = findViewById(R.id.selectbtn); Button updateBtn = findViewById(R.id.updatebtn); //添加数据 addBtn.setOnClickListener(new View.OnClickListener() { @Override public void onClick(View view) { database.execSQL("insert into student values(?,?,?,?)",new String[]{stuId.getText().toString(),stuName.getText().toString(),stuSex.getText().toString(),stuAge.getText().toString()}); //将输入框数据置空 stuId.setText(""); stuName.setText(""); stuSex.setText(""); stuAge.setText(""); //唤醒查询点击事件 selectBtn.callOnClick(); } }); //查询数据 selectBtn.setOnClickListener(new View.OnClickListener() { @Override public void onClick(View view) { Cursor cursor = database.rawQuery("select stuId as _id,stuName,stuSex,stuAge from student", null); SimpleCursorAdapter cursorAdapter = new SimpleCursorAdapter(MainActivity.this,R.layout.one,cursor,new String[]{cursor.getColumnName(0),cursor.getColumnName(1),cursor.getColumnName(2),cursor.getColumnName(3)},new int[]{R.id.oneid,R.id.onename,R.id.onesex,R.id.oneage}); listview.setAdapter(cursorAdapter); } }); //点击某一列表项触发该事件,将列表信息填入输入框 listview.setOnItemClickListener(new AdapterView.OnItemClickListener() { @Override public void onItemClick(AdapterView<?> adapterView, View view, int i, long l) { TextView id = view.findViewById(R.id.oneid); TextView name = view.findViewById(R.id.onename); TextView age = view.findViewById(R.id.oneage); TextView sex = view.findViewById(R.id.onesex); //获取数据 stuId.setText(id.getText()); stuName.setText(name.getText()); stuSex.setText(age.getText()); stuAge.setText(sex.getText()); } }); //删除数据 deleteBtn.setOnClickListener(new View.OnClickListener() { @Override public void onClick(View view) { database.execSQL("delete from student where stuId=?",new String[]{stuId.getText().toString()}); //清空输入框数据 stuId.setText(""); stuName.setText(""); stuSex.setText(""); stuAge.setText(""); //唤醒查询点击事件 selectBtn.callOnClick(); } }); //修改数据 updateBtn.setOnClickListener(new View.OnClickListener() { @Override public void onClick(View view) { database.execSQL("update student set stuName=?,stuSex=?,stuAge=? where stuId=?",new String[]{stuName.getText().toString(),stuSex.getText().toString(),stuAge.getText().toString(),stuId.getText().toString()}); //将输入框数据置空 stuId.setText(""); stuName.setText(""); stuSex.setText(""); stuAge.setText(""); //唤醒查询点击事件 selectBtn.callOnClick(); } }); } }- 1
- 2
- 3
- 4
- 5
- 6
- 7
- 8
- 9
- 10
- 11
- 12
- 13
- 14
- 15
- 16
- 17
- 18
- 19
- 20
- 21
- 22
- 23
- 24
- 25
- 26
- 27
- 28
- 29
- 30
- 31
- 32
- 33
- 34
- 35
- 36
- 37
- 38
- 39
- 40
- 41
- 42
- 43
- 44
- 45
- 46
- 47
- 48
- 49
- 50
- 51
- 52
- 53
- 54
- 55
- 56
- 57
- 58
- 59
- 60
- 61
- 62
- 63
- 64
- 65
- 66
- 67
- 68
- 69
- 70
- 71
- 72
- 73
- 74
- 75
- 76
- 77
- 78
- 79
- 80
- 81
- 82
- 83
- 84
- 85
- 86
- 87
- 88
- 89
- 90
- 91
- 92
- 93
- 94
- 95
- 96
- 97
- 98
- 99
- 100
- 101
-
相关阅读:
怎么文字转语音?两分钟让你学会三种方法
springboot基于JAVA的电影推荐系统的开发与实现毕业设计源码112306
深入ftrace function原理
github access token
基于JMH做Benchmark基准测试
4、【WebGIS实战】软件操作篇——数据导入及处理
数据结构——图结构
Redis热key如何发现和解决
辽宁工程技术大学计算机考研资料汇总
react-router-dom6学习11-如何使用路由监听上
- 原文地址:https://blog.csdn.net/m0_53881899/article/details/127609959