-
Numpy基础教程
Numpy
功能十分强大的python扩展库,数学库,主要用于数组计算。1 Numpy 对象
- N 维数组对象 ndarray,它是一系列同类型数据的集合,以 0 下标为开始进行集合中元素的索引
- ndarray 中的每个元素在内存中都有相同存储大小的区域
- ndarray 内部由以下内容组成:
- 一个指向数据(内存或内存映射文件中的一块数据)的指针
- 数据类型或 dtype,描述在数组中的固定大小值的格子
- 一个表示数组形状(shape)的元组,表示各维度大小的元组
- 一个跨度元组(stride),其中的整数指的是为了前进到当前维度下一个元素需要"跨过"的字节数
2 Numpy创建
numpy.array 构造器来创建
# order:创建数组的样式,C为行方向,F为列方向,A为任意方向 # numpy.array(object,dtype = None, copy =True, order = None, subok = False, ndmin = 0)- 1
- 2
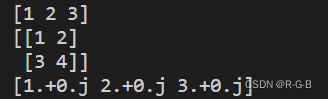
a = np.array([1,2,3]) b = np.array([[1,2],[3,4]]) # 二维数组,外面必须有一层方括号 c = np.array([1,2,3],dtype = complex) #复数 print(a) print(b) print(c)- 1
- 2
- 3
- 4
- 5
- 6
- 7
numpy.empty
numpy.empty方法用来创建一个指定形状(shape)、数据类型(dtype)且未初始化的数组
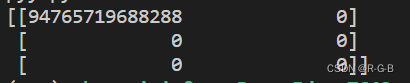
#order - "C"和"F"两个选项,分别代表,行优先和列优先,在计算机内存中的存储元素的顺序。 # numpy.empty(shape,dtype = float, order = 'C') x = np.empty([3,2],dtype = int) #创建一个3行2列,未初始化的数组 print(x)- 1
- 2
- 3
- 4
numpy.zeros
numpy.zeros创建指定大小的数组,数组元素以 0 来填充
#numpy.zeros(shape, dtype = float, order = 'C') y = np.zeros([2,5],dtype = int) #[2,5]圆括号、方括号 好像都行 print(y)- 1
- 2
- 3

numpy.ones
numpy.ones创建指定形状的数组,数组元素以 1 来填充
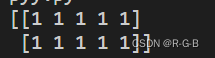
#numpy.ones(shape, dtype = None, order = 'C') y = np.ones((2,5),dtype = int) #[2,5]圆括号、方括号 好像都行 print(y)- 1
- 2
- 3
numpy.arange
numpy.arange创建数值范围并返回 ndarray 对象
# start,stop指定范围,step设定步长,dtype数据类型生成ndarry # numpy.arange(start,stop,step,dtype) x = np.arange (10,20,2) # 10~20步长2,不包含20 y = np.arange(5) # 到5结束,默认0开始,步长1 print(x) print(y)- 1
- 2
- 3
- 4
- 5
- 6

Numpy索引
- 通过冒号分隔切片参数 start:stop:step 来进行切片操作。
- 切片还可以包括省略号 …,来使选择元组的长度与数组的维度相同。 如果在行位置使用省略号,它将返回包含行中元素的 ndarray。
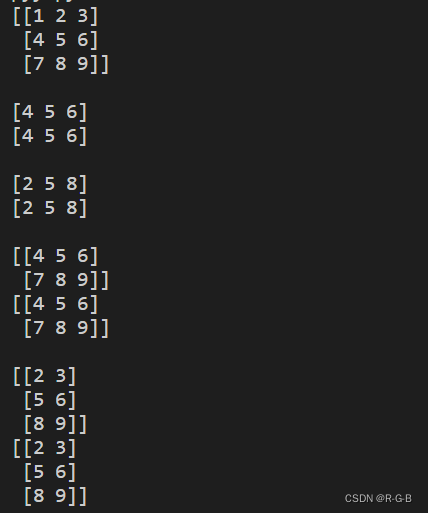
a = np.array([[1,2,3],[4,5,6],[7,8,9]]) print(a,'\n') print(a[1,:]) #第2行元素 print(a[1,...],'\n') print(a[:,1]) # 第2列元素 print(a[...,1],'\n') print(a[1:,:]) # 第2行及剩下的所有元素 print(a[1:,...],'\n') print(a[:,1:]) # 第2列及剩下的所有元素 print(a[...,1:],'\n')- 1
- 2
- 3
- 4
- 5
- 6
- 7
- 8
- 9
- 10
- 11
- 12
- 13
- 14
3 Numpy常用操作
numpy.reshape
numpy.reshape 函数可以在不改变数据的条件下修改形状
numpy.reshape(arr,newshape,order = ‘C’)
a = np.arange(8) print('a:\n',a) b = a.reshape(4,2) print("b:\n",b)- 1
- 2
- 3
- 4
- 5

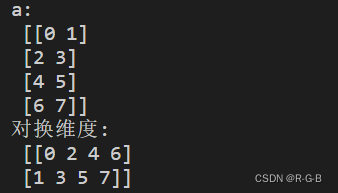
numpy.transpose
numpy.transpose 函数用于对换数组的维度,numpy.ndarray.T 类似 numpy.transpose
# numpy.transpose(arr,axes) a = np.arange(8).reshape(4,2) print("a:\n",a) print("对换维度:\n",np.transpose(a))- 1
- 2
- 3
- 4
- 5
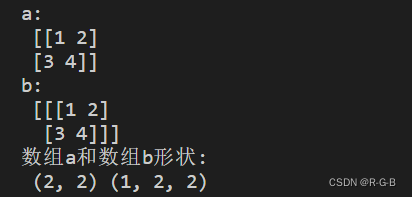
numpy.expand_dims
numpy.expand_dims 函数通过在指定位置插入新的轴来扩展数组形状
# numpy.expand_dims(arr,axis) a = np.array([[1,2],[3,4]]) print("a:\n",a) b = np.expand_dims(a,axis = 0) print("b:\n",b) print("数组a和数组b形状:\n",a.shape, b.shape)- 1
- 2
- 3
- 4
- 5
- 6
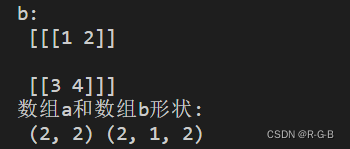
b = np.expand_dims(a,axis = 1) print("b:\n",b) print("数组a和数组b形状:\n",a.shape, b.shape)- 1
- 2
- 3
b = np.expand_dims(a,axis = 2) print("b:\n",b) print("数组a和数组b形状:\n",a.shape, b.shape)- 1
- 2
- 3

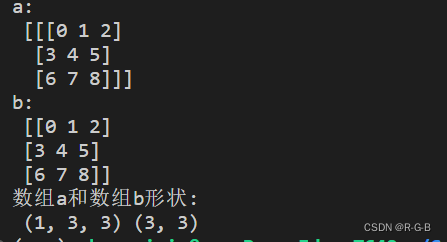
numpy.squeeze
numpy.squeeze 函数从给定数组的形状中删除一维的条目
# numpy.squeeze(arr,axis) a = np.arange(9).reshape(1,3,3) print("a:\n",a) b = np.squeeze(a)#去掉第一个维度 print("b:\n",b) print("数组a和数组b形状:\n",a.shape, b.shape)- 1
- 2
- 3
- 4
- 5
- 6
 ## numpy.concatenate
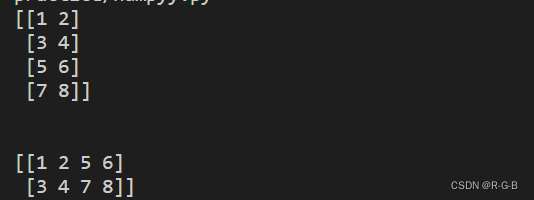
numpy.concatenate 函数用于沿指定轴连接相同形状的两个或多个数组# numpy.concatenate((a1,a2,...),axis) a = np.array([[1,2],[3,4]]) b = np.array([[5,6],[7,8]]) print(np.concatenate((a,b),axis = 0)) # 按行拼接 print('\n') print(np.concatenate((a,b),axis = 1)) # 按列拼接- 1
- 2
- 3
- 4
- 5
- 6
-
相关阅读:
在C#中使用Halcon开发视觉检测程序
当 mysql-connector-java-5 遇上 MySQL8,终究还是错付了 → 门当户对真的很重要!
41. 缺失的第一个正数
振弦采集模块主动上传测量数据( UART)
内存管理
前端食堂技术周刊第 99 期:Remix 2.0、v0、2023 组件库盘点、TS Config 备忘录、Hello 算法
ElasticSearch的文档、字段、映射和高级查询
Java面试题,面试题,CAS,CAS原理
七月论文审稿GPT第2版:从Meta Nougat、GPT4审稿到Mistral、LongLora
Elastic:推出 7.16.2 和 6.8.22 版本的 Elasticsearch 和 Logstash 以升级 Apache Log4j2
- 原文地址:https://blog.csdn.net/m0_51233386/article/details/127552284