-
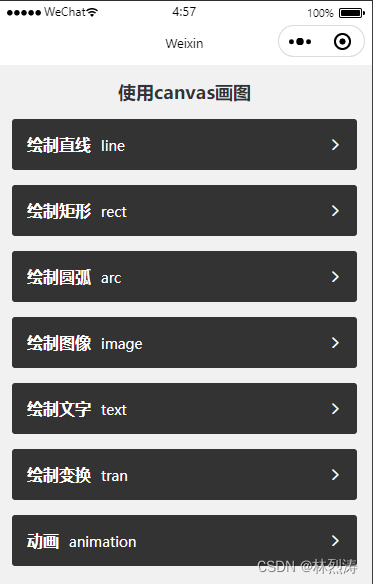
微信小程序canvas2d使用封装与案例使用

微信小程序canvas2d使用封装与案例使用,看一下这边封装效果
canvas2d文档:https://www.canvasapi.cn/
下载地址:https://download.csdn.net/download/Linlietao0587/86828749获取context方法
<canvas type="2d" id="myCanvas1" style="width: 750rpx;height: 200px;"></canvas>- 1
封装好的获取函数
// 获取canvas实例和ctx画笔 getMyCanvasAndCtx(id) { //id canvas 2d的id return new Promise(resolve => { const query = wx.createSelectorQuery() query.select(`#${id}`).fields({ node: true, size: true }).exec((res) => { const canvas = res[0].node; const ctx = canvas.getContext('2d'); const dpr = wx.getSystemInfoSync().pixelRatio; canvas.width = res[0].width * dpr; canvas.height = res[0].height * dpr; ctx.scale(dpr, dpr); var data = { canvas: canvas, ctx: ctx } resolve(data) }) }) },- 1
- 2
- 3
- 4
- 5
- 6
- 7
- 8
- 9
- 10
- 11
- 12
- 13
- 14
- 15
- 16
- 17
- 18
- 19
- 20
- 21
- 22
- 23
一、绘制直线

已经封装好方法

看其中一个已经封装好的函数//绘制横线(水平) drawHLine(res, x, y, lineLong, lineWidth, lineColor) { //res 包含canvas与ctx //x,y 横坐标与纵坐标 //lineLong 线长 //lineWidth 线宽 //lineColor 颜色 return new Promise(resolve => { let ctx = res.ctx; ctx.save(); //保存绘图上下文 ctx.beginPath(); //开始绘制 ctx.lineWidth = lineWidth; //线的宽度 ctx.strokeStyle = lineColor; //线的颜色 ctx.moveTo(x, y); // 将坐标移至直线起点 ctx.lineTo(x + lineLong, y); // 绘制直线 ctx.stroke(); // 通过线条绘制轮廓(边框) ctx.restore(); resolve(); }) },- 1
- 2
- 3
- 4
- 5
- 6
- 7
- 8
- 9
- 10
- 11
- 12
- 13
- 14
- 15
- 16
- 17
- 18
- 19
- 20
使用到方法
方法 解释 ctx.moveTo(x,y) 起始点 ctx.lineTo(x,y) 与末端点连成直线 ctx.stroke() 描边 使用到属性
属性 说明 ctx.lineWidth=value 线宽 ctx.strokeStyle=value 描边样式 
看一下其它效果


二、绘制矩形

canvas.getMyCanvasAndCtx('myCanvas1').then(res => { let ctx = res.ctx; //描边矩形--空心 ctx.lineWidth=5; //lineWidth 线条边线线宽 ctx.strokeStyle='orange';//strokeStyle 线条样式,默认是black ctx.strokeRect(10, 20, 100, 100); //填充矩形--实心 ctx.fillStyle='orange'; //fillStyle 填充样式,默认是black ctx.fillRect(130, 20, 100, 100); //阴影 ctx.shadowColor = 'blue'; //阴影_颜色 ctx.shadowBlur = 10;//阴影_模糊程度 ctx.shadowOffsetX=40;//阴影_水平偏移 ctx.shadowOffsetY=40;//阴影_垂直偏移 ctx.strokeRect(250,20,100,100) ctx.clearRect(250,20,100,100) //清空矩形 })- 1
- 2
- 3
- 4
- 5
- 6
- 7
- 8
- 9
- 10
- 11
- 12
- 13
- 14
- 15
- 16
- 17
- 18
- 19
三、绘制圆弧

canvas.getMyCanvasAndCtx('myCanvas1').then(res => { let ctx = res.ctx; ctx.beginPath(); //arc(x, y, radius, startAngle, endAngle [, anticlockwise]); //arc(圆心x坐标,圆心y坐标,半径,起始角度,结束角度,是否按逆时针方向绘制) ctx.arc(80,80,50,0,Math.PI*2,false) ctx.stroke(); ctx.beginPath(); ctx.moveTo(250,80) ctx.arc(250,80,50,Math.PI*1/3,Math.PI*1,true) ctx.closePath(); ctx.stroke(); })- 1
- 2
- 3
- 4
- 5
- 6
- 7
- 8
- 9
- 10
- 11
- 12
- 13
- 14
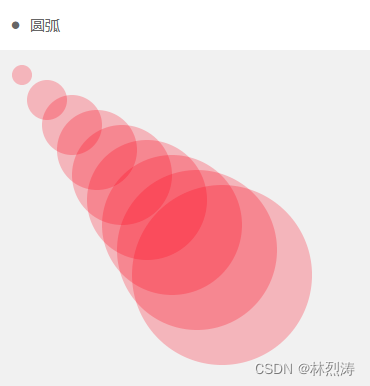
canvas.getMyCanvasAndCtx('myCanvas2').then(res => { let ctx = res.ctx; for (var i = 0; i < 10; i++) { ctx.beginPath(); ctx.arc(i * 25, i * 25, i * 10, 0, Math.PI * 2, true); ctx.fillStyle = "rgba(255,0,0,0.25)"; ctx.fill(); //填充刚才所画的圆形 } })- 1
- 2
- 3
- 4
- 5
- 6
- 7
- 8
- 9
四、绘制文字
封好的函数


使用方法

五、绘制变化

canvas.getMyCanvasAndCtx('myCanvas1').then(res => { let ctx = res.ctx; ctx.save(); //保存了当前context的状态 ctx.fillStyle = "gray"; ctx.fillRect(0, 0, res.canvas.width, res.canvas.height); //大矩形 ctx.fillStyle = "orange"; //页面填充颜色 ctx.fillRect(10, 10, 350, 330); //大矩形 ctx.fillStyle = "black"; //rgba(255,0,0,0.1) ctx.fillRect(20, 20, 100, 100); //正方形 //平移1 缩放2 旋转3 ctx.translate(170, 20); //坐标原点平移(100, 100) ctx.scale(0.5, 0.5); //x,y轴是原来一半 ctx.rotate(Math.PI / 4); //旋转45度 ctx.fillStyle = 'green' ctx.fillRect(0, 0, 100, 100); //平移 缩放 旋转后的正方形 ctx.restore(); //恢复之前保存的绘图状态 ctx.beginPath(); //开始绘图路径 ctx.arc(280, 60, 50, 0, 2 * Math.PI, false); //绘制圆 ctx.stroke(); ctx.fill(); canvas.drawWaterMark(res, 'Hello 你好', 15, 'white', 0.5).then(()=>{ this.data['myCanvas1']=res.canvas; })- 1
- 2
- 3
- 4
- 5
- 6
- 7
- 8
- 9
- 10
- 11
- 12
- 13
- 14
- 15
- 16
- 17
- 18
- 19
- 20
- 21
- 22
- 23
- 24
- 25
- 26
- 27
这个也有封装好水印,可以直接调用

还有图层混合模式canvas.getMyCanvasAndCtx('myCanvas2').then(res => { let ctx = res.ctx; canvas.drawImage(res, '/img/1.jpg', 0, 0, 500, 333).then(() => { //source-* (over、in、out、atop) //destination-*(over、in、out、atop) //lighter 线性减淡(添加) //copy 显示最新 xor 重叠透明 multiply 正片叠底 //screen 滤色 overlay 叠加 darken 变暗 lighten 变亮 //color-dodge 颜色减淡 color-burn 颜色加深 //hard-light 强光 soft-light 柔光 difference 差异 //exclusion 排除 hue 色调 saturation饱和度 //color 色值 luminosity亮度 ctx.globalCompositeOperation = 'lighter'; canvas.drawImage(res, '/img/bright.jpg', 0, 0, 500, 333) this.data['myCanvas2']=res.canvas; }) })- 1
- 2
- 3
- 4
- 5
- 6
- 7
- 8
- 9
- 10
- 11
- 12
- 13
- 14
- 15
- 16
- 17
- 18
六、动画
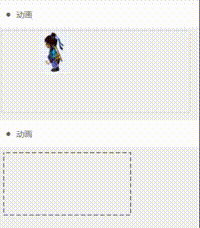

const canvas = require('../../utils/canvas.js') var x = 400; var n = 0; // 计数器 var offset = 0; Page({ data: {}, draw1() { canvas.getMyCanvasAndCtx('myCanvas1').then(res => { const img = res.canvas.createImage(); img.src = '/img/people.jpg'; img.onload = () => { //从原图(60*n)位置开始截取中间一块宽60*高80的区域,显示在屏幕(x,0)处 res.ctx.drawImage(img, 60 * n, 0, 60, 80, x, 0, 60, 80); }; if (n >= 8) { n = 0; } else { n++; } if (x >= 0) { x = x - 30; //前移30像素 } else { x = 400; //回到右侧 } }) }, draw2() { canvas.getMyCanvasAndCtx('myCanvas2').then(res => { let canvas = res.ctx; let ctx = res.ctx; ctx.clearRect(0, 0, canvas.width, canvas.height); ctx.setLineDash([8, 4]);//虚线样式(实线和透明部分长度) offset += 0.5; if (offset > 24) { offset = 0; } ctx.lineDashOffset = offset;//虚线绘制的偏移距离 ctx.strokeRect(10, 10, 236, 116); }) }, onLoad(options) { this.setData({ interval1: setInterval(this.draw1, 100), // 定时器,每0.1秒执行一次draw()函数 interval2: setInterval(this.draw2, 10), // 定时器,每0.1秒执行一次draw()函数 }) }, onHide() { console.log('onHide') clearInterval(this.data.interval1); clearInterval(this.data.interval2); }, onUnload() { console.log('onunload') clearInterval(this.data.interval1); clearInterval(this.data.interval2); } })- 1
- 2
- 3
- 4
- 5
- 6
- 7
- 8
- 9
- 10
- 11
- 12
- 13
- 14
- 15
- 16
- 17
- 18
- 19
- 20
- 21
- 22
- 23
- 24
- 25
- 26
- 27
- 28
- 29
- 30
- 31
- 32
- 33
- 34
- 35
- 36
- 37
- 38
- 39
- 40
- 41
- 42
- 43
- 44
- 45
- 46
- 47
- 48
- 49
- 50
- 51
- 52
- 53
- 54
- 55
- 56
- 57
- 58
- 59
- 60
- 61
- 62
下载地址:https://download.csdn.net/download/Linlietao0587/86828749
-
相关阅读:
猿创征文|docker本地私人仓库快速搭建后的安全优化(用户鉴权和简易的web界面开启)
计算机毕业设计SSM成绩管理与学情分析系统【附源码数据库】
电机控制算法
【Telegraf 介绍】
面试题:你是如何计划和组织一个大型的软件测试项目的?
pyplot设置字体格式大小、坐标轴刻度在图内
【考研数学】概率论如何复习?跟谁好?
网络编程 day02 (linux) send recv bing listen accept 函数的 知识
基于html5的网上书店系统
leetcode 40.组合总和Ⅱ 回溯法求解 (c++版本)
- 原文地址:https://blog.csdn.net/Linlietao0587/article/details/127544521
