-
Android JetPack Compose组件中Scaffold的应用
一、 创建Activity Empty Compose模块
在Android Studio中创建一个新的项目,选择一个Empty Compose Activity,如下图所示:

二、搭建Scaffold脚手架主结构/** * Main activity * 定义主活动 * @constructor Create empty Main activity */ class MainActivity : ComponentActivity() { override fun onCreate(savedInstanceState: Bundle?) { super.onCreate(savedInstanceState) setContent { Ch04_ComposeTheme { Surface( modifier = Modifier.fillMaxSize(), color = MaterialTheme.colors.background ) { MainScreen() } } } } }//end MainActivity- 1
- 2
- 3
- 4
- 5
- 6
- 7
- 8
- 9
- 10
- 11
- 12
- 13
- 14
- 15
- 16
- 17
- 18
- 19
- 20
/** * Main screen * 定义主界面的脚手架框架 */ @Composable fun MainScreen(){ val scaffoldState = rememberScaffoldState() Scaffold(scaffoldState = scaffoldState, //定义头部 topBar={ }, //定义侧滑内容 drawerContent = { }, //定义中心区内容,实现界面的切换 content={ }, //定义底部的导航内容 bottomBar = { }, //定义悬浮按钮 floatingActionButton={ } )//end Scaffold }- 1
- 2
- 3
- 4
- 5
- 6
- 7
- 8
- 9
- 10
- 11
- 12
- 13
- 14
- 15
- 16
- 17
- 18
- 19
- 20
- 21
- 22
- 23
- 24
- 25
- 26
- 27
- 28
- 29
- 30
在主活动MainActivity中调用脚手架主框架
三、定义需要切换的三个界面:HomeScreen、SettingScreen、HelpScreen
显示效果如图所示:
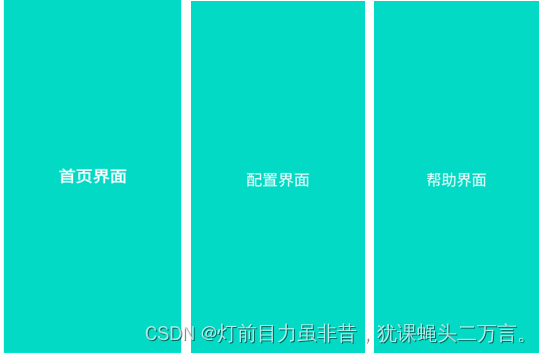
/** 定义首页界面*/ @Preview @Composable fun HomeScreen(){ Column(modifier= Modifier .fillMaxSize() .padding(10.dp) .background(colorResource(id = R.color.teal_200)), horizontalAlignment = Alignment.CenterHorizontally, verticalArrangement = Arrangement.Center, content = { Text(text="首页界面",color=Color.White, fontSize=36.sp, fontWeight = FontWeight.ExtraBold) }) } /**定义配置界面*/ @Preview @Composable fun SettingScreen(){ Column( content = { Text("配置界面", fontSize=36.sp, color = Color.White) }, modifier = Modifier .fillMaxSize() .background(colorResource(R.color.teal_200)), horizontalAlignment = Alignment.CenterHorizontally, verticalArrangement = Arrangement.Center, ) } /**定义帮助界面*/ @Preview @Composable fun HelpScreen(){ Column(modifier= Modifier.fillMaxSize() .background(colorResource(id = R.color.teal_200)), verticalArrangement = Arrangement.Center, horizontalAlignment = Alignment.CenterHorizontally){ Text("帮助界面",color= Color.White,fontSize=36.sp) } }- 1
- 2
- 3
- 4
- 5
- 6
- 7
- 8
- 9
- 10
- 11
- 12
- 13
- 14
- 15
- 16
- 17
- 18
- 19
- 20
- 21
- 22
- 23
- 24
- 25
- 26
- 27
- 28
- 29
- 30
- 31
- 32
- 33
- 34
- 35
- 36
- 37
- 38
- 39
- 40
- 41
- 42
- 43
- 44
也可以定义通用的组合函数,然后让定义个界面的组合函数来调用,形如:
@Composable fun DisplayText(content:String){ Column(modifier= Modifier.fillMaxSize() .background(colorResource(id = R.color.teal_200)), verticalArrangement = Arrangement.Center, horizontalAlignment = Alignment.CenterHorizontally){ Text("$content",color= Color.White,fontSize=36.sp) } }- 1
- 2
- 3
- 4
- 5
- 6
- 7
- 8
- 9
则三个界面的修改如下:
/** 定义首页界面*/ @Preview @Composable fun HomeScreen(){ DisplayText("首页界面") }- 1
- 2
- 3
- 4
- 5
- 6
- 7
/**定义配置界面*/ @Preview @Composable fun SettingScreen(){ DisplayText("配置界面") }- 1
- 2
- 3
- 4
- 5
- 6
/**定义帮助界面*/ @Preview @Composable fun HelpScreen(){ DisplayText("帮助界面") }- 1
- 2
- 3
- 4
- 5
- 6
四、将切换屏幕界面定义在密封类中
/** * 定义要切换界面的密封类 * @property route String 导航线路 * @property title String 标题 * @property icon ImageVector 图标 * @property screenToLoad [@androidx.compose.runtime.Composable] Function0加载动作处理 * @constructor */ sealed class Screens(val route:String, val title:String, val icon: ImageVector, val screenToLoad:@Composable ()-> Unit){ object HomePage:Screens("home","首页界面", Icons.Filled.Home,{ HomeScreen() }) object SettingPage:Screens("setting","配置界面",Icons.Filled.Settings,{ SettingScreen() }) object HelpPage:Screens("help","帮助界面",Icons.Filled.Info,{ HelpScreen() }) } - 1
- 2
- 3
- 4
- 5
- 6
- 7
- 8
- 9
- 10
- 11
- 12
- 13
- 14
- 15
- 16
- 17
- 18
- 19
定义保存屏幕界面的列表中
//定义要切换的界面列表val screens = listOf(Screens.HomePage,Screens.SettingPage,Screens.HelpPage) - 1
五、创建侧滑菜单的导航
创建侧滑菜单,显示效果如下所示:
(1)定义侧滑菜单的顶部内容
/** * Top bar view * 定义头部 */ @Preview @Composable fun HeaderBarView(){ Box(modifier= Modifier .fillMaxWidth() .wrapContentHeight() .background(color = colorResource(id = R.color.purple_200))){ Row(modifier= Modifier .fillMaxWidth() .padding(5.dp)){ Column{ Image(painter=painterResource(id = android.R.mipmap.sym_def_app_icon), contentDescription = "logo图标", modifier= Modifier .width(dimensionResource(id = R.dimen.image_width)) .height(60.dp) .clip(shape = CircleShape) .background(Color.Black)) }//end Column Column{ Text(stringResource(id = R.string.title_robot)) Text(stringResource(id = R.string.title_introduction)) } }//end Column } }- 1
- 2
- 3
- 4
- 5
- 6
- 7
- 8
- 9
- 10
- 11
- 12
- 13
- 14
- 15
- 16
- 17
- 18
- 19
- 20
- 21
- 22
- 23
- 24
- 25
- 26
- 27
- 28
- 29
(2)定义侧滑菜单
/** * 定义侧滑的下面的菜单 * @param scaffoldState ScaffoldState 脚手架的状态 * @param action Function1<[@kotlin.ParameterName] Screens, Unit>? 要处理的切换动作,默认为空 */ @Composable fun DrawerViews(scaffoldState: ScaffoldState, action: ((screen:Screens) -> Unit)?=null){ val scope = rememberCoroutineScope() Column(modifier= Modifier.fillMaxSize()){ screens.forEach { screen-> val clickable =remember{ mutableStateOf(false) } Row(verticalAlignment = Alignment.CenterVertically){ IconButton(onClick={ action?.invoke(screen) clickable.value = !clickable.value scope.launch { scaffoldState.drawerState.close() } }){ Icon(imageVector = screen.icon,"${screen.title}") } Text("${screen.title}",fontSize=20.sp, fontWeight = FontWeight.Bold, color = if(clickable.value) colorResource(id = R.color.purple_500) else colorResource(id = R.color.teal_700)) } } } }- 1
- 2
- 3
- 4
- 5
- 6
- 7
- 8
- 9
- 10
- 11
- 12
- 13
- 14
- 15
- 16
- 17
- 18
- 19
- 20
- 21
- 22
- 23
- 24
- 25
- 26
- 27
- 28
- 29
(3)组合两部分的内容到脚手架主框架中。
在脚手架中增加侧滑菜单的处理/** * Main screen * 定义主界面的脚手架框架 */ @Composable fun MainScreen(){ //脚手架的状态 val scaffoldState = rememberScaffoldState() //当前的屏幕 Val currentScreen:MutableState= remember{ mutableStateOf(Screens.Home) } Scaffold(scaffoldState = scaffoldState, //定义头部 topBar={ }, //定义侧滑内容 drawerContent = { HeaderBarView() DrawerViews(scaffoldState){screen-> currentScreens.value = screen } }, //主界面显示区 content={ currentScreens.value.screenToLoad() }, ....... )//end Scaffold } - 1
- 2
- 3
- 4
- 5
- 6
- 7
- 8
- 9
- 10
- 11
- 12
- 13
- 14
- 15
- 16
- 17
- 18
- 19
- 20
- 21
- 22
- 23
- 24
- 25
- 26
- 27
- 28
- 29
- 30
- 31
- 32
六、创建应用头部的导航
/** * 定义应用头部内容 * 在头部定义一个导航菜单 * @param scaffoldState ScaffoldState 脚手架的状态 */ @Composable fun TopBarView(currentScreen:MutableState,scaffoldState: ScaffoldState){ //协程的范围 val scope = rememberCoroutineScope() TopAppBar( title={ Text("${currentScreen.title}",fontSize=20.sp) }, navigationIcon={ IconButton(onClick={ scope.launch { scaffoldState.drawerState.open() } }){ Icon(imageVector = Icons.Filled.Home,contentDescription="",tint=Color.White) } }, actions={ IconButton(onClick = { }) { Icon(imageVector = Icons.Filled.MoreVert,contentDescription="",tint=Color.White) } }, modifier = Modifier .fillMaxWidth() .wrapContentHeight(), backgroundColor = Color.Black, contentColor = Color.White ) } - 1
- 2
- 3
- 4
- 5
- 6
- 7
- 8
- 9
- 10
- 11
- 12
- 13
- 14
- 15
- 16
- 17
- 18
- 19
- 20
- 21
- 22
- 23
- 24
- 25
- 26
- 27
- 28
- 29
- 30
- 31
- 32
- 33
- 34
- 35
- 36
说明:
(1) scaffoldState:ScaffoldState用于处理脚手架的相关操作,在这里用于打开侧滑菜单。
(2) 定义TopAppBar来定义类似ActionBar的头部动作条。
修改MainActivity.kt中定义的脚手架,增加TopBar的功能/** * Main screen * 定义主界面的脚手架框架 */ @Composable fun MainScreen(){ val scaffoldState = rememberScaffoldState() val currentScreens:MutableState= remember{ mutableStateOf(Screens.HomePage) } Scaffold(scaffoldState = scaffoldState, topBar = { TopBarView(currentScreen,scaffoldState) }, drawerContent = { HeaderBarView() DrawerViews(scaffoldState){screen-> currentScreens.value = screen } }, content={ currentScreens.value.screenToLoad() }, ...... } - 1
- 2
- 3
- 4
- 5
- 6
- 7
- 8
- 9
- 10
- 11
- 12
- 13
- 14
- 15
- 16
- 17
- 18
- 19
- 20
- 21
- 22
- 23
- 24
七、创建应用底部的导航
运行效果如下所示:

定义底部导航栏的内容/** * 定义应用底部的视图 *接收从外部传递的要显示的当前界面 */ @Composable fun BottomViews(currentScreen:MutableState){ BottomAppBar( backgroundColor = Color.Blue, contentColor = Color.Yellow){ screens.forEach { screen-> BottomNavigationItem( icon = { Icon(imageVector = item.icon, contentDescription = "${screen.title}") } , label={ Text("${screen.title}") }, selected = screen.route == currentScreen.value.route, onClick = { currentScreen.value = screen } ) } } } - 1
- 2
- 3
- 4
- 5
- 6
- 7
- 8
- 9
- 10
- 11
- 12
- 13
- 14
- 15
- 16
- 17
- 18
- 19
- 20
- 21
- 22
- 23
- 24
- 25
(3) 底部导航栏加入到脚手架中,并实现底部导航
在MainActivity.kt中的脚手架中,增加底部导航栏的处理@Composable fun MainScreen(){ val scaffoldState = rememberScaffoldState() val currentScreens:MutableState= remember{ mutableStateOf(Screens.HomePage) } Scaffold(scaffoldState = scaffoldState, topBar = { TopBarView(currentScreen,scaffoldState) }, drawerContent = { HeaderBarView() DrawerViews(scaffoldState){screen-> currentScreens.value = screen } }, content={ currentScreens.value.screenToLoad() }, bottomBar = { BottomViews(currentScreen = currentScreens) }, ...... } - 1
- 2
- 3
- 4
- 5
- 6
- 7
- 8
- 9
- 10
- 11
- 12
- 13
- 14
- 15
- 16
- 17
- 18
- 19
- 20
- 21
- 22
- 23
八、脚手架增加浮动按钮返回首页的处理
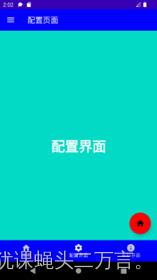
@Composable fun MainScreen(){ //脚手架的状态 val scaffoldState = rememberScaffoldState() //当前显示的界面 val currentScreen:MutableState= remember{ mutableStateOf(Screens.HomePage) } //当前的上下文 val context = LocalContext.current Scaffold(scaffoldState = scaffoldState, topBar = { TopBarView(currentScreen,scaffoldState) }, drawerContent = { HeaderBarView() DrawerViews(scaffoldState){screen-> currentScreen.value = screen } }, content={ currentScreen.value.screenToLoad() }, bottomBar = { BottomViews(currentScreen = currentScreen) }, floatingActionButton = { FloatingActionButton( backgroundColor = Color.Red, onClick = { Toast.makeText(context,"返回首页",Toast.LENGTH_LONG).show() currentScreen.value = Screens.HomePage }){ Icon(Icons.Filled.Home, contentDescription = "返回首页") } }) } - 1
- 2
- 3
- 4
- 5
- 6
- 7
- 8
- 9
- 10
- 11
- 12
- 13
- 14
- 15
- 16
- 17
- 18
- 19
- 20
- 21
- 22
- 23
- 24
- 25
- 26
- 27
- 28
- 29
- 30
- 31
- 32
- 33
- 34
- 35
参考文献
(1)https://www.geeksforgeeks.org/bottom-navigation-bar-in-android-jetpack-compose/
(2)https://amryousef.me/side-drawer-jetpack-compose- 1
-
相关阅读:
linux安装mysql8超详细到每步命令
算法题:最大出牌数量
SAP集成相关
Python基础——函数(二)
Word处理控件Aspose.Words功能演示:在 Python 中从 Word 文档中提取图像
树形结构数据转换
[论文阅读] (23)恶意代码作者溯源(去匿名化)经典论文阅读:二进制和源代码对比
集美大学校赛 B,C
音乐伴奏提取?唱歌剪辑好用的音频人声分离软件!提取步骤很简单!
golang操作Kafka
- 原文地址:https://blog.csdn.net/userhu2012/article/details/127482137
