-
pytest的使用
pytest是一个成熟的python测试框架:
- 支持简单的单元测试和复杂的功能测试;
- 可以结合Requests实现接口测试;结合Selenium、Appium实现自动化功能测试;
- 可以跟Allure集合,集成到Jenkins中,实现持续集成
安装
前提:本地已配置完成Python环境
方式一:pip install pytest
方式二:PyCharm直接安装用法说明
命名规则
pytest运行的测试用例是有默认规则的,所以我们编写测试用例时,就要按照规则去编写
类型 规则 文件(即.py文件) test_开头,或_test结尾类 Test开头方法/函数 test_开头包 无规则 注意: 测试类中不可以添加__init__构造函数,如果有,该类会被解释为普通的类,不会被pytest识别。


PyCharm配置pytest解释器
想在PyCharm中运行pytest,需要进行一些配置,路径:点击File -> Settings…
- 安装pytest库:在Python Interpreter中,确保有pytest包存在(如果没有,可以点击右侧的
+图标进行安装)

- 修改默认测试执行器为pytest:在Tools -> Python Integrated Tools 中,修改Testing的执行器为pytest

配置成功后,符合pytest规则的.py文件下的类、函数、方法左侧会显示绿色三角形,点击可执行对应的内容

命令行执行用例
本地编写和调试测试用例的时候,可以在PyCharm工具上方便的执行对应的用例,但是有时候自动化跑批,并不是在PyCharm上进行跑批的,通常情况是通过命令去执行测试用例,所以相关的命令我们也需要掌握
命令 说明 pytest执行包下所有的用例,即执行命令行当前所在目录下的全部 符合规则的用例 pytest 文件名.py执行指定的模块,即某个.py文件下符合规则的用例 pytest 文件名.py::类名运行指定模块里面的某个类 pytest 文件名.py::类名::方法名运行指定模块指定类里的指定的方法 pytest 文件名.py::函数名运行只当模块里的某个函数 从表格里可以看出,文件名、类名、方法名、函数名之间是通过
::进行关联的

setup和teardown
pytest提供了一些setup和teardown方法或函数,相当于是前置调用和后置调用
类型 规则 setup_module/teardown_module 全局模块级,在模块被执行前后运行1次 setup_class/teardown_class 类级,只在所属类执行前后运行一次 setup_function/teardown_function 函数级,不在类中的def定义的都是函数,类中def定义的是方法。函数被调用前后执行,如果模块内有多个函数,每个函数被执行前后都会执行1次 setup_method/teardown_method 方法级,类中的每个方法执行前后都会执行1次 setup/teardown 与setup_method/teardown_method一致 示例:
test_demo.py的内容如下:def setup_module(): print("hogwart的setup_module") def teardown_module(): print("hogwart的teardown_module") def setup_function(): print("hogwart的setup_function") def teardown_function(): print("hogwart的teardown_function") def test_wen(): print("test_wen的函数") def test_wen2(): print("test_wen2的函数") class TestDemo: def setup_class(self): print("hogwart的setup_class") def teardown_class(self): print("hogwart的teardown_class") def setup(self): print("hogwart的setup") def teardown(self): print("hogwart的teardown") def test_demo1(self): print("TestDemo的test_demo1方法") def test_demo2(self): print("TestDemo的test_demo2方法")- 1
- 2
- 3
- 4
- 5
- 6
- 7
- 8
- 9
- 10
- 11
- 12
- 13
- 14
- 15
- 16
- 17
- 18
- 19
- 20
- 21
- 22
- 23
- 24
- 25
- 26
- 27
- 28
- 29
- 30
- 31
- 32
- 33
- 34
- 35
- 36
pytest运行test_demo.py脚本,执行结果如下:

常用命令行参数
参数 说明 –help 帮助文档 -x 用例一旦失败,立刻停止执行 –maxfail=num 用例失败条数达到num时立即停止执行 -m 执行某些被标记的用例 -k 执行包含指定字符串的测试用例 -v 打印详细日志 -s 打印输出日志(一般是-vs一起用,-vs是-v -s的缩写) –collect-only 只收集用例,不会运行用例。用于测试平台的用例导入功能 –lf –last-failed的缩写,如果上一次有失败用例,则重新运行失败的用例(成功的不运行),如果上一次没有失败的用例,则重新运行全部用例 –ff –failed-first的缩写,先运行上一次失败的用例,再运行其余的用例 -X

–maxfail=num
test_demo.py内容如下:
def test_case1(): assert 1 == 1 def test_case2(): assert 1 == 3 def test_case3(): assert 1 == 2 def test_case4(): assert 1 == 1- 1
- 2
- 3
- 4
- 5
- 6
- 7
- 8
- 9
- 10
- 11
pytest运行test_demo.py,使用–maxfail=xxx的结果如下:


-k
pytest提供对函数名或方法名做模糊匹配的过滤执行功能
示例:
test_demo.py的内容如下:def test_case1(): assert 1 == 1 def test_case2(): assert 1 == 1 def test_case3(): assert 1 == 1 def test_haha(): assert 1 == 1 def test_case4(): assert 1 == 1 def test_wen(): assert 1 == 1- 1
- 2
- 3
- 4
- 5
- 6
- 7
- 8
- 9
- 10
- 11
- 12
- 13
- 14
- 15
- 16
- 17
执行命令中,包含
case字符串的函数被执行:

执行命令中,未包含case字符串的函数被执行

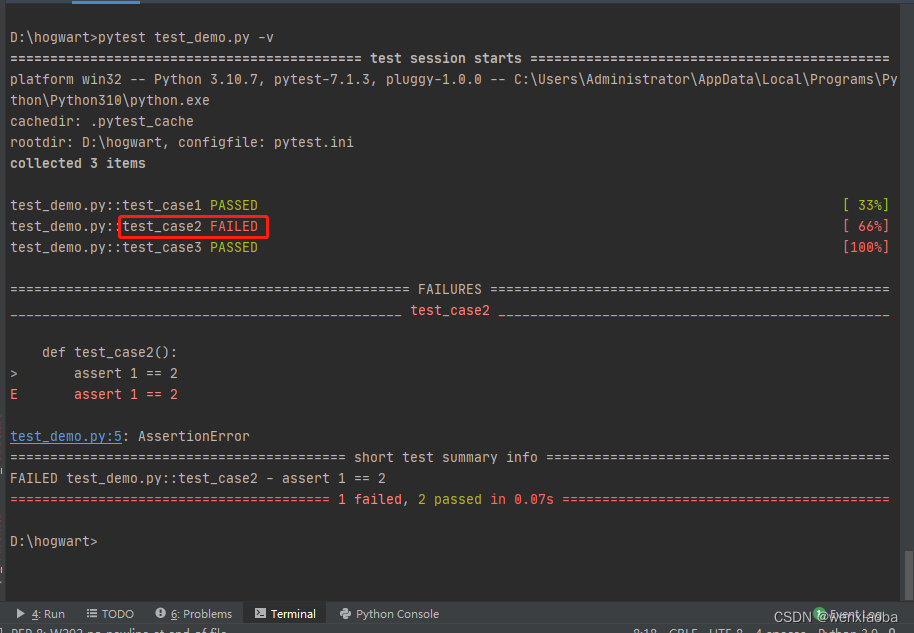
-v和-s-v是打印详细日志,-s是打印输出内容
可以看看加了与没加的区别
执行的test_demo.py内容:def test_case1(): print("test_case1的执行内容") assert 1 == 1 def test_case2(): print("test_case2的执行内容") assert 1 == 2- 1
- 2
- 3
- 4
- 5
- 6
- 7
没加:

-v可以显示具体的用例执行信息

有时候我们在用例处使用了print等可以在控制台输入内容的语句,如果我们想在执行pytest的时候显示出来,可以使用-s命令

-vs是-v和-s的叠加

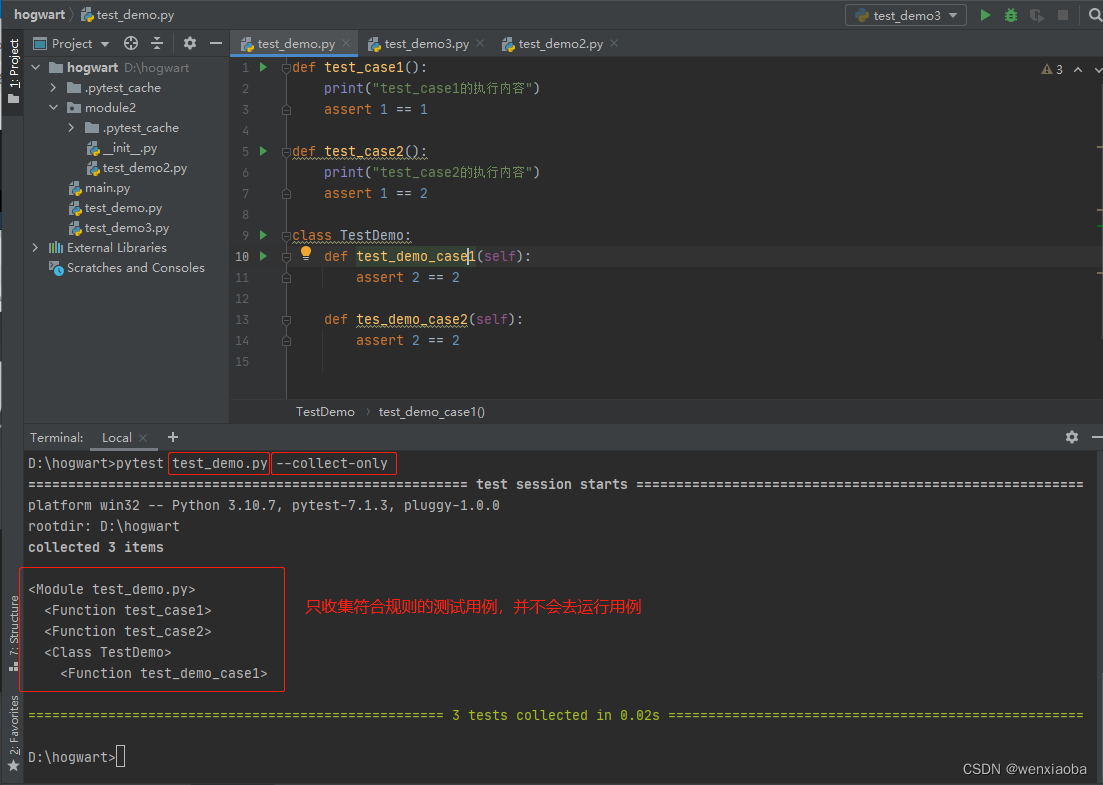
–collect-only
有时候,我们在部署测试平台,需要收集可执行的测试用例,并不需要立即去执行的时候,就可以使用
--collect-only参数
-m
我们如果想执行一部分用例,比如每日跑批、每月跑批的用例不一样,我们可以给用例添加标签,然后根据标签进行跑批
加标签方法:在测试用例方法或函数前一行添加@pytest.mark.标签名(添加前,脚本需要import pytest)
执行指定标签的用例:pytest -m=标签名pytest -m 标签名
执行指定标签外的用例:
pytest -m "not 标签名"
注意: 命令行执行某个标签的案例时,标签是百分百精准匹配的,不是模糊匹配
test_demo.py内容如下:import pytest @pytest.mark.function def test_case1(): print("test_case1的执行内容") assert 1 == 1 @pytest.mark.function def test_case2(): print("test_case2的执行内容") assert 1 == 1 class TestDemo: @pytest.mark.method def test_demo_case1(self): assert 2 == 2 @pytest.mark.method def tes_demo_case2(self): assert 2 == 2- 1
- 2
- 3
- 4
- 5
- 6
- 7
- 8
- 9
- 10
- 11
- 12
- 13
- 14
- 15
- 16
- 17
- 18
- 19
- 20
运行标签名是
function的用例,如下:

从图中可以看出,有 PytestUnknownMarkWarning提示,这个是说明标签没有配置,配置方法是在当前路径下的pytest.ini下配置标签名称,使用的时候才不会有warning提示
格式:markers = 标签名1 标签名2 标签名n- 1
- 2
- 3
新建pytest.ini文件,将标签名都配置上:

重新执行,不会有PytestUnknownMarkWarning提示了

执行标签名是function的用例:

执行标签名是非function标签的用例:

–lf和–ff
- –lf:–last-failed的缩写,如果上一次有失败用例,则重新运行失败的用例(成功的不运行),如果上一次没有失败的用例,则重新运行全部用例
- –ff:–failed-first的缩写,先运行上一次失败的用例,再运行其余的用例
test_demo.py的内容如下:
def test_case1(): assert 1 == 1 def test_case2(): assert 1 == 2 def test_case3(): assert 1 == 1- 1
- 2
- 3
- 4
- 5
- 6
- 7
- 8
命令行执行时,test_case2是失败的
然后带--lf执行

使用--ff命令执行

跳过指定用例
pytest内置了一些标签,用来处理一些特殊的测试用例。
标签 说明 @pytest.mark.skip(reason)跳过该用例(不执行),跳过原因是reason的参数内容。在命令行执行时,会打印不执行原因 @pytest.mark.skipif(contional, reason)contional为True时,不执行该用例,并打印不执行原因reason,否则执行该用例 skip
test_demo.py内容如下:
import pytest @pytest.mark.skip def test_case1(): print("业务逻辑有更新,开发还在设计中") assert True @pytest.mark.skip(reason="业务逻辑有调整,开发还在设计中") def test_case2(): print("未执行(test_case2)") assert True def test_case3(): print("执行(test_case3)") if True: pytest.skip(reason="黑名单,拒绝提供取现服务") print("未执行(test_case3)") assert True def test_case4(): assert True- 1
- 2
- 3
- 4
- 5
- 6
- 7
- 8
- 9
- 10
- 11
- 12
- 13
- 14
- 15
- 16
- 17
- 18
- 19
- 20
- 21

skipif
test_demo.py内容如下:
import pytest def return_result(): return True @pytest.mark.skipif(return_result()==True, reason="结果为True时,不执行") def test_case1(): print("业务逻辑有更新,开发还在设计中") assert True @pytest.mark.skipif('N'=='Y', reason="开关打开,不执行") def test_case2(): print("开关关闭,执行用例") assert True- 1
- 2
- 3
- 4
- 5
- 6
- 7
- 8
- 9
- 10
- 11
- 12
- 13
- 14
pytest执行结果如下:

预期失败设置
有时候用例执行的时候有缺陷,开发修复中,但又为了测试进度继续执行时,我们可以设置xfail标签,该标签添加后,pytest执行时,用例执行成功显示结果是XPASS,失败是XFAIL,提醒我们测试人员去验证
标签 说明 @pytest.mark.xfail(reason="")会去执行用例,用例执行成功,显示结果是XPASS,失败是XFAIL 如果使用
pytest.xfail(reason="")函数,默认结果是XFAIL,且执行了该语句后就结束该用例的执行了。
示例:
test_demo.py的内容是:import pytest @pytest.mark.xfail def test_case1(): print("这个是test_case1的打印内容") assert True @pytest.mark.xfail def test_case2(): print("这个是test_case2的打印内容") assert False @pytest.mark.xfail(reason="缺陷,缺陷id是xxx") def test_case3(): print("这个是test_case3的打印内容") assert True def test_case4(): print("*****test_case4 Action******") if True: pytest.xfail(reason="功能还在修复中,下个迭代修复") print("测试逻辑验证") print("这个没有被打印")- 1
- 2
- 3
- 4
- 5
- 6
- 7
- 8
- 9
- 10
- 11
- 12
- 13
- 14
- 15
- 16
- 17
- 18
- 19
- 20
- 21
- 22
- 23
执行结果为:

参数化pytest.mark.parametrize
参数化设计方法就是将模型中的定量信息变量化,使之称为任意调整的参数。即将业务流程化,将业务中重复的内容固定,将不同的内容抽象出来,设置成参数,通过参数的传递、赋值来覆盖较多的测试范围。
内置的pytest.mark.parametrize(argnames, argvalues, indirect, ids, scope)装饰器可以对测试函数的参数进行参数化- argnames:被装饰的测试函数的,需要进行数据驱动的参数集(字符串形式),如果被测函数有多个参数需要进行数据驱动,则使用
,连接(不需要进行数据驱动的参数就不用写上) - argvalues:需要给被装饰的测试函数传递的参数值,可以是列表、元组。有多少个元素,被测函数就会执行多少次
- ids:给测试用例重命名(默认是参数1-参数2-…-参数n),也是列表或元组形式,argvalues有多少个元素,ids就得有多少个元素
最重要的参数是argnames和argvalues
示例:
test_demo.py内容如下:import pytest data = [ [23, 45, 68], [1, 5, '6'], ['67', 33, 100], [-4, 1, -3] ] # parametrize第一个参数与被测函数test_add的需要数据驱动的参数保持一致(如果是类的话,self不用加进来),但parametrize第一个参数是字符串形式的 # 第二个参数是个列表(可以是元组),是需要传递给测试函数执行的被测数据集 @pytest.mark.parametrize("num1, num2, expected_result", data) def test_add(num1, num2, expected_result): assert float(num1) + float(num2) == float(expected_result)- 1
- 2
- 3
- 4
- 5
- 6
- 7
- 8
- 9
- 10
- 11
- 12
- 13
- 14
脚本执行结果如下:

可以通过ids给各个用例命名
import pytest data = [ [23, 45, 68], [1, 5, '6'], ['67', 33, 100], [-4, 1, -3] ] def refact_name(datas): re_name = [] for data in datas: re_name.append(f"{data[0]}+{data[1]}={data[2]}") return re_name # parametrize第一个参数与被测函数test_add的保持一致, # 第二个参数是个列表(可以是元组),是需要传递给测试函数执行的被测数据集 # ids:给用例重命名 @pytest.mark.parametrize("num1, num2, expected_result", data, ids=refact_name(data)) def test_add(num1, num2, expected_result): assert float(num1) + float(num2) == float(expected_result)- 1
- 2
- 3
- 4
- 5
- 6
- 7
- 8
- 9
- 10
- 11
- 12
- 13
- 14
- 15
- 16
- 17
- 18
- 19
- 20
- 21
- 22
执行结果为:

有时候有多个参数,每个参数有其指定的测试集,不想另外起个函数来生成新的测试集进行覆盖,可以参考笛卡尔积的思路,一个函数设置多个pytest.mark.parametrize装饰器。import pytest phone = ["HuaWei", "RedMi", "IPhone", "Vivo", "Meizu"] client = ["browser", "APP", "WeChat"] @pytest.mark.parametrize("phone", phone) @pytest.mark.parametrize("client", client) def test_compatibility(phone, client): print(f"兼容性测试:{phone}+{client}")- 1
- 2
- 3
- 4
- 5
- 6
- 7
- 8
- 9
执行结果如下:

python方式执行pytest
前面章节讲的都是PyCharm在配置测试执行器是pytest的情况下去执行pytest命令的,如果我们在集成的时候,想通过python命令去执行的话,就需要知道python上要怎么处理。
有2种方式:- main函数:pytest也提供了main()函数,通过给main()函数传递参数来执行Pytest命令,即写入了python脚本
- python -m pytest命令:-m后面跟上pytest命令即可
main()函数
将pytest命令按照空格拆分成列表,然后将列表作为参数传递给pytest.main()函数
示例:
test_demo.py内容如下:def test_case1(): assert 1 == 1 class TestDemo: def test_case2(self): assert 1 == 1 def test_case3(self): assert 1 == 1 def test_wen(self): assert True- 1
- 2
- 3
- 4
- 5
- 6
- 7
- 8
- 9
- 10
- 11
- 12
rukou.py跟test_demo.py在同一个项目内,脚本内容为:
import pytest pytest.main(["test_demo.py::TestDemo", "-v", "-k", "not wen"])- 1
- 2
- 3
python命令执行rukou.py

python -m pytest命令
python -m 后面跟着pytest命令即可
test_demo.py内容如下:def test_case1(): assert 1 == 1 class TestDemo: def test_case2(self): assert 1 == 1 def test_case3(self): assert 1 == 1 def test_wen(self): assert True- 1
- 2
- 3
- 4
- 5
- 6
- 7
- 8
- 9
- 10
- 11
- 12
在命令行窗口执行命令如下:

异常处理pytest.raise()
Python的异常处理是使用try/except/finally,具体的使用参考这篇文章Python异常。
pytest也提供了异常处理方法:pytest.raises(expected_exception, *args, **kwargs)- expected_exception:必传,预期能捕捉到的异常,单个异常类型或多个异常类型组成的元组
- match:非必传,正则表达式,匹配异常信息
执行结果:如果代码块抛出的异常在expected_exception中,并且异常信息符合正则表达式,该代码块执行成功,用例会继续执行后面的内容,否则用例直接报错且执行失败(不会执行后面的内容
使用方式如下:with pytest.raises((异常类型1, 异常类型2, ..., 异常类型n), match="异常信息正则表达式"): raise ValueError("异常信息")- 1
- 2
expected_exception逻辑验证
test_demo.py代码:
import pytest def test_expected_exception_in(): # 预期捕获的异常只有1个时,可以直接将异常类型传入,不用组成元组传入 with pytest.raises(ValueError): raise ValueError print("我是一棵树") # 预期捕获的异常如果是其中的某一个时,可以将预期的异常类型组成元组,作为一个参数传入 with pytest.raises((ValueError, IndexError)): raise IndexError("我是一个小小小鸟") print("一只小胖鸟,飞行异常") def test_expected_exception_not_in(): # 抛出的异常不在预期捕获异常中 with pytest.raises(ValueError): raise ZeroDivisionError print("我不在,这里没有被执行")- 1
- 2
- 3
- 4
- 5
- 6
- 7
- 8
- 9
- 10
- 11
- 12
- 13
- 14
- 15
- 16
pytest执行结果如下:

match参数逻辑验证
test_demo.py代码:
import pytest def test_match_matching(): # 异常信息与match正则匹配:执行正常,继续向后执行用例 with pytest.raises(ValueError, match=".*[pP]ython.*"): raise ValueError("人生苦短,我用Python") print("正则表达式匹配") def test_match_mismatch(): # 异常信息与match正则不匹配 with pytest.raises(ValueError, match="没钱"): raise ValueError("人生苦短,我用Python") print("正则表达式不匹配")- 1
- 2
- 3
- 4
- 5
- 6
- 7
- 8
- 9
- 10
- 11
- 12
- 13
pytest执行如下:

错误类型比对
很多时候,我们将数据存放到yaml、excel、txt等文件中,需要的时候通过读取的方式转成需要的数据格式。有时候测试预期结果是返回指定异常的类型,但是在数据文件中读取出来的是字符串格式,我们可以通过eval()或异常的typename属性进行比较。
eval("异常类型"):将字符串形式的异常类型转成python对象异常对象.typename:获取异常类型对象的字符串名称
示例:
test_demo.py内容如下:
import pytest class TestDemo: @pytest.mark.parametrize("num1, num2, expceted_result", [["文", 3, "TypeError"], [23, 0, "ZeroDivisionError"]]) def test_error(self, num1, num2, expceted_result): with pytest.raises(eval(expceted_result)) as e: num1 / num2 assert expceted_result == e.typename- 1
- 2
- 3
- 4
- 5
- 6
- 7
- 8
test_demo.py执行结果如下图:

数据驱动
在对某个功能进行测试时,我们经常是通过改变输入内容来验证功能的正常。数据驱动即是对功能进行整合和提炼,通过数据验证功能的正常。
pytest的@pytest.mark.parametrize()支持数据驱动,我们可以将测试数据存放到yaml、excel、csv、json等文件中,通过相关方法读取出来,转成指定的列表形式。
以下展示通过csv的数据的方法来简单说明@pytest.mark.parametrize()的数据驱动:
test_demo.py内容如下:import csv import pytest def get_data_from_csv(): with open("wen.csv", "r") as f: reader = csv.reader(f) data = [] for line in reader: data.append(line) return data @pytest.mark.parametrize("num1, num2, result", get_data_from_csv()) def test_wen2(num1, num2, result): assert float(num1) + float(num2) == float(result) print(f"{num1}+{num2} = {result}")- 1
- 2
- 3
- 4
- 5
- 6
- 7
- 8
- 9
- 10
- 11
- 12
- 13
- 14
- 15
wen.csv内容如下:
23,45,68 -4,5,1 -4,1,-3 0,5,5- 1
- 2
- 3
- 4
pytest执行结果如下:

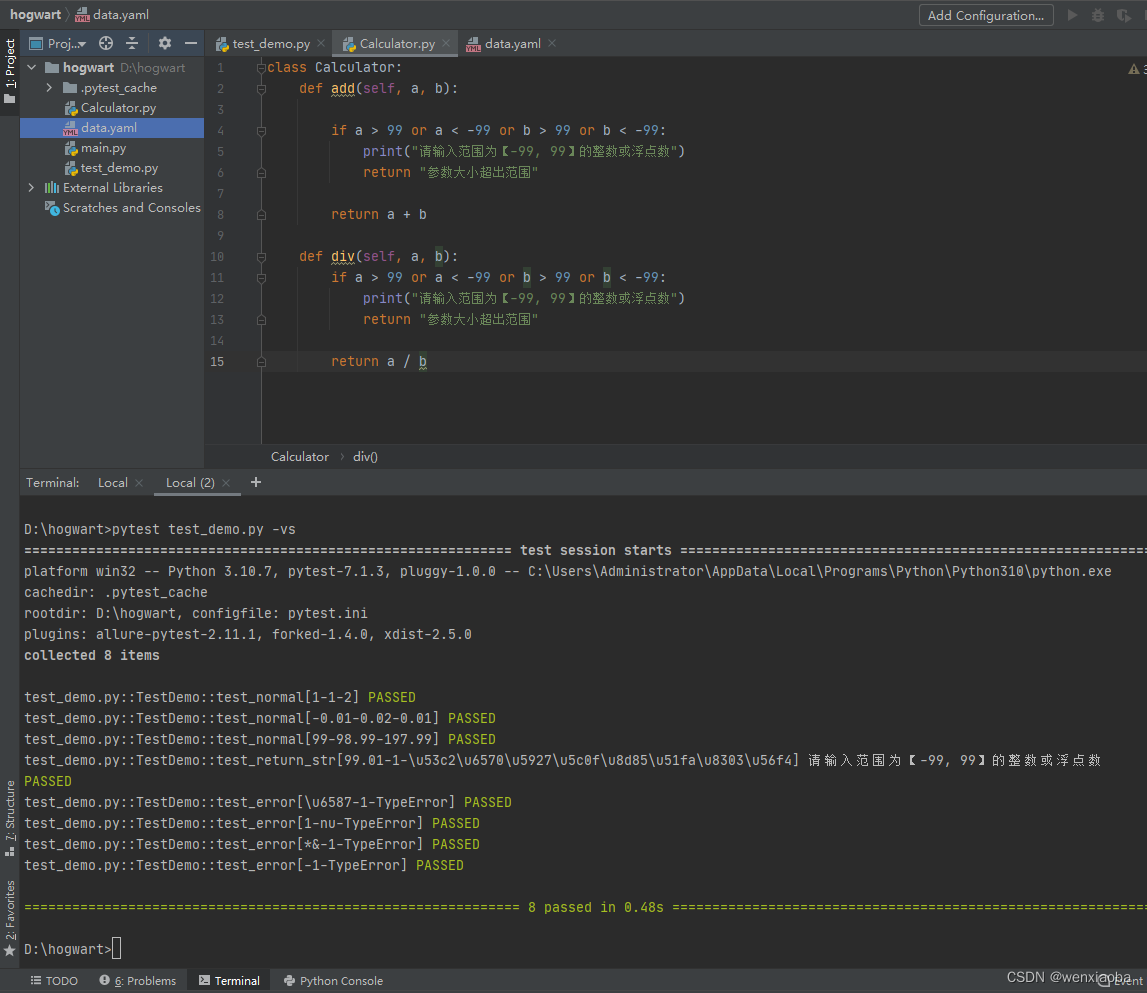
以下是通过yaml的方式实现参数化:
执行内容:测试Calculator的add()方法
Calculator内容如下:class Calculator: def add(self, a, b): if a > 99 or a < -99 or b > 99 or b < -99: print("请输入范围为【-99, 99】的整数或浮点数") return "参数大小超出范围" return a + b def div(self, a, b): if a > 99 or a < -99 or b > 99 or b < -99: print("请输入范围为【-99, 99】的整数或浮点数") return "参数大小超出范围" return a / b- 1
- 2
- 3
- 4
- 5
- 6
- 7
- 8
- 9
- 10
- 11
- 12
- 13
- 14
- 15
data.yaml文件内容如下:
normal: - - 1 - 1 - 2 - - -0.01 - 0.02 - 0.01 - - 99 - 98.99 - 197.99 return_str: - - 99.01 - 1 - 参数大小超出范围 error: - - 文 - 1 - TypeError - - 1 - nu - TypeError - - '*&' - 1 - TypeError - - '' - 1 - TypeError- 1
- 2
- 3
- 4
- 5
- 6
- 7
- 8
- 9
- 10
- 11
- 12
- 13
- 14
- 15
- 16
- 17
- 18
- 19
- 20
- 21
- 22
- 23
- 24
- 25
- 26
- 27
- 28
- 29
- 30
- 31
- 32
- 33
- 34
- 35
test_demo.py的内容如下:
import yaml import pytest from Calculator import Calculator def get_data(): with open("data.yaml", "r", encoding="utf-8") as f: return yaml.safe_load(f) class TestDemo: datas = get_data() cal = Calculator() @pytest.mark.parametrize("num1, num2, expceted_result", datas.get("normal")) def test_normal(self, num1, num2, expceted_result): assert self.cal.add(num1, num2) == expceted_result @pytest.mark.parametrize("num1, num2, expceted_result", datas.get("return_str")) def test_return_str(self, num1, num2, expceted_result): assert self.cal.add(num1, num2) == expceted_result @pytest.mark.parametrize("num1, num2, expceted_result", datas.get("error")) def test_error(self, num1, num2, expceted_result): with pytest.raises(eval(expceted_result)) as e: self.cal.add(num1, num2) assert expceted_result == e.typename- 1
- 2
- 3
- 4
- 5
- 6
- 7
- 8
- 9
- 10
- 11
- 12
- 13
- 14
- 15
- 16
- 17
- 18
- 19
- 20
- 21
- 22
- 23
- 24
- 25
- 26
test_demo.py执行结果如下:
相关的文件读取可以参考以下文章:
[PyYAML](h相关的文件读取可以参考以下文章:
PyYAML
Excel文件处理-Python之openpyxl
python内置库csv
python之json库fixture
fixture能为测试提供一个定义好的、可靠的和一致的上下文。
fixture经常用于测试用例执行前后的数据准备、数据验证等操作。
@pytest.fixture(fixture_function, *, scope="function", params=None,autouse=False, ids=None, name=None)比较常用的参数是以下5个:- scope:设置被装饰函数的使用范围,默认是
function,相关级别说明:function:函数级,每一个函数或方法都会调用class:类级,每个测试类只运行一次module:模块级,每一个.py文件调用一次package:每一个python包只调用一次session:会话级,每次会话只运行一次(即每次pytest执行,就执行1次)
- params:被fixture装饰的函数想要外部传进来的数据,可以包装成列表,以params参数传递进来,函数内通过
request.param可以获取到传来的数据。 - autouse:自动使用,默认为False,如果为True的话,在scope范围内的用例都会自动执行被装饰的函数(不用在需调用函数或方法的参数中输入函数名),为False时就不会自动使用(需要手动在参数添加)。
简单示例
比如针对购物界面,点击购买时,要验证应用登录场景和未登录场景,使用setup()和teardown()明显不太合适,一般处理方法是实现登录方法,然后在登录场景时调用,在未登录场景时不调用,一般实现如下:
def login(): print("登录成功!") def test_buy_with_login(): login() print("购买商品成功") def test_buy_without_login(): print("购买商品异常(未登录),跳转登录页面")- 1
- 2
- 3
- 4
- 5
- 6
- 7
- 8
- 9
执行结果如下:

使用fixture可以比较方便的执行,在这个示例中,login是会被经常调用的前置条件,我们使用
@pytest.fixture()对其进行装饰,然后在需要登录的前置用例中,函数名作为参数进行传递,示例如下:import pytest @pytest.fixture() def login(): print("登录成功!") def test_buy_with_login(login): print("购买商品成功") def test_buy_without_login(): print("购买商品异常(未登录),跳转登录页面")- 1
- 2
- 3
- 4
- 5
- 6
- 7
- 8
- 9
- 10
- 11
执行结果如下:

scope参数:作用域设置
@pytest.fixture()中的scope参数可以设置被装饰函数的使用范围:function:函数级,默认,每一个函数或方法都会调用class:类级,每个测试类只运行一次module:模块级,每一个.py文件调用一次package:每一个python包只调用一次session:会话级,每次会话只运行一次(即每次pytest执行,就执行1次)
简单展示下
login()函数中,fixture()的scope参数为class和session的区别
test_demo.py内容如下:import pytest # fixture的scope为"class" @pytest.fixture(scope="class") def login(): print("\n登录成功!") def test_buy_with_login1(login): print("购买商品成功") def test_buy_with_login2(login): print("购买商品成功") def test_buy_without_login(): print("购买商品异常(未登录),跳转登录页面") class TestDemo: def test_buy_with_login1(self, login): print("购买商品成功") def test_buy_with_login2(self, login): print("购买商品成功") class TestInner: def test_buy_with_login3(self, login): print("购买商品成功") def test_buy_with_login4(self, login): print("购买商品成功")- 1
- 2
- 3
- 4
- 5
- 6
- 7
- 8
- 9
- 10
- 11
- 12
- 13
- 14
- 15
- 16
- 17
- 18
- 19
- 20
- 21
- 22
- 23
- 24
- 25
- 26
- 27
- 28
- 29
- 30
执行pytest命令后:
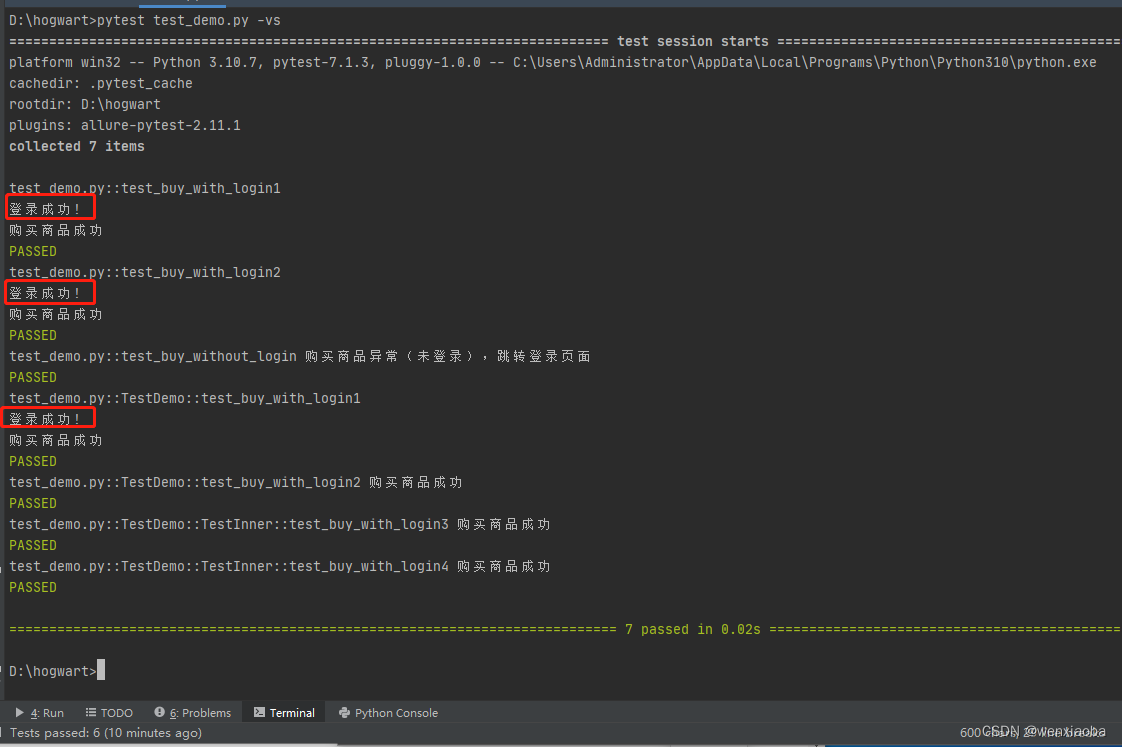
从执行结果可以看出,
login()被执行了3次,test_buy_with_login1()函数、test_buy_with_login2()函数和TestDemo::test_buy_with_login1()方法,可以看出login()函数被设置了作用域为class时,只有调用了login参数的函数每次执行,调用了login方法的类只执行1次(即使有内部类调用了,最外层的类还是只运行了一次)将
login()的作用域设置成session,test_demo.py内容如下:import pytest # fixture的scope为"session" @pytest.fixture(scope="session") def login(): print("\n登录成功!") def test_buy_with_login1(login): print("购买商品成功") def test_buy_with_login2(login): print("购买商品成功") def test_buy_without_login(): print("购买商品异常(未登录),跳转登录页面") class TestDemo: def test_buy_with_login1(self, login): print("购买商品成功") def test_buy_with_login2(self, login): print("购买商品成功") class TestInner: def test_buy_with_login3(self, login): print("购买商品成功") def test_buy_with_login4(self, login): print("购买商品成功")- 1
- 2
- 3
- 4
- 5
- 6
- 7
- 8
- 9
- 10
- 11
- 12
- 13
- 14
- 15
- 16
- 17
- 18
- 19
- 20
- 21
- 22
- 23
- 24
- 25
- 26
- 27
- 28
- 29
session每次pytest执行都是一次会话,即每次pytest执行用例时(用例有调用login)都会被调用:

如果pytest执行中的用例没有调用login()的,则pytest不会执行login()函数

配合yield使用
yield的用法解释可以参考大神的这篇文章:python中yield的用法详解——最简单,最清晰的解释
这里就简单的描述下yield是怎么模拟
teardown()的。
从前面的示例中我们可以看到,@pytest.fixture()可以模拟成setup()部分,如果被@pytest.fixture()装饰的函数中使用了yield关键字,则yield关键字后面的部分就可以模拟出teardown()的效果。
示例:
test_demo.py内容如下:import pytest @pytest.fixture() def login(): print("\n登录成功!") yield print("退出登录成功") def test_buy_with_login1(login): print("购买商品成功") def test_buy_with_login2(login): print("购买商品成功")- 1
- 2
- 3
- 4
- 5
- 6
- 7
- 8
- 9
- 10
- 11
- 12
- 13
pytest执行结果如下:

可以看到,每个方法执行完成后(PASSED),会去执行退出登录的操作(即yield后面的内容)
yield也可以传递参数给调用方。
test_demo.py内容如下:import pytest @pytest.fixture() def login(): name = "wenxiaoba" print("\n登录成功!") yield name, "token_values" print(f"{name}退出登录成功") @pytest.fixture() def order(): product = "毛巾" print(f"购物车添加{product}") yield product print(f"购物车清除{product}") def test_buy_with_login1(login): name, token = login print(f"登录token:{token}") print(f"{name}购买商品成功") def test_buy_with_login2(login, order): params = login product = order print(f"yield返回的多个数据时,类型为:{type(params)},数据是{params}") print(f"yield返回的1个数据时,数据类型与返回的数据的类型一致,类型为:{type(product)},数据是:{product}") print(f"{login[0]}购买{product}成功")- 1
- 2
- 3
- 4
- 5
- 6
- 7
- 8
- 9
- 10
- 11
- 12
- 13
- 14
- 15
- 16
- 17
- 18
- 19
- 20
- 21
- 22
- 23
- 24
- 25
- 26
- 27
pytest执行结果如下:

注意:如果想正常使用yield,@pytest.fixture()的参数autouse最好不要设置为True,或者必须在测试用例的函数或方法的参数中,加上被装饰函数,否则测试用例中使用变量名 = 被装饰函数名,变量指向了函数,而不是yield返回的数据。在自动化中的数据共享
在将被
fixture()装饰的函数调试完成后,如果其他人也想用时,则需要导入对应的函数,如下,同一个项目下,有business1和business2这2个包,如果bussiness2下的模块想使用bussiness1下的test_business1.py的login()函数,则需要进行导入,具体内容如下:


pytest提供了conftest.py,在conftest.py下的内容可以共享。pytest先识别当前模块下的函数,再识别当前目录下的conftest.py,再向上级目录识别conftest.py直至跟目录。未识别到被@pytest.fixture()装饰的函数,则报错。
示例:
如下,hogwart项目下有test_demo.py、conftest.py、business1和business2,
test_demo.py内容如下,有被@pytest.fixture()装饰的login()及其测试用例:

conftest.py内容也有被@pytest.fixture()装饰的login()函数

business1目录下,有conftest.py和test_business1.py共2个Python脚本,conftest.py也有被
@pytest.fixture()装饰的login()函数

test_business1.py的测试用例调用了login()函数

business1下只有test_business2.py文件,其测试用例也调用了login()函数,具体内容如下:

现在执行pytest命令,结果如图:

从打印信息来看,test_demo.py文件的test_buy_with_login1()调用了被@pytest.fixture()装饰的login()函数,没有调用当前目录下conftest.py的login()函数,说明是从本模块(即同一个文件下)搜索对应的函数;business1目录下有conftest.py,且conftest.py定义了login()函数,test_business1.py的test_buy_with_login1()调用了login()是同目录下的conftest.py,而不是上一级(hogwart目录下)下的conftest.py,说明了是从同目录下的conftest.py中查找,business2目录下的test_business2.py文件中test_buy_with_login1()打印了hogwart目录下conftest.py中的login()函数,则说明了如果同模块、同目录conftest.py都没有找到的,则会向上一级查找。总结下来,测试用例调用了被@pytest.fixture()装饰的函数,查找顺序是:同一模块(.py) --> 同一个包的conftest.py --> 上一级目录(直至项目的根目录下)。如果想调用其他包的被
@pytest.fixture()装饰的函数,可以导入对应包的conftest.py,示例如下:

pytest执行结果如下:

自动调用
@pytest.fixture()函数有个autouse参数,默认值为False,若设置为True时,用例函数或方法中可以不用加上被其装饰的函数的参数,但是在作用域内执行用例时,被装饰函数还是会被调用。示例如下:
test_demo.py内容如下:import pytest @pytest.fixture(autouse=True) # 设置autouse为True def login(): print("\n登录成功!--test_demo") yield print("退出登录成功--test_demo") def test_buy_with_login1(): # 括号内没有加上login参数 print("购买商品成功") class TestDemo: def test_demo1(self): # 括号内没有加上login参数 print("购买水果成功")- 1
- 2
- 3
- 4
- 5
- 6
- 7
- 8
- 9
- 10
- 11
- 12
- 13
- 14
pytest执行结果如下:

虽然test_buy_with_login1()函数和test_demo1()没有传入login参数,但是因为login()的@pytest.fixture()中,autouse被设置成了True,所以作用域范围内,login()都会被自动调用。
autouse使用起来会比较鸡肋,而且使用了autouse,若被调函数或方法的参数中没有传入被@pytest.fixture()装饰的函数,则使用yield时,被调函数无法正常使用yield的返回数据(被调函数会赋值成是函数变量)。参数化
对于被
@pytest.fixture()装饰的函数,如果函数需要有参数传入,则需要在@pytest.fixture()中通过params参数传入,然后在被装饰函数中,通过request.param接收并使用,params传入的数据需要是迭代器数据,比如列表、元组等。总之,想要被装饰函数能使用参数传入,必须做到以下2点:@pytest.fixture()必须传入params参数,传入数据必须是可迭代对象,比如列表、元组等;- 被装饰函数必须传入参数request(固定,最好是第一个参数),函数中通过
request.param来接收使用
示例:
test_demo.py的内容如下:import pytest @pytest.fixture(params=[["wen", "12345"], ["xiaoba", "password"]]) def login(request): print("\n登录成功!--test_demo") print(f"login可使用参数是:{request.param},参数类型是{type(request.param)}") yield request.param[0] print("退出登录成功--test_demo") def test_demo1(login): name = login print(f"{name} 购买商品成功")- 1
- 2
- 3
- 4
- 5
- 6
- 7
- 8
- 9
- 10
- 11
- 12
pytest命令执行结果为:

pytest.ini
pytest配置文件pytest.ini可以改变pytest默认的运行方式,或指定其运行方式。比如:修改用例命名规则、配置日志格式、添加标签、指定执行目录、排除搜索目录等。pytest.ini的一些注意事项如下:
- 一般放在项目的根目录
- 文件内容开头是
[pytest],接下去才是配置,如果没有[pytest],则pytest执行时会有报错 - 最好不要有中文
查看pytest.ini配置选项
执行命令:
pytest --help
查看:


常用配置
格式 描述 示例 python_files = xxx修改测试用例文件(即模块,.py文件)匹配规则(默认是test_开头或_test结尾) .py文件的匹配规则修改成check_开头、_check结尾: python_files = check_* *_check.pypython_classes = xxx修改测试用例的类匹配规则(默认是Test开头) 修改测试类为Test开头或Check开头: python_classes = Test* Check*python_functions = xxx修改测试用例的函数或方法的匹配规则(默认test_开头) 修改测试用例的方法和函数的匹配规则为test_开头或check_开头: python_functions= test_* check_*addopts = xxx更改默认命令行选项,在执行Pytest命令的时候,有部分参数是固定不变的,我们可以将这部分参数设置到addopts配置中,这样每次执行pytest命令时,我们不用手动输入固定不变的参数,但是pytest命令会默认带上addopte的内容 固定的pytest命令参数有-vs,并生成allure统计数据: addopts = -vs --alluredir ./result,设置之后,执行pytest命令时,命令中没有-vs --alluredir ./result,但pytest也会有-vs --alluredir ./result的执行效果testpaths = xxx设置执行的路径(精准匹配) 只执行module1、module2目录下测试用例: testpaths = module1 module2norecursedirs = xxx忽略(不执行)某些目录 不执行config目录和common开头的目录 : norecursedirs = config common*markers = xxx自定义标签 自定义login和get标签: markers =
login: marker description
get: xxx, this marker is use for lalalala...log_cli = true日志开关(默认false) ,是否在控制台输出日志 打开日志开关: log_cli = truelog_cli_level = xxx设置控制台日志级别 设置日志级别为info: log_cli_level = infoaddopts = --capture=noaddopt是用来更改默认命令行选项, --capture=no表示在控制台打印详细日志(相当于pytest的-vs,但是–capture=no是针对日志) addopts = --capture=nolog_cli_format = xxx设置控制台日志打印格式 og_cli_format = %(asctime)s [%(levelname)s] %(message)s (%(filename)s:%(lineno)s)log_cli_date_format = xxx设置控制台日志时间格式 log_cli_date_format = %Y-%m-%d %H:%M:%Slog_file = xxx设置日志文件位置 log_file = ./log/test.loglog_file_level = xxx设置日志文件等级 log_file_level = infolog_file_format = xxx设置日志文件格式 log_file_format = %(asctime)s [%(levelname)s] %(message)s (%(filename)s:%(lineno)s)log_file_date_format = xxx设置日志文件日期格式 log_file_date_format = %Y-%m-%d %H:%M:%S日志的格式参考模板如下:
[pytest] log_cli = true log_cli_level = info addopts = --capture=no log_cli_format = %(asctime)s [%(levelname)s] %(message)s (%(filename)s:%(lineno)s) log_cli_date_format = %Y-%m-%d %H:%M:%S log_file = ./log/test.log log_file_level = info log_file_format = %(asctime)s [%(levelname)s] %(message)s (%(filename)s:%(lineno)s) log_file_date_format = %Y-%m-%d %H:%M:%S- 1
- 2
- 3
- 4
- 5
- 6
- 7
- 8
- 9
- 10
日志说明
有时候,我们想要按照某种方式,将日志存放到对应的目录下,而不是一直薅着一个日志文件去记录,可以通过
request.config.pluginmanager.get_plugin("logging-plugin").set_log_path(fname)语句(fname为完整文件路径)动态生成日志文件。
示例:想将日志内容存放到当天的日志文件中
conftest.py文件内容如下:import pytest from datetime import datetime @pytest.fixture(scope="session", autouse=True) def logging_config(request): print("设置了日志格式") now = datetime.now() day = now.strftime("%Y%m%d") log_name = './logs/' + day + '.log' request.config.pluginmanager.get_plugin("logging-plugin").set_log_path(log_name)- 1
- 2
- 3
- 4
- 5
- 6
- 7
- 8
- 9
- 10
pytest.ini内容如下:
[pytest] log_cli = true log_cli_level = info addopts = --capture=no log_cli_format = %(asctime)s [%(levelname)s] %(message)s (%(filename)s:%(lineno)s) log_cli_date_format = %Y-%m-%d %H:%M:%S log_file_level = info log_file_format = %(asctime)s [%(levelname)s] %(message)s (%(filename)s:%(lineno)s) log_file_date_format = %Y-%m-%d %H:%M:%S- 1
- 2
- 3
- 4
- 5
- 6
- 7
- 8
- 9
test_demo.py内容如下:
import logging def test_logging(): logging.info("这个是日志的文件内容message")- 1
- 2
- 3
- 4
pytest执行结果如下:

当前项目的logs目录自动生成20221022.log文件,文件内容如下:

pytest插件
pytest插件有3个分类:
- 外部插件:pip install 安装的插件
- 本地插件:pytest自动模块发现机制(conftest.py存放的)
- 内置插件:代码内部的_pytest目录加载
常用的外部插件
名称 描述 pytest-ordering 控制用例的执行顺序 pytest-xdist 分布式并发执行测试用例 pytest-dependency 控制用例的依赖关系 pytest-rerunfailures 失败重跑 pytest-assume 多重校验 pytest-random-order 用例随机执行 pytest-html 测试报告 关于pytest的外部插件,可以在pip官网,通过"pytest-xxx"搜索到Pytest的插件

搜索出来的结果中,有"pytest-"的基本上是pytest的插件,点击某个插件,进入页面之后,会有该插件的使用详情说明,如果没有的话,点击”Homepage“,即可进入到对应插件的远程仓库(基本上是github),在远程仓库里查看是否有该插件的使用说明


hook函数
hook函数是pytest提供的钩子函数,可以理解为对pytest测试用例执行操作的修改提供了入口,我们只需要在提供的入口(函数)去修改对应内容即可,pytest执行时会自动调用钩子函数。pytest可用的hook函数可以在当前项目的External Libraries --> site-packages–>_pytest–>hookspec.py文件中查看

hook函数的执行顺序如下:root └── pytest_cmdline_main ├── pytest_plugin_registered ├── pytest_configure │ └── pytest_plugin_registered ├── pytest_sessionstart │ ├── pytest_plugin_registered │ └── pytest_report_header ├── pytest_collection │ ├── pytest_collectstart │ ├── pytest_make_collect_report │ │ ├── pytest_collect_file │ │ │ └── pytest_pycollect_makemodule │ │ └── pytest_pycollect_makeitem │ │ └── pytest_generate_tests │ │ └── pytest_make_parametrize_id │ ├── pytest_collectreport │ ├── pytest_itemcollected │ ├── pytest_collection_modifyitems │ └── pytest_collection_finish │ └── pytest_report_collectionfinish ├── pytest_runtestloop │ └── pytest_runtest_protocol │ ├── pytest_runtest_logstart │ ├── pytest_runtest_setup │ │ └── pytest_fixture_setup │ ├── pytest_runtest_makereport │ ├── pytest_runtest_logreport │ │ └── pytest_report_teststatus │ ├── pytest_runtest_call │ │ └── pytest_pyfunc_call │ ├── pytest_runtest_teardown │ │ └── pytest_fixture_post_finalizer │ └── pytest_runtest_logfinish ├── pytest_sessionfinish │ └── pytest_terminal_summary └── pytest_unconfigure- 1
- 2
- 3
- 4
- 5
- 6
- 7
- 8
- 9
- 10
- 11
- 12
- 13
- 14
- 15
- 16
- 17
- 18
- 19
- 20
- 21
- 22
- 23
- 24
- 25
- 26
- 27
- 28
- 29
- 30
- 31
- 32
- 33
- 34
- 35
- 36
- 37
来源:定制pytest插件必备之pytest hook的执行顺序
各个钩子函数的作用参考博客:pytest hook简介hook函数编写要求:
- 在conftest.py中编写;
- 函数的名称、参数等内容,必须保持与hookspec.py文件中的一致
以下简单的示例说明下怎么使用hook函数
示例1
在测试用例执行前打印“开始装逼”,测试用例执行后打印“结束装逼”

test_demo.py内容及其执行结果如下:

示例2
测试用例的用例名称和用例id,中文正常显示(不显示成unicode编码内容)
conftest.py编写内容如下:

test_demo.py内容及其执行情况如下:

示例3
添加命令行参数并对参数数据进行处理
conftest.py内容如下:import pytest def pytest_addoption(parser: "Parser", pluginmanager: "PytestPluginManager") -> None: mygroup = parser.getgroup("person_add") # 设置一个group mygroup.addoption("--env", # 注册一个命令行选项 default="ST", # 参数的默认值 dest="env", # 存储的变量,可以使用Option对象访问到这个值 help="设置测试用例所跑的环境,ST:系统测试环境,UAT:用户验收环境,PRE:预上线环境" # 帮助提示,参数的描述信息 ) @pytest.fixture() def env_param_deal(request): my_env = request.config.getoption("--env", default="ST") if my_env == "ST": return "这个是ST环境的测试数据" elif my_env == "UAT": return "这个是UAT环境的测试数据" elif my_env == "PRE": return "这个是PRE环境的测试数据" else: assert ValueError("未知的测试环境")- 1
- 2
- 3
- 4
- 5
- 6
- 7
- 8
- 9
- 10
- 11
- 12
- 13
- 14
- 15
- 16
- 17
- 18
- 19
- 20
- 21
命令行切换到conftest.py所在目录,输入
pytest --help,可以看到添加的参数:

test_demo.py的内容:def test_case1(env_param_deal): print(env_param_deal)- 1
- 2
其执行结果如下:

-
相关阅读:
HTML 核心技术点基础详细解析以及综合小案例
《七月集训》(第一天)——数组
Transformer简单理解(MT)
6. MySQL 查询、去重、别名
云端代码编辑器Atheos
未来展望:Starday供应链火力全开,为跨境电商再添动力!
上海计算机学会 2024年4月月赛 丙组T3 交换的次数
MPEG算法及代码例程
COCI2021-2022#1 Volontiranje
linux的三剑客
- 原文地址:https://blog.csdn.net/wenxiaoba/article/details/127203672
