-
【无标题】
文章目录
Deploy heroku
Video Resources
Checklist of Deployment Steps
- He carried out the steps I found in the video from his github And a list of steps is included here.
- Copy the project seperately - Go to 'Getting Started on Heroku with Python' - Create an Heroku account - install pipenv - Install git ( check git --version) - Install Heroku CLI - Login heroku - Create a virtual enviroment - Run manage.py not gonna run - pip freeze nothing installing - Check which version django,requests you have and install it - Run manage.py and then stop it - Go to django heroku - Create a Procfile and - Install django-heroku - Add stuff to settings.py file - Install guincorn - pip freeze > requirements.txt - heroku create attreyaweb (to create an app on heroku) - git status git commands (git push heroku master) - Open up the website - Admin panel not working. heroku run bash. Migrations- 1
- 2
- 3
- 4
- 5
- 6
- 7
- 8
- 9
- 10
- 11
- 12
- 13
- 14
- 15
- 16
- 17
- 18
- 19
- 20
- 21
Preparation
Create an account
- To create a heroku account, click here this is a platform, similar to github, which is also managed through git, so you have to register an account and eventually deploy the server to heroku with the git command

Create python and Django runtime environments with pipenv / anaconda
- The reason he mentions
install pipenvis to create a virtual environment withpipenv, which can also be created withanaconda; the purpose of a virtual environment is to protect your local python environment, which can create an isolated environment without affecting everything locally, in which you can create any Python runtime environment, or delete the virtual environment at any time- I use the command
conda create -n server python=3.9, which creates a virtual environment namedserverwith python version3.9. - The python version must be chosen very carefully, because the latest version of heroku only supports a few python versions, so if you choose the wrong python version when the deployment is done in heroku, it will also report a version error.
- As for the versions it supports now, you can check here; note whether you have Heroku-20 or Heroku-22, I deployed with Heroku-22 so I went straight to 3.9 python

- I use the command
Install git
- Install git, this is to ensure that your local git can push the code to the remote repository, this should be OK as long as you have used github or gitlab partners
Install heroku cli
- Create a heroku scaffold heroku cli, the method of this installation official website also gives
- I have an Apple system, so I installed heroku’s scaffolding in the first way

- Logging in to heroku is a step we’ll take later, so let’s not rush here.
- We’ve also finished creating the virtual environment, which was created with anaconda; this step should actually be a part of the environment before writing the code, but if you’re here, you’ve obviously finished writing the code, so if you’re not using the python version supported by heroku, you’d better use conda to reallocate an environment, and then copy and paste the code into the new environment to debug it and see if it works.
- I have an Apple system, so I installed heroku’s scaffolding in the first way
Installing gunicorn
- Note: Be sure to install gunicorn in your own environment
pip install gunicornThis won’t work in your local environment, and it won’t work on your local runtime server, but when you upload your code to heroku, he will use [gunicorn](https://devcenter.heroku.com/ articles/django-app-configuration) to deploy it for you, so gunicorn must be present in your environment so that it can be pushed to the remote heroku repository along with the requirements.txt generated by the next freeze operation
Generate requirements.txt file
- The next step of
pip freeze > requirements.txtis to export all your python environments to the requirements.txt file, which is a list of all the libraries you need to run your code, and will be read from it when you deploy and configure the deployment environment for you remotely. This file records the list of libraries you need to run your code.If you have this problem in your requirements.txt, you have to take care of it, delete the content after it and replace it with the version number manually, just like the others. = version number`

Create the Procfile file manually
- Next, you need to create a
Procfilefile **without a suffix! No suffix! No suffix! ** (macs tend to default to txt format for files without a suffix, so be sure to pay attention to this, this file is truly suffix-free) - The contents of the
Procfilefile isweb: gunicorn myproject.wsgiwheremyprojectis replaced with the name of your file, for example, in my server, it should beweb: gunicorn djangoServer.wsgiThis file is very important forherokudeployment is very important, otherwise the deployment will definitely fail - The location of this file is as follows.

Install django-heroku
- Next is to install
django-heroku, install commandpip install django-heroku - Follow the instructions of the official website to set the content of setting.py, the official website recommended how you write you write
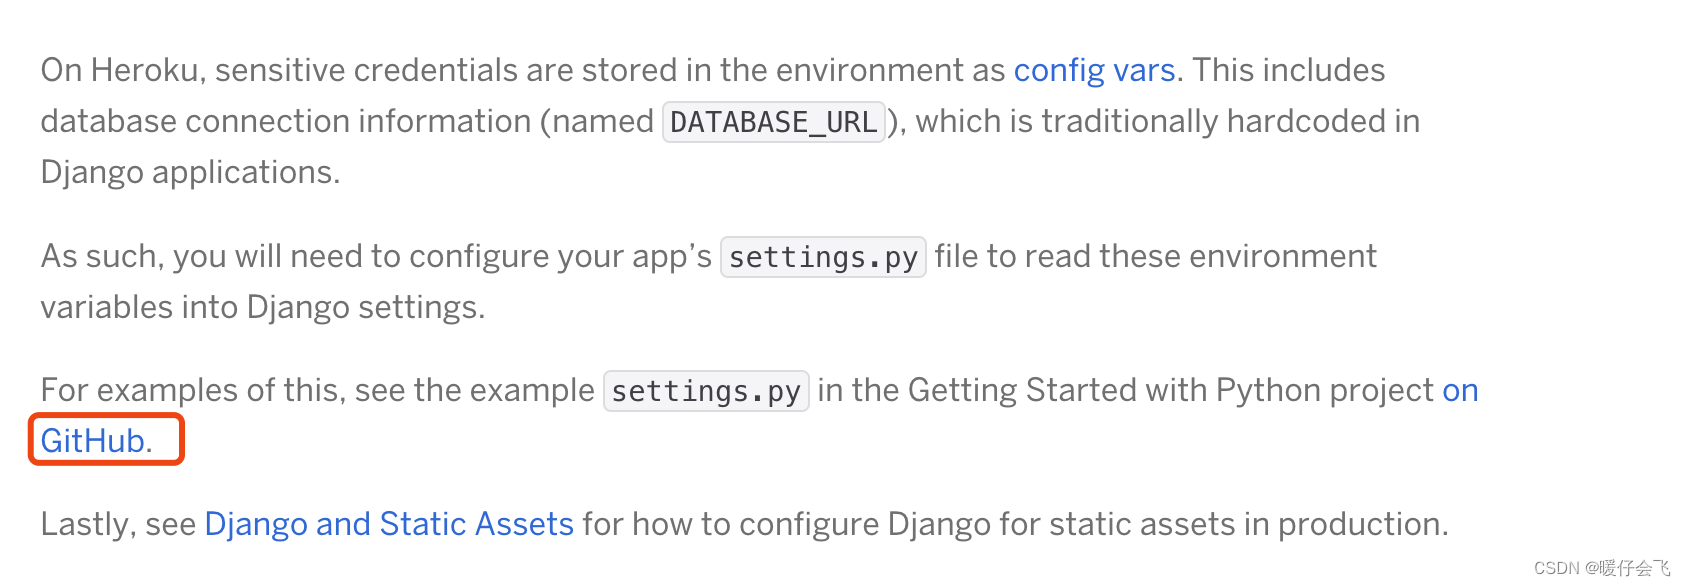
- Modify your original
settings.pyfile in Django according to the one recommended on the official site. - I’ve posted my own
settings.pyhere for your reference, with particular attention toALLOWED_HOSTS = ["*"]which must not be left out.
""" Django settings for djangoServer project. Generated by 'django-admin startproject' using Django 3.2. For more information on this file, see https://docs.djangoproject.com/en/3.2/topics/settings/ For the full list of settings and their values, see https://docs.djangoproject.com/en/3.2/ref/settings/ """ import datetime from pathlib import Path import dj_database_url import os from django.test.runner import DiscoverRunner from pathlib import Path # Build paths inside the project like this: BASE_DIR / 'subdir'. BASE_DIR = Path(__file__).resolve().parent.parent """ Heroku """ IS_HEROKU = "DYNO" in os.environ SECRET_KEY = "CHANGE_ME!!!! (P.S. the SECRET_KEY environment variable will be used, if set, instead)." if 'SECRET_KEY' in os.environ: SECRET_KEY = os.environ["SECRET_KEY"] # Generally avoid wildcards(*). However since Heroku router provides hostname validation it is ok if IS_HEROKU: ALLOWED_HOSTS = ["*", 're-echidna-django.herokuapp.com'] else: ALLOWED_HOSTS = ['*','re-echidna-django.herokuapp.com'] # SECURITY WARNING: don't run with debug turned on in production! if not IS_HEROKU: DEBUG = True # Application definition # Quick-start development settings - unsuitable for production # See https://docs.djangoproject.com/en/3.2/howto/deployment/checklist/ # SECURITY WARNING: keep the secret key used in production secret! SECRET_KEY = 'django-insecure-pm42jjw)=bp1*8m3+vd=#kfnbe99213px8yb9*_7^%r6d$wlii' # SECURITY WARNING: don't run with debug turned on in production! DEBUG = True ALLOWED_HOSTS = ["*"] # Application definition INSTALLED_APPS = [ 'django.contrib.admin', 'django.contrib.auth', 'django.contrib.contenttypes', 'django.contrib.sessions', 'django.contrib.messages', 'django.contrib.staticfiles', 'RE_app.apps.AppConfig', 'corsheaders' ] MIDDLEWARE = [ 'django.middleware.security.SecurityMiddleware', 'django.contrib.sessions.middleware.SessionMiddleware', 'django.middleware.common.CommonMiddleware', # 'django.middleware.csrf.CsrfViewMiddleware', 'django.contrib.auth.middleware.AuthenticationMiddleware', 'django.contrib.messages.middleware.MessageMiddleware', 'django.middleware.clickjacking.XFrameOptionsMiddleware', 'corsheaders.middleware.CorsMiddleware', 'django.middleware.common.CommonMiddleware' ] CORS_ORIGIN_ALLOW_ALL = True CORS_ALLOW_CREDENTIALS = True ROOT_URLCONF = 'djangoServer.urls' TEMPLATES = [ { 'BACKEND': 'django.template.backends.django.DjangoTemplates', 'DIRS': [os.path.join(BASE_DIR, 'RE_app', 'templates')] , 'APP_DIRS': True, 'OPTIONS': { 'context_processors': [ 'django.template.context_processors.debug', 'django.template.context_processors.request', 'django.contrib.auth.context_processors.auth', 'django.contrib.messages.context_processors.messages', ], }, }, ] WSGI_APPLICATION = 'djangoServer.wsgi.application' # Database # https://docs.djangoproject.com/en/3.2/ref/settings/#databases DATABASES = { 'default': { # 'ENGINE': 'django.db.backends.sqlite3', # 'ENGINE': None, # 'ENGINE': 'djongo', # 'NAME': BASE_DIR / 'db.sqlite3', # 'NAME': 'RE_ECHIDNA', # 'ENFORCE_SCHEMA': False, # 'CLIENT': { # 'host': 'mongodb+srv://: # 'host': 'mongodb+srv://ZIYUQ:@ / ?retryWrites=true&w=majority'} @cluster0.366apt7.mongodb.net/?retryWrites=true&w=majority'} } } # Password validation # https://docs.djangoproject.com/en/3.2/ref/settings/#auth-password-validators AUTH_PASSWORD_VALIDATORS = [ { 'NAME': 'django.contrib.auth.password_validation.UserAttributeSimilarityValidator', }, { 'NAME': 'django.contrib.auth.password_validation.MinimumLengthValidator', }, { 'NAME': 'django.contrib.auth.password_validation.CommonPasswordValidator', }, { 'NAME': 'django.contrib.auth.password_validation.NumericPasswordValidator', }, ] # Internationalization # https://docs.djangoproject.com/en/3.2/topics/i18n/ LANGUAGE_CODE = 'en-us' TIME_ZONE = 'UTC' USE_I18N = True USE_L10N = True USE_TZ = True # Static files (CSS, JavaScript, Images) # https://docs.djangoproject.com/en/3.2/howto/static-files/ STATIC_URL = '/static/' # Default primary key field type # https://docs.djangoproject.com/en/3.2/ref/settings/#default-auto-field DEFAULT_AUTO_FIELD = 'django.db.models.BigAutoField' """ Heroku """ # Test Runner Config class HerokuDiscoverRunner(DiscoverRunner): """Test Runner for Heroku CI, which provides a database for you. This requires you to set the TEST database (done for you by settings().)""" def setup_databases(self, **kwargs): self.keepdb = True return super(HerokuDiscoverRunner, self).setup_databases(**kwargs) # Use HerokuDiscoverRunner on Heroku CI if "CI" in os.environ: TEST_RUNNER = "djangoServer.settings.HerokuDiscoverRunner" # Default primary key field type # https://docs.djangoproject.com/en/4.0/ref/settings/#default-auto-field DEFAULT_AUTO_FIELD = 'django.db.models.BigAutoField' # print(os.path.join(BASE_DIR, 'RE_app', 'templates'))- 1
- 2
- 3
- 4
- 5
- 6
- 7
- 8
- 9
- 10
- 11
- 12
- 13
- 14
- 15
- 16
- 17
- 18
- 19
- 20
- 21
- 22
- 23
- 24
- 25
- 26
- 27
- 28
- 29
- 30
- 31
- 32
- 33
- 34
- 35
- 36
- 37
- 38
- 39
- 40
- 41
- 42
- 43
- 44
- 45
- 46
- 47
- 48
- 49
- 50
- 51
- 52
- 53
- 54
- 55
- 56
- 57
- 58
- 59
- 60
- 61
- 62
- 63
- 64
- 65
- 66
- 67
- 68
- 69
- 70
- 71
- 72
- 73
- 74
- 75
- 76
- 77
- 78
- 79
- 80
- 81
- 82
- 83
- 84
- 85
- 86
- 87
- 88
- 89
- 90
- 91
- 92
- 93
- 94
- 95
- 96
- 97
- 98
- 99
- 100
- 101
- 102
- 103
- 104
- 105
- 106
- 107
- 108
- 109
- 110
- 111
- 112
- 113
- 114
- 115
- 116
- 117
- 118
- 119
- 120
- 121
- 122
- 123
- 124
- 125
- 126
- 127
- 128
- 129
- 130
- 131
- 132
- 133
- 134
- 135
- 136
- 137
- 138
- 139
- 140
- 141
- 142
- 143
- 144
- 145
- 146
- 147
- 148
- 149
- 150
- 151
- 152
- 153
- 154
- 155
- 156
- 157
- 158
- 159
- 160
- 161
- 162
- 163
- 164
- 165
- 166
- 167
- 168
- 169
- 170
- 171
- 172
- 173
- 174
- 175
- 176
- 177
- 178
- 179
- 180
- 181
- 182
- 183
- 184
- 185
- 186
- 187
- 188
- 189
- 190
- 191
- 192
- 193
- 194
- 195
- 196
- Modify your original
Manually create a runtime.txt file specifying the version of python to deploy
- The final step before deployment is to create a runtime.txt text file in a folder with the version of python you want the remote to use.

To clarify, here my local python is actually 3.9.0 but I venture to judge that the remote 3.9.15 should be compatible with 3.9.0 and the remote only supports so many python versions that I can only choose 3.9.15 so I can tell you here that the local 3.9 series of python should not affect the deployment.
Formal deployment
- With all the previous preparations, you can now start deploying.
- Go to your project folder, in my own case I just go to the outermost djangoServer folder and go to.

- Go to your project folder, in my own case I just go to the outermost djangoServer folder and go to.
Login to heroku in the terminal
heroku loginLogin to your own heroku account, he will pop up a screen, just login. (If you are using vpn, try to disconnect it when you do this step, otherwise it may say your ip address is inconsistent)
Create heroku repository in terminal
- At this point create a heroku repository
heroku create xxxxxwith any name you want, for example Iheroku create re-echidna-dataportaland it will create a repository under your heroku account.
- Since we are creating the repository directly in a non-empty local folder, next we need to
initthe local folder and associate it with the remote repository. You can also follow the deployment instructions in your own project (but the official website gives the steps to build a remote repository from zero and pull it locally, where you complete your code tasks and push it to the remote, if you are following my method where the code is already written locally and the project folder is no longer empty, then follow my method).


init the local project folder and associate it with the heroku created remotely
git initheroku git:remote -a xxxxxxx is the name of the create- At this point, we’ve established a connection between the local files and the remote repository
Push the local project to heroku to complete the deployment
git add .Commit all local files to the local repositorygit commit -am "Just Say Anything"git push heroku masterOnce this is executed, the remote will prepare the runtime environment based on your requirements, select the python version via runtime and check if it’s supported, and finally deploy it via procfile
-
相关阅读:
LVGL misc area 方块区域通用函数(lv_area.c)
XTU-OJ 1169-最大子段和
Midjourney绘图欣赏系列(六)
Codeforces暑期训练周报(8.4~8.10)
SpringBoot基础篇学习笔记
IO口电路种类
20多年前微软曾计划收购,任天堂嘲讽道:“笑死我了”
[Linux打怪升级之路]-yun安装和gcc的使用
go-zero环境搭建
Python 多线程HTTP服务器
- 原文地址:https://blog.csdn.net/Abner98414/article/details/127456270
