-
flask配置SSL证书,实现https服务
flask配置SSL证书,实现https服务 & Nginx实战
一、什么是数字签名
参考
某电子商务网站向CA申请了数字证书,用户可以通过使用CA的公钥验证CA的签名的真伪来确定该网站的合法性。
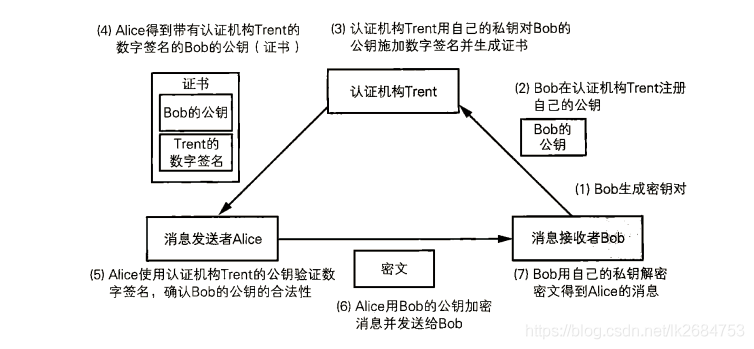
1)网站向机构发送公钥;
2)机构对网站发过来的公钥用私钥对其加上数字签名(即数字证书 = 网站公钥 + 机构在网站公钥上做的数字签名);
3)接着用户获得了网站的数字签名证书和网站的公钥,利用机构提供的公钥对数字签名进行解密,将解密后的结果与数字证书中网站所提供的原始公钥进行匹配,验证网站的公钥的合法性。
4)用户先使用网站提供的公钥对消息进行加密,再向网站发送消息。
5)网站收到用户发过来的密文之后,使用私钥进行解密。数字签名中用到了非对称加密:CA机构用私钥对网站发送的公钥进行加密,用户(浏览器) 使用CA机构的公钥对数字签名进行解密,验证数字签名解码后的明文是否和网站公钥一致;
这里应该没用到摘要算法,否则用户无法使用CA的公钥对CA密钥加密后的数字签名进行解密。
二、windows + flask配置SSL证书,实现https服务
参考
方法1:通过flask的ssl_context 或 gunicorn命令,实现https服务
在
windows系统中,flask要想实现https服务,其实很简单:-
在windows上安装
openssL,参考windows安装OpenSSL -
利用
openssl生成一个自签证书,命令如下。执行完后会生成四个文件:server.crt,server.csr,server.key,server.key.org这样,签名就生成好了。参考flask配置https# 生成私钥 openssl genrsa -des3 -out server.key 1024 # 生成csr文件 openssl req -new -key server.key -out server.csr cp server.key server.key.org #在windows中将server.key重命名为server.key.org openssl rsa -in server.key.org -out server.key # 生成crt文件,有效期365天 openssl x509 -req -days 365 -in server.csr -signkey server.key -out server.crt- 1
- 2
- 3
- 4
- 5
- 6
- 7
- 8
-
将
server.crt和server.key拷贝到flask项目根目录下:
代码如下:
import os from app import create_app # 启动脚本 app = create_app(os.getenv('FLASK_CONFIG') or 'default') if __name__ == '__main__': app.run(debug=True,threaded=True,host='0.0.0.0',port=5000,ssl_context=('server.crt','server.key'))- 1
- 2
- 3
- 4
- 5
- 6
- 7
- 8
执行
runApp.py之后:* Debugger is active! * Debugger PIN: 454-625-203 * Running on all addresses. WARNING: This is a development server. Do not use it in a production deployment. * Running on https://112.86.xxx.xxx:5000/ (Press CTRL+C to quit)- 1
- 2
- 3
- 4
- 5
-
此时浏览器访问
https请求会显示链接不安全(可以直接点击无视,继续访问),主要原因是浏览器中只配置了CA机构的证书,并没有配置自签证书。如果是chrome浏览器,在安全设置中直接将server.crt导入即可,参考谷歌浏览器如何导入根证书/安全证书呢-百度经验

-
为了方便在
postman上测试接口,先File> setting关闭掉SSL认证,接着导入证书即可。参考Postman https请求、添加证书
在开发阶段可以使用app.run(),但是在部署项目时不建议使用,建议使用性能更强的guicorn,参考独立的wsgi容器 — Flask Documentation (1.1.x)import os import sys import argparse from app import create_app import requests import socket from app.blueprints.view_utils.yaml_load import load_yaml,write_yaml from gevent import pywsgi from werkzeug.middleware.proxy_fix import ProxyFix curPath = os.path.abspath(os.path.dirname(__file__)) rootPath = curPath sys.path.append(rootPath) # 启动脚本 app = create_app(os.getenv('FLASK_CONFIG') or 'default') #手动配置 server_config.yml if __name__ == '__main__': app.wsgi_app = ProxyFix(app.wsgi_app) app.run()- 1
- 2
- 3
- 4
- 5
- 6
- 7
- 8
- 9
- 10
- 11
- 12
- 13
- 14
- 15
- 16
- 17
- 18
- 19
- 20
- 21
配置
SSL证书则参考Running gunicorn on https?
命令如下:gunicorn -w 5 -b 0.0.0.0:5000 --certfile=client-1.local.crt --keyfile=client-1.local.key manage:app- 1
方法2:Nginx配置https server,实现https服务
参考
- windows nginx配置HTTPS详细教程(内网)
Nginx路径匹配规则 & 动静资源分离:Java进阶2 - 易错知识点整理(待更新)
具体步骤:
-
windows上安装
nginx,参考windows nginx配置HTTPS详细教程(内网) -
开启
flask服务,启动时不用通过ssl_context配置SSL证书,启动代码如下:import os from app import create_app # 启动脚本 app = create_app(os.getenv('FLASK_CONFIG') or 'default') if __name__ == '__main__': app.run(debug=True,threaded=True,host='0.0.0.0',port=5000)- 1
- 2
- 3
- 4
- 5
- 6
- 7
- 8
-
将第一步中生成的自签证书放在
conf目录下,并完成nginx.conf关于https服务器的配置,nginx.conf配置如下。参考windows服务器通过nginx配置https#user nobody; worker_processes 1; events { worker_connections 1024; } http { include mime.types; default_type application/octet-stream; sendfile on; #tcp_nopush on; #keepalive_timeout 0; keepalive_timeout 65; # HTTP server # server{ # listen 80; # server_name 127.0.0.1; # rewrite ^(.*)$ https://$host$1 permanent; # 重定向 # } # HTTPS server server { listen 443 ssl; server_name 127.0.0.1; #处理跨域 add_header 'Access-Control-Allow-Origin' '*' always; add_header 'Access-Control-Max-Age' '1000' always; add_header 'Access-Control-Allow-Methods' "POST, GET, OPTIONS, DELETE, PUT" always; add_header 'Access-Control-Allow-Headers' "x-requested-with, Content-Type, Origin, authorization, Accept, client-security-token" always; ssl_certificate cert/server.crt; ssl_certificate_key cert/server.key; ssl_session_cache shared:SSL:1m; ssl_session_timeout 5m; ssl_ciphers ECDHE-RSA-AES128-GCM-SHA256:ECDHE:ECDH:AES:HIGH:!NULL:!aNULL:!MD5:!ADH:!RC4; #表示使用的加密套件的类型。 ssl_protocols TLSv1 TLSv1.1 TLSv1.2; #表示使用的TLS协议的类型。 ssl_prefer_server_ciphers on; #静态资源代理配置 # location /index{ # root F:/nginx_test/; # index report.html report.htm; # } #动态资源代理配置 #下面所有的服务可以通过该统一接口直接访问 location /api{ proxy_pass http://127.0.0.1:5000/; } # #舱门检测 # location ^~ /predict_manhole{ # proxy_pass http://127.0.0.1:5000/predict_manhole; # } # location ^~ /shutdown_manhole_analysis{ # proxy_pass http://127.0.0.1:5000/shutdown_manhole_analysis; # } # #烟雾检测 # location ^~ /predict_fire{ # proxy_pass http://127.0.0.1:5000/predict_fire; # } # location ^~ /shutdown_fire_analysis{ # proxy_pass http://127.0.0.1:5000/shutdown_fire_analysis; # } # #人脸检测 # location ^~ /face_recog{ # proxy_pass http://127.0.0.1:5000/face_recog; # } # location ^~ /shutdown_faceRecog_analysis{ # proxy_pass http://127.0.0.1:5000/shutdown_faceRecog_analysis; # } # location ^~ /update_id_dataset{ # proxy_pass http://127.0.0.1:5000/update_id_dataset; # } # #语言转写 # location ^~ /predict_text_from_audio{ # proxy_pass http://127.0.0.1:5000/predict_text_from_audio; # } # #语言合成 # location ^~ /predict_audio_from_text{ # proxy_pass http://127.0.0.1:5000/predict_audio_from_text; # } #error_page 404 /404.html; error_page 500 502 503 504 /50x.html; location = /50x.html { root html; } } }- 1
- 2
- 3
- 4
- 5
- 6
- 7
- 8
- 9
- 10
- 11
- 12
- 13
- 14
- 15
- 16
- 17
- 18
- 19
- 20
- 21
- 22
- 23
- 24
- 25
- 26
- 27
- 28
- 29
- 30
- 31
- 32
- 33
- 34
- 35
- 36
- 37
- 38
- 39
- 40
- 41
- 42
- 43
- 44
- 45
- 46
- 47
- 48
- 49
- 50
- 51
- 52
- 53
- 54
- 55
- 56
- 57
- 58
- 59
- 60
- 61
- 62
- 63
- 64
- 65
- 66
- 67
- 68
- 69
- 70
- 71
- 72
- 73
- 74
- 75
- 76
- 77
- 78
- 79
- 80
- 81
- 82
- 83
- 84
- 85
- 86
- 87
- 88
- 89
- 90
- 91
- 92
- 93
- 94
- 95
- 96
- 97
- 98
- 99
- 100
- 101
- 102
- 103
- 104
-
进入
nginx目录,使用cmd启动nginx,如果发现443端口被占用,则结束掉该进程即可。方法如下:-
端口检查:
netstat -aon|findstr "443" -
进程检查:
tasklist | findstr 进程id -
打开任务管理器>>结束任务(这里结束的是
vmware-hostd.exe)
-
-
通过
https://127.0.0.1/可以访问nginx主页面

也可以通过输入https://127.0.0.1/api/face_recog?type=2&webCamera_url=0,Nginx 会代理转发到https://127.0.0.1:5000/face_recog?type=2&webCamera_url=0,完成请求处理,效果如下:

Note:- 代理转发(
proxy pass)时,页面路径没有变,即https://127.0.0.1/api/xxx等价于访问http://127.0.0.1:5000/xxx;; - 如果使用重定向(
rewrite),页面路径会发生变动。
- 代理转发(
方法3:域名注册 + 证书申请,实现安全的https服务
参考
具体步骤如下:
-
先在阿里云购买域名(我买了1元的
wangxiaoxi.top域名,购买时需要先制定模板,等待半小时左右就审核通过了)参考如何在阿里云注册购买域名之详细操作流程,阿里云申请域名及域名配置https -
完成本地服务器
ip和域名的绑定,此时DNS服务配置状态会显示正常(需要先完成此步,SSL证书在配置时才可以自动识别DNS服务器),但是在浏览器上可能无法访问域名。参考为你的阿里云服务器配置一个域名并成功访问

Note:
- 如果本地通过公网地址 + 端口号,即
157.0.xxx.xxx:5000访问服务,则在公网上可以通过和公网ip绑定好的域名,即wangxiaoxi.top:5000访问服务。 - 在
python中,获取公网ip和 内网ip的代码分别如下,参考分享Python获取本机IP地址的几种方法#获取公网ip import requests res = requests.get('http://myip.ipip.net', timeout=5).text print(res) #获取局域网ip import socket # 函数 gethostname() 返回当前正在执行 Python 的系统主机名 res = socket.gethostbyname(socket.gethostname()) print(res)- 1
- 2
- 3
- 4
- 5
- 6
- 7
- 8
- 9
- 10
- 如果本地通过公网地址 + 端口号,即
-
购买阿里云的免费SSL证书

购买好之后,先创建证书,再申请证书。参考阿里云SSL证书免费申请方法(图文教程)如果使用的是阿里的域名,则会自动进行DNS服务器检测,接着提交审核,半小时后会收到CA机构签发的数字证书的邮件提醒。

-
下载阿里云免费证书(这里选择
nginx下载包),并将证书文件xx.pem和密钥xx.key保存到nginx根目录下的cert文件夹中,nginx.conf的配置同上面自签证书配置的一样。参考阿里云申请域名及域名配置https
nginx.conf配置修改如下:#user nobody; worker_processes 1; events { worker_connections 1024; } http { include mime.types; default_type application/octet-stream; sendfile on; #tcp_nopush on; #keepalive_timeout 0; keepalive_timeout 65; # HTTPS server server { listen 443 ssl; server_name wangxiaoxi.top; #处理跨域 add_header 'Access-Control-Allow-Origin' '*' always; add_header 'Access-Control-Max-Age' '1000' always; add_header 'Access-Control-Allow-Methods' "POST, GET, OPTIONS, DELETE, PUT" always; add_header 'Access-Control-Allow-Headers' "x-requested-with, Content-Type, Origin, authorization, Accept, client-security-token" always; ssl_certificate cert/8666272_wangxiaoxi.top.pem; ssl_certificate_key cert/8666272_wangxiaoxi.top.key; ssl_session_cache shared:SSL:1m; ssl_session_timeout 5m; ssl_ciphers ECDHE-RSA-AES128-GCM-SHA256:ECDHE:ECDH:AES:HIGH:!NULL:!aNULL:!MD5:!ADH:!RC4; #表示使用的加密套件的类型。 ssl_protocols TLSv1 TLSv1.1 TLSv1.2; #表示使用的TLS协议的类型。 ssl_prefer_server_ciphers on; #静态资源代理配置 # location /index{ # root F:/nginx_test/; # index report.html report.htm; # } #动态资源代理配置 location /api{ proxy_pass http://127.0.0.1:5000/; } #error_page 404 /404.html; error_page 500 502 503 504 /50x.html; location = /50x.html { root html; } } }- 1
- 2
- 3
- 4
- 5
- 6
- 7
- 8
- 9
- 10
- 11
- 12
- 13
- 14
- 15
- 16
- 17
- 18
- 19
- 20
- 21
- 22
- 23
- 24
- 25
- 26
- 27
- 28
- 29
- 30
- 31
- 32
- 33
- 34
- 35
- 36
- 37
- 38
- 39
- 40
- 41
- 42
- 43
- 44
- 45
- 46
- 47
- 48
- 49
- 50
- 51
- 52
- 53
- 54
- 55
- 56
- 57
- 58
- 59
浏览器访问路径更改为
https://wangxiaoxi.top/api/face_recog?type=2&webCamera_url=0,访问效果如下图所示,此时发送的https请求是安全的连接。

补充1:在https服务中,配置http服务
有两种方法
-
一种是在
server{}中同时监听443(https)和80(http)端口,配置如下:server{ listen 80; server_name wangxiaoxi.top; rewrite ^(.*)$ https://$host$1 permanent; # 重定向 } server { listen 443 ssl; server_name wangxiaoxi.top; #处理跨域 add_header 'Access-Control-Allow-Origin' '*' always; add_header 'Access-Control-Max-Age' '1000' always; add_header 'Access-Control-Allow-Methods' "POST, GET, OPTIONS, DELETE, PUT" always; add_header 'Access-Control-Allow-Headers' "x-requested-with, Content-Type, Origin, authorization, Accept, client-security-token" always; ssl_certificate cert/8666272_wangxiaoxi.top.pem; ssl_certificate_key cert/8666272_wangxiaoxi.top.key; # ssl_certificate cert/server.crt; # ssl_certificate_key cert/server.key; ssl_session_cache shared:SSL:1m; ssl_session_timeout 5m; ssl_ciphers ECDHE-RSA-AES128-GCM-SHA256:ECDHE:ECDH:AES:HIGH:!NULL:!aNULL:!MD5:!ADH:!RC4; #表示使用的加密套件的类型。 ssl_protocols TLSv1 TLSv1.1 TLSv1.2; #表示使用的TLS协议的类型。 ssl_prefer_server_ciphers on; ...- 1
- 2
- 3
- 4
- 5
- 6
- 7
- 8
- 9
- 10
- 11
- 12
- 13
- 14
- 15
- 16
- 17
- 18
- 19
- 20
- 21
- 22
- 23
- 24
- 25
- 26
- 27
- 28
-
另一种是在
server{}中监听80端口,然后重定向到监听443的server{}进行处理,配置如下:server { listen 80; listen 443 ssl; server_name wangxiaoxi.top; ... #此处省略 }- 1
- 2
- 3
- 4
- 5
- 6
两者的主要区别在于访问路径是否发送修改。
Note:如果在windows10配置时发现80端口已被System占用,
nginx启动时出现这个报错[emerg] bind() to 0.0.0.0:80 failed (10013: An attempt was made to access,修改注册表即可。具体解决方法参考windows10启动 nginx 报错: [emerg] bind() to 0.0.0.0:80 failed (10013: An attempt was made to access_穆埙的博客-CSDN博客补充2:配置静态资源,实现前端服务
这里将
vue项目(dist文件夹)拷贝到nginx根目录下的html文件夹下:
然后在
nginx.conf上配置静态资源代理:server{ listen 80; server_name wangxiaoxi.top; rewrite ^(.*)$ https://$host$1 permanent; # 重定向 } server { listen 443 ssl; server_name wangxiaoxi.top; #处理跨域 add_header 'Access-Control-Allow-Origin' '*' always; add_header 'Access-Control-Max-Age' '1000' always; add_header 'Access-Control-Allow-Methods' "POST, GET, OPTIONS, DELETE, PUT" always; add_header 'Access-Control-Allow-Headers' "x-requested-with, Content-Type, Origin, authorization, Accept, client-security-token" always; ssl_certificate cert/8666272_wangxiaoxi.top.pem; ssl_certificate_key cert/8666272_wangxiaoxi.top.key; # ssl_certificate cert/server.crt; # ssl_certificate_key cert/server.key; ssl_session_cache shared:SSL:1m; ssl_session_timeout 5m; ssl_ciphers ECDHE-RSA-AES128-GCM-SHA256:ECDHE:ECDH:AES:HIGH:!NULL:!aNULL:!MD5:!ADH:!RC4; #表示使用的加密套件的类型。 ssl_protocols TLSv1 TLSv1.1 TLSv1.2; #表示使用的TLS协议的类型。 ssl_prefer_server_ciphers on; #静态资源代理配置 location /{ # root D:/programSoftware/nginx/nginx-1.22.1/html/dist #这样配置静态资源,并不能将 wangxiaoxi.top/和当前文件夹绑定起来,浏览器要访问静态资源,仍然需要通过 wangxiaoxi.top/dist访问 root html; #nginx根目录下的html文件夹 index index.html index.htm; autoindex on; autoindex_exact_size off; charset urf-8; add_header 'Access-Control-Allow-Origin' '*'; add_header 'Access-Control-Allow-Credentials' 'true'; add_header 'Access-Control-Allow-Methods' 'GET, PUT, POST, DELETE, OPTIONS'; add_header 'Access-Control-Allow-Headers' 'Content-Type,*'; } #########精通资源配置########## location ~ ^/(images|img|javascript|js|css|flash|media|static)/ { root D:/programSoftware/nginx/nginx-1.22.1/html/dist/; #####静态资源的路径(下面有个图说明) autoindex on; access_log off; expires 30d; #####设置缓存时间 } }- 1
- 2
- 3
- 4
- 5
- 6
- 7
- 8
- 9
- 10
- 11
- 12
- 13
- 14
- 15
- 16
- 17
- 18
- 19
- 20
- 21
- 22
- 23
- 24
- 25
- 26
- 27
- 28
- 29
- 30
- 31
- 32
- 33
- 34
- 35
- 36
- 37
- 38
- 39
- 40
- 41
- 42
- 43
- 44
- 45
- 46
- 47
- 48
- 49
- 50
然后在浏览器中输入
https://wangxiaoxi.top/dist/,即可访问html/dist文件夹下的index.html主页面。
Note:在配置
root时,如果配置为root D:/programSoftware/nginx/nginx-1.22.1/html/dist,并不能将wangxiaoxi.top/和当前文件夹绑定起来,浏览器要想访问静态资源,仍然需要通过wangxiaoxi.top/dist访问。 -
相关阅读:
BERT之后,NLP主要预训练模型演变梳理
概率论的一些知识
【深圳1024开发者城市聚会定向征文】
@ 代码随想录算法训练营第8周(C语言)|Day56(动态规划)
牛客网解题之矩形覆盖
一个基于.Net Core跨平台小程序考试系统
动态规划:路径和子数组问题(C++)
Java&Vue 借助json传递数据
【TS】泛型以及多个泛型参数
【2022秋线上作业-第5次-第11-13周】选择题
- 原文地址:https://blog.csdn.net/qq_33934427/article/details/127456673
