-
【Linux集群教程】14 集群装机 - PXE原理和PXE服务搭建
1 PXE 原理
1.1 PXE 定义
PXE (Pre-boot Execution Environment) 是由 Intel 和 微软设计的协议,它可以使计算机通过网络启动。协议分 为 client 和 server 两端,PXE client 在网卡的 ROM 中,当计算机引导时,BIOS 把 PXE client 调入内存执行,并显示出命令菜单,经用户选择后,PXE client 将放置在远端的操作系统通过网络下载到本地运行。
PXE(Pre-boot Execution Environment)是由Intel设计的协议,它可以使计算机通过网络启动。工作在Client/Server模式,允许客户机通过网络从远程服务器下载引导镜像,并加载安装文件或者整个操作系统。
PXE的结构是C/S结构,Server端是需要构建的PXE服务,Client是客户端。
并不是所有的机器都支持PXE装机,只有网卡支持PXE装机,才能进行机器系统安装。
1.1.1 PXE 的优点
1、规模化:可以同时装配多台服务器;
2、自动化:安装系统、配置各种服务;
3、远程实现:不需要光盘、U盘等介质进行安装。1.1.2 搭建PXE需要满足的条件
客户端的条件
1、客户机的网卡需要支持PXE协议,且主板支持网络引导。一般服务器都支持,只需要进入BIOS设置允许从Network或LAN启动即可
2、网络中有一台DHCP服务器以便为客户机自动分配IP地址,指定引导文件位置。
3、服务器要通过TFTP(简单文件传输协议)服务来提供系统内核和引导镜像文件的下载。
搭建PXE远程安装服务器
PXE远程安装服务器集成了CentOS 7安装源、TFTP服务、DHCP服务、FTP服务,能够向客户机裸机发送PXE引导程序、Linux内核、启动菜单等数据,以及提供安装文件。
TFTP(简单文件传输协议),是一个基于UDP协议实现的用于在客户机和服务器之间进行简单文件传输的协议,适合于小文件传输的应用场合。TFTP服务默认由xinetd服务进行管理,使用UDP端口69
xinetd是新一代的网络守护进程服务程序,又叫超级服务器,常用来管理多种轻量级Internet服务。
1.2 安装过程图解
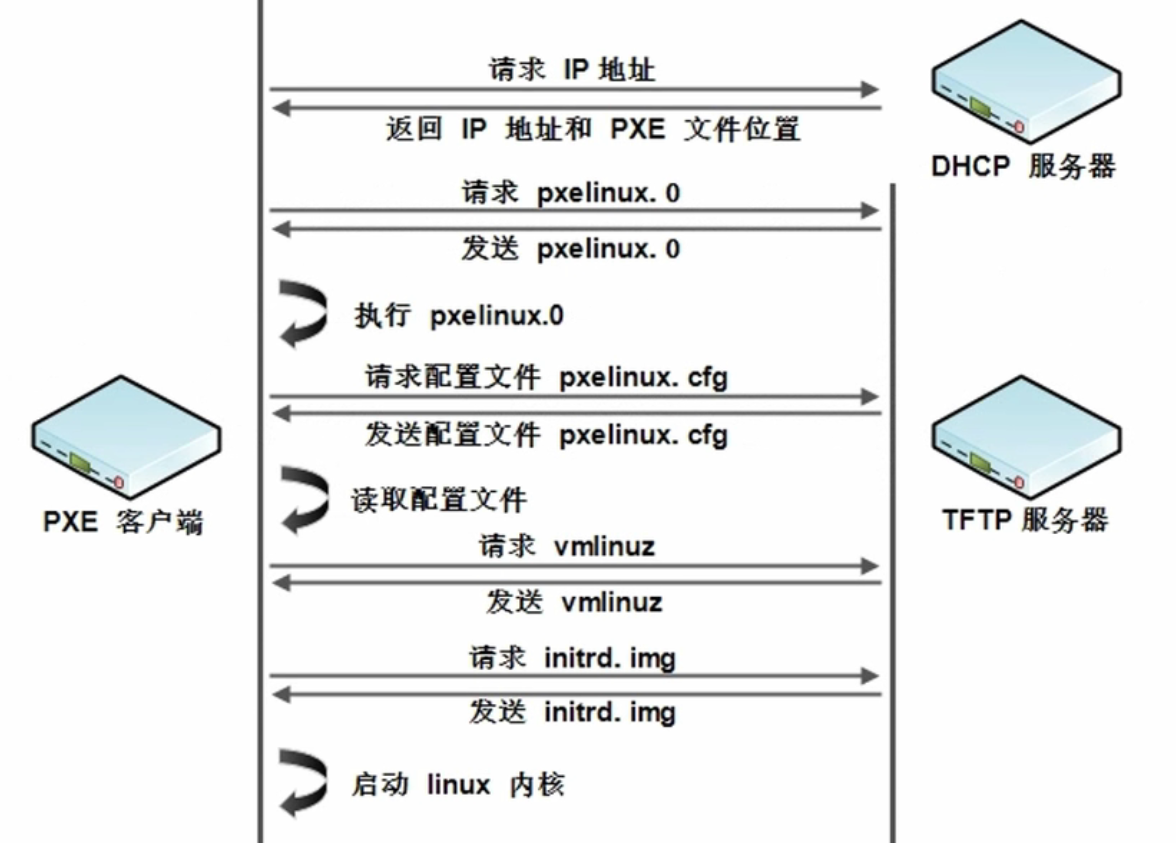
1:PXE客户机发出 DHCP 请求,向 DHCP 服务器申请IP地址
2:DHCP服务器响应PXE客户机请求,自动给PXE客户机一个IP地址,
- 并告知客户机:服务器的IP地址和PXE引导文件 pxelinux.0,默认在TFTP(使用的是UDP协议)共享目录 /var/lib/tftpoot/下。
- 二进制执行文件 pxelinux.0 用来自我执行,生成安装界面,以及可选的操作系统界面(网络装机才会遇到)
3:PXE客户机向TFTP服务器发起获取 pxelinux.0 引导程序文件的请求
4:TFTP服务器响应PXE客户机的请求,将其共享的 pxelinux.0 文件传输给PXE客户机
5:PXE客户机通过网络来启动系统安装主界面
6:PXE客户机向文件共享服务器(FTP、HTTP、NFS)发起获取Centos或Windows系统安装文件的请求
7:(VSFTP)文件共享服务器相应PXE客户机的请求,将共享的系统安装文件(共享真正的镜像)转述给PXE客户机
8:PXE 客户机进入到安装提示界面,用户需要手动来完成系统安装的操作
拓展:
PXE 客户端中的BIOS中网卡启动项调成第一位。
vmlinuz:虚拟内存Linux操作系统(压缩版),为了减少其文件空间占用情况。即内存里运行的Linux系统环境,独立于硬盘
initrd.img:基础文件系统。
客户端一获取到 vmlinuz 和 initrd.img 以后,就可以在客户端运行出一个 Linux 的内核,就可以正常的安装系统。
2 PXE 服务构建
2.0 PXE中各服务器软件的功能
DHCP:用来给PXE客户机自动分配TCP/IP设置(包括IP地址、子网掩码、网关、DNS等)。告知PXE客户机“TFTP服务器的IP地址和PXE启动文件名”。
TFTP:是一个迷你的FTP共享协议软件,用来给PXE客户机提供网络启动的引导程序文件pxelinux.0。
syslinux:用来提供pxelinux.0网络引导程序文件。
文件共享:可以是 Vsftpd、NFS、Samba、HTTP等软件来实现文件共享。用来给PXE客户机提供系统安装文件。
2.1 注意事项
- 虚拟环境中注意是否将自带 DHCP 功能关闭
- 注意测试安装机器是否将网络与 PXE 服务器网络对齐
2.2 安装流程
2.2.0 环境初始化
###CentOS 6系统 #关闭防火墙 $ iptables -F && service iptables save && chkconfig iptables off $ iptables -L #关闭SELinux $ setenforce 0 && sed -i 's/^SELINUX=.*/SELINUX=disabled/' /etc/selinux/config $ getenforce ###CentOS 7系统 #关闭防火墙 $ systemctl disable --now firewalld #关闭SELinux $ setenforce 0 && sed -i 's/^SELINUX=.*/SELINUX=disabled/' /etc/selinux/config $ getenforce #配置本地Yum源- 1
- 2
- 3
- 4
- 5
- 6
- 7
- 8
- 9
- 10
- 11
- 12
- 13
- 14
- 15
并且如果是使用的 VMware Workstation 的虚拟软件,则将网卡的DHCP功能取消即可。
在 编辑 → 虚拟网络适配器 → “对应的网卡” → 取消网卡的DHCP功能。(因为在 PXE 中就已经有一个DHCP服务器用来分配IP地址和发送配置文件到客户机,所以默认的网卡的DHCP功能需要关闭,否则流程走不通了)

注意:PXE 构建中需要才用一个图形化的操作系统,因为在PXE构建中有一个软件去生成对应的剧本,安装的流程,安装的流程软件包是需要在图形化展现的。所以必须是图形化的操作系统。
2.2.1 CentOS 6.8 安装 PXE
这里我主要使用的是CentOS 7.9.2009 的操作系统,CentOS 6的系统步骤贴到此。
参考文献 [ https://blog.csdn.net/w918589859/article/details/112591287 ]
- 安装环境
CentOS 6.8 操作系统
init 5 #打开图形化界面 mount -t iso9660 /dev/cdrom /mnt/cdrom yum -y install vsftpd dhcp tftp syslinux tftp-server- 1
- 2
- 3
- 4
- 拷贝镜像文件到 FTP 服务器目录
cd /var/ftp/pub #创建目录,改变所属主,组,用于拷贝镜像 mkdir dvd && chown -R ftp:ftp dvd cp -av /mnt/cdrom/* dvd/ #拷贝镜像- 1
- 2
- 3
- 4
- 5
- 配置DHCP服务
vim /etc/dhcp/dhcpd.conf #直接添加如下内容 #网段 subnet 10.10.10.0 netmask 255.255.255.0 { #分配的地址池范围 range 10.10.10.100 10.10.10.200; #当前的路由 option routers 10.10.10.11; #本机的ip next-server 10.10.10.11; filename "pxelinux.0"; }- 1
- 2
- 3
- 4
- 5
- 6
- 7
- 8
- 9
- 10
- 11
- 12
- 开启 FTP 服务
$ vim /etc/xinetd.d/tftp service tftp { socket_type = dgram protocol = udp wait = yes user = root server = /usr/sbin/in.tftpd #设置默认工作目录 server_args = -s /tftpboot #设置开机自启动 disable = no per_source = 11 cps = 100 2 flags = IPv4 } $ mkdir /tftpboot- 1
- 2
- 3
- 4
- 5
- 6
- 7
- 8
- 9
- 10
- 11
- 12
- 13
- 14
- 15
- 16
- 创建相关目录并拷贝所需文件
#当pxelinux0去执行的时候,默认到这个目录下寻找引导配置文件 mkdir -p /tftpboot/pxelinux.cfg #默认寻找的配置文件名 \cp /var/ftp/pub/dvd/isolinux/isolinux.cfg /tftpboot/pxelinux.cfg/default \cp /usr/share/syslinux/pxelinux.0 /tftpboot/ chmod 644 /tftpboot/pxelinux.cfg/default \cp /var/ftp/pub/dvd/isolinux/* /tftpboot/- 1
- 2
- 3
- 4
- 5
- 6
- 7
- 8
- 开启相关服务并设置自动开启
service dhcpd restart && chkconfig dhcpd on service xinetd restart && chkconfig xinetd on service vsftpd restart && chkconfig vsftpd on- 1
- 2
- 3
- 配置 kisckstart 无人值守安装脚本
$ yum -y install system-config-kickstart #进入图形界面执行 $ system-config-kickstart #将保存的 ks.cfg 配置文件存放到 FTP 中 $ cp ks.cfg /var/ftp/pub/ #修改配置文件 $ vim /tftpboot/pxelinux.cfg/default #改为linux default linux #prompt 1 timeout 600 .... label linux menu label ^Install or upgrade an existing system menu default kernel vmlinuz #添加ks=ftp://10.10.10.11/pub/ks.cfg append initrd=initrd.img ks=ftp://10.10.10.11/pub/ks.cfg label vesa- 1
- 2
- 3
- 4
- 5
- 6
- 7
- 8
- 9
- 10
- 11
- 12
- 13
- 14
- 15
- 16
- 17
- 18
- 19
- 20
2.2.2 CentOS 7.9 安装 PXE
参考文献: [ https://www.cnblogs.com/NanZhiHan/p/14978387.html ]
#查看SELinux的状态 $ getenforce Disabled #打开图形化界面 #安装图形化界面(需要联网),若有图形化功能则省略该步骤 $ wget -O /etc/yum.repos.d/CentOS-Base.repo https://mirrors.aliyun.com/repo/Centos-7.repo $ yum makecache fast $ yum groupinstall -y "Server with GUI" #开启图形化功能 $ init 5 $ mount -t iso9660 /dev/cdrom /mnt/cdrom $ yum -y install vsftpd dhcp tftp tftp-server syslinux syslinux-tftpboot httpd xinetd #创建一个存放系统镜像文件目录,然后把镜像文件cp到该目录中。 $ mkdir /var/www/html/centos7 $ cp -av /mnt/cdrom/* /var/www/html/centos7/ #拷贝镜像文件到 FTP 服务器目录 #$ cd /var/ftp/pub #创建目录,改变所属主,组,用于拷贝镜像 #$ mkdir dvd && chown -R ftp:ftp dvd #拷贝镜像,时间可能会比较久 #$ cp -av /mnt/cdrom/* dvd/ #安装TFTP服务,修改配置文件并启动。这里修改一下tftp的根目录,因为还需要测试ubuntu系统, #这里做一个区分,如果只安装一个系统,可以不用修改。 $ yum -y install tftp-server $ vim /etc/xinetd.d/tftp #将disable=yes 修改为 disable=no #将 server_args = -s /var/lib/tftpboot 修改为 server_args = -s /var/lib/tftpboot/centos7 -c $ vim /usr/lib/systemd/system/tftp.service #将 ExecStart=/usr/sbin/in.tftpd -s /var/lib/tftpboot 修改为 ExecStart=/usr/sbin/in.tftpd -s /var/lib/tftpboot/centos7 $ systemctl daemon-reload #配置DHCP服务 $ vim /etc/dhcp/dhcpd.conf #直接添加如下内容 #网段 subnet 10.10.10.0 netmask 255.255.255.0 { #分配的地址池范围(DHCP服务为客户端分配的ip范围) range 10.10.10.100 10.10.10.200; #当前的路由(网关) option routers 10.10.10.11; #指定TFTP服务器的地址(本地IP地址) next-server 10.10.10.11; #广播 option broadcast-address 10.10.10.255; ##指定PXE引导程序的文件名 filename "pxelinux.0"; } #开启 FTP 服务 $ vim /etc/xinetd.d/tftp #将disable=yes 修改为 disable=no #将 server_args = -s /var/lib/tftpboot 修改为 server_args = -s /var/lib/tftpboot/centos7 -c $ vim /usr/lib/systemd/system/tftpd.service #将 ExecStart=/usr/sbin/in.tftpd -s /var/lib/tftpboot 修改为 ExecStart=/usr/sbin/in.tftpd -s /var/lib/tftpboot/centos7 $ mkdir /var/lib/tftpboot/centos7 #将linux内核、初始化镜像文件和pxe引导文件cp到tftp目录中 #默认寻找的配置文件名 $ \cp /mnt/cdrom/images/pxeboot/vmlinuz /var/lib/tftpboot/centos7 $ \cp /mnt/cdrom/images/pxeboot/initrd.img /var/lib/tftpboot/centos7 $ \cp /usr/share/syslinux/pxelinux.0 /var/lib/tftpboot/centos7 #创建相关目录并拷贝所需文件 #当pxelinux0去执行的时候,默认到这个目录下寻找对应所需要的引导配置文件 $ mkdir /var/lib/tftpbppt/centos7/pxelinux.cfg #配置启动菜单,启动菜单分为典型启动菜单和无人值守启动菜单。(先进行典型启动菜单,后使用无人值守菜单) #典型启动菜单,典型菜单在安装好dhcp后就可以安装系统了。 $ cat > /var/lib/tftpboot/centos7/pxelinux.cfg/default <<-'EOF' default auto prompt 0 label auto kernel vmlinuz append initrd=initrd.img method=http://10.10.10.11/centos7 EOF #无人值守菜单 #$ cat > /var/lib/tftpboot/centos7/pxelinux.cfg/default <<-'EOF' #default auto #prompt 0 #label auto # kernel vmlinuz # append initrd=initrd.img method=http://10.10.10.11/centos7 ks=http://10.10.10.11/centos7/ks.cfg #EOF #开启相关服务并设置自动开启 systemctl restart dhcpd && systemctl enable dhcpd && systemctl status dhcpd systemctl restart tftp && systemctl enable tftp && systemctl status tftp systemctl restart xinetd && systemctl enable xinetd && systemctl status xinetd systemctl restart vsftpd && systemctl enable vsftpd && systemctl status vsftpd systemctl start httpd && systemctl enable httpd && systemctl status httpd- 1
- 2
- 3
- 4
- 5
- 6
- 7
- 8
- 9
- 10
- 11
- 12
- 13
- 14
- 15
- 16
- 17
- 18
- 19
- 20
- 21
- 22
- 23
- 24
- 25
- 26
- 27
- 28
- 29
- 30
- 31
- 32
- 33
- 34
- 35
- 36
- 37
- 38
- 39
- 40
- 41
- 42
- 43
- 44
- 45
- 46
- 47
- 48
- 49
- 50
- 51
- 52
- 53
- 54
- 55
- 56
- 57
- 58
- 59
- 60
- 61
- 62
- 63
- 64
- 65
- 66
- 67
- 68
- 69
- 70
- 71
- 72
- 73
- 74
- 75
- 76
- 77
- 78
- 79
- 80
- 81
- 82
- 83
- 84
- 85
- 86
- 87
- 88
- 89
- 90
- 91
- 92
- 93
- 94
- 95
- 96
- 97
- 98
- 99
- 100
- 101
- 102
可以先查看一下效果,根据VMware Workstation 的创建虚拟机的向导进行配置即可。→ 选择"稍后安装操作系统"

网络选择"仅主机模式"(必须要在同一个网络空间内)

运行该虚拟机,查看一下效果

就可以到安装系统的操作界面

以上可以实现效果即可,就跟正常安装系统即可。会发现这还是需要人为手动进行一些系统的安装。这就需要"无人值守菜单"进行使用
接下来就要构建 kisckstart 剧本文件。
#配置 kisckstart 无人值守安装脚本(是使用python编写的软件包) $ yum -y install system-config-kickstart #进入图形界面执行 $ system-config-kickstart #后续操作就直接跟 kickstart 的向导进行配置- 1
- 2
- 3
- 4
- 5
- 6
- 进入图形化界面操作并打开 kisckstart

- 基本配置,根据自己的需求选择,输入 Root 密码

- 安装方式:选择Http,如果使用的是FTP搭建就使用 FTP

- 引导装载程序选择安装

- 分区信息,选择清除主引导记录,添加好自己的分区信息

- 网络添加 DHCP

- 认证

- 禁用防火墙,根据需要,可以不禁用防火墙功能

- 根据需求,选择是否安装图形界面

- 最后根据自己的需求,写入脚本信息,可以不写,其他没截图的均为默认。这里将 Yum 源进行配置即可。

- 最后保存文件即可(我将文件保存到 /root/ 目录下)

$ cp /root/ks.cfg /var/www/html/centos7/ks.cfg # 无人值守菜单 $ cat > /var/lib/tftpboot/centos7/pxelinux.cfg/default <<-'EOF' default auto prompt 0 label auto kernel vmlinuz append initrd=initrd.img method=http://10.10.10.11/centos7 ks=http://10.10.10.11/centos7/ks.cfg EOF- 1
- 2
- 3
- 4
- 5
- 6
- 7
- 8
- 9
- 10
- kickstart 生成了绝大部分的配置文件,但是依旧需要管理员手动填写一些信息,才能实现真正的无人值守安装系统。
在保存的文件末尾进行编辑添加最小化操作系统,不然依旧会导致进入到图形化的界面
cat >> /var/www/html/centos7/ks.cfg <<EOF # Operating System Selection %packages @^minimal %end EOF # 添加完毕后直接进行测试即可- 1
- 2
- 3
- 4
- 5
- 6
- 7
- 8
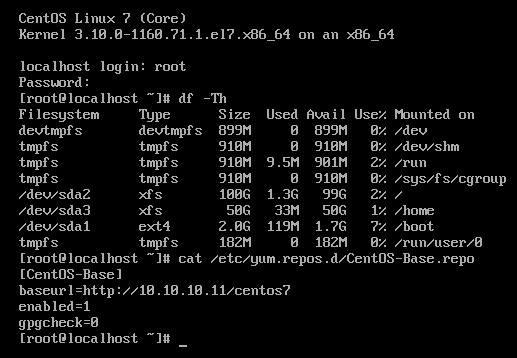
直接进行测试安装即可,部分安装过程截图。所有的步骤都是自动化完成,不需要人为介入。


可以发现配置的 ks.cfg 已经达到了管理员的目的。显示出和自身配置的信息相同,就代表 PXE 服务进行部署完毕。可以进行无人值守装机,以及大批量装机的目的。全程自动化完成。
创建一个虚拟机,不选择安装镜像,至少配置 2GB 内存,硬盘记得配置为 ks.cfg 文件中配置分区的总和大小以上,以上ks文件只需要200G(这里创建的硬盘是200G)。[ 所以硬盘空间大小需要特别的注意 ]
#开启相关服务并设置自动开启(可选择) #systemctl restart dhcpd && systemctl enable dhcpd && systemctl status dhcpd #systemctl restart tftp && systemctl enable tftp && systemctl status tftp #systemctl restart xinetd && systemctl enable xinetd && systemctl status xinetd #systemctl restart vsftpd && systemctl enable vsftpd && systemctl status vsftpd #systemctl start httpd && systemctl enable httpd && systemctl status httpd- 1
- 2
- 3
- 4
- 5
- 6
需要注意的是:如果在硬盘初始化分区的时候,出现一个提示框,告诉管理员说类似硬盘驱动跟底层的引导器不匹配,是否需要继续进行安装,Yes | No。出现该问题不代表 PXE 服务安装的是失败的,是因为在虚拟化环境中,硬盘的类型导致的。直接点 “Yes” 即可。在真正的生产环境中是不会有该问题的。
小总结:配置启动菜单,启动菜单分为典型启动菜单和无人值守启动菜单。
# 典型启动菜单,典型菜单在安装好dhcp后就可以安装系统了。 cat > /var/lib/tftpboot/centos7/pxelinux.cfg/default <<-'EOF' default auto prompt 0 label auto kernel vmlinuz append initrd=initrd.img method=http://10.10.10.11/centos7 EOF # 无人值守菜单 cat > /var/lib/tftpboot/centos7/pxelinux.cfg/default <<-'EOF' default auto prompt 0 label auto kernel vmlinuz append initrd=initrd.img method=http://10.10.10.11/centos7 ks=http://10.10.10.11/centos7/ks.cfg EOF- 1
- 2
- 3
- 4
- 5
- 6
- 7
- 8
- 9
- 10
- 11
- 12
- 13
- 14
- 15
- 16
- 17
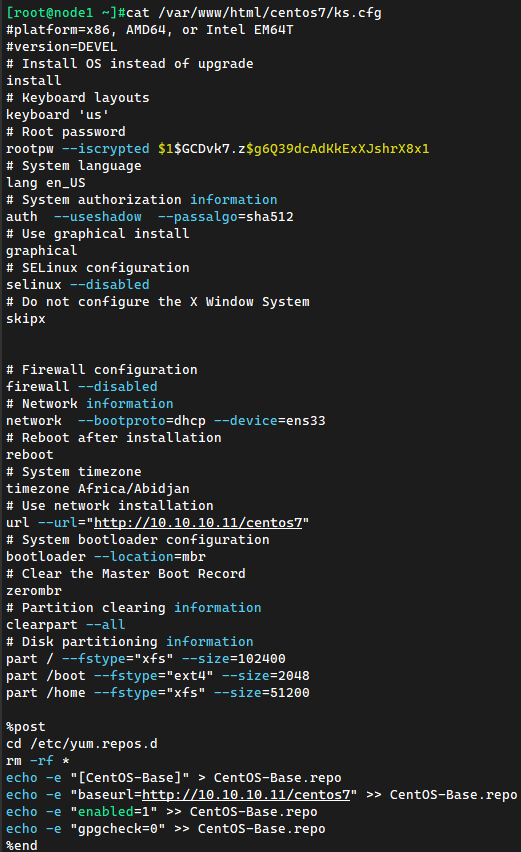
2.3 KS 文件模板展示
示例1:
#准备ks.cfg文件,注意文件存放位置。这个是为了在安装系统的时候,自动去做相应配置,不需要人工干预,典型启动就不需要这个文件。 #第一次 或者 有CP 此文件有问题的,建议通过图形界面,安装system-config-kickstart cat > /var/www/html/centos7/ks.cfg <<-'EOF' #platform=x86, AMD64, 或 Intel EM64T #version=DEVEL # Install OS instead of upgrade install # Keyboard layouts keyboard 'us' # Root password rootpw --iscrypted $1$Q/XYvFAh$qdLAUR8q7c3jjaGmefO5F/ # System language lang en_US # System authorization information auth --useshadow --passalgo=sha512 # Use graphical install graphical # SELinux configuration selinux --disabled # Do not configure the X Window System skipx # Firewall configuration firewall --disabled # Network information network --bootproto=dhcp --device=ens33 # Reboot after installation reboot # System timezone timezone Asia/Shanghai # Use network installation url --url="ftp://10.10.10.11/centos7" # System bootloader configuration bootloader --location=mbr # Partition clearing information clearpart --all # Disk partitioning information part /boot --fstype="xfs" --size=200 part / --fstype="xfs" --size=18980 %post --interpreter=/bin/bash cd /etc/yum.repos.d rm -rf * echo -e "[base]" > base.repo echo -e "baseurl=ftp://10.10.10.11/centos7" >> base.repo echo -e "enabled=1" >> base.repo echo -e "gpgcheck=0" >> base.repo %end #下面是手动添加的,保存出来的文件没有,意思就是最小化安装系统,如果需要安装其他包,可以写在%packages下面 #可以在 /root/anaconda-ks.cfg %packages @^minimal %end EOF #上面文件中root密码是1q2w3e4r- 1
- 2
- 3
- 4
- 5
- 6
- 7
- 8
- 9
- 10
- 11
- 12
- 13
- 14
- 15
- 16
- 17
- 18
- 19
- 20
- 21
- 22
- 23
- 24
- 25
- 26
- 27
- 28
- 29
- 30
- 31
- 32
- 33
- 34
- 35
- 36
- 37
- 38
- 39
- 40
- 41
- 42
- 43
- 44
- 45
- 46
- 47
- 48
- 49
- 50
- 51
- 52
- 53
- 54
- 55
示例2:
#platform=x86, AMD64, 或 Intel EM64T #version=DEVEL # Firewall configuration firewall --disabled # Install OS instead of upgrade install # Use network installation url --url="ftp://10.10.10.11/pub/dvd" # Root password rootpw --iscrypted $1$Avf.TcS5$qICcOlYLRtgGRo6z9f1am0 # System authorization information auth --useshadow --passalgo=sha512 # Use graphical install graphical firstboot --disable # System keyboard keyboard us # System language lang en_US # SELinux configuration selinux --disabled # Installation logging level logging --level=info # Reboot after installation reboot # System timezone timezone Africa/Abidjan # System bootloader configuration bootloader --location=mbr # Clear the Master Boot Record zerombr # Partition clearing information clearpart --all --initlabel # Disk partitioning information part /boot --fstype="ext4" --size=600 part swap --fstype="swap" --size=4000 part / --fstype="ext4" --grow --size=1 %post --interpreter=/bin/bash touch /root/1.txt echo "123" >> /root/1.txt echo "123" >> /root/1.txt %end %packages @base @chinese-support @core @debugging @basic-desktop @desktop-debugging @desktop-platform @directory-client @fonts @general-desktop @graphical-admin-tools @input-methods @internet-applications @internet-browser @java-platform @legacy-x @network-file-system-client @office-suite @print-client @remote-desktop-clients @server-platform @server-policy @workstation-policy @x11 mtools pax python-dmidecode oddjob wodim sgpio genisoimage device-mapper-persistent-data abrt-gui samba-winbind certmonger pam_krb5 krb5-workstation libXmu %end- 1
- 2
- 3
- 4
- 5
- 6
- 7
- 8
- 9
- 10
- 11
- 12
- 13
- 14
- 15
- 16
- 17
- 18
- 19
- 20
- 21
- 22
- 23
- 24
- 25
- 26
- 27
- 28
- 29
- 30
- 31
- 32
- 33
- 34
- 35
- 36
- 37
- 38
- 39
- 40
- 41
- 42
- 43
- 44
- 45
- 46
- 47
- 48
- 49
- 50
- 51
- 52
- 53
- 54
- 55
- 56
- 57
- 58
- 59
- 60
- 61
- 62
- 63
- 64
- 65
- 66
- 67
- 68
- 69
- 70
- 71
- 72
- 73
- 74
- 75
- 76
- 77
- 78
- 79
- 80
- 81
- 82
- 83
- 84
- 85
-
相关阅读:
一文详解快速排序详细到极致
【vue3源码】十二、认识虚拟DOM
Java雪花算法生成id
节假日物流业如何安排
浏览器原理 - 同源策略和跨域
github国内镜像,实测可以用,最后一个完美复刻
Vue 项目进行 SEO 优化
酶联试剂抗体抗原 ——博迈伦
无代码开发平台数据ID入门教程
[算法周训 1]二叉树与链表训练1
- 原文地址:https://blog.csdn.net/weixin_40274679/article/details/127450010
